Honda Fit (GE8) HomeLink and Ambient Light Retrofit Using an Acura TSX Overhead Console
Introduction
This guide covers retrofitting factory HomeLink, a door-triggered map light, and a color-matched ambient LED into a second-generation Honda Fit (GE8) while preserving the navigation system's voice-control microphone. The build replaces the Fit's plain overhead map-light housing with a HomeLink-equipped console pulled from a compatible Honda or Acura, using a 2004-2008 Acura TSX unit as the reference donor, so a cluster of loose garage-door remotes can be retired in favor of integrated buttons above the visors. It applies to USDM GE8 Fit Sport models with Navigation, which already carry the overhead map-light wiring; base cars are feasible too but need extra power taps because that wiring is absent. Plan to fabricate a small wiring harness, transfer connector pins, tap three vehicle circuits, and remove interior trim, so a soldering iron and basic automotive electrical skills are needed. Because donor consoles differ in color, mounting-hole spacing, and whether they carry the auto-off Door switch, selecting the correct unit matters as much as the wiring. Adapted from a community writeup by Zalthras on FitFreak (https://www.fitfreak.net/forums/2nd-generation-ge8-specific-fit-i-c-e-sub-forum/57699-diy-complete-tsx-homelink-install-ge8-sport-w-nav.html), including corrections from the follow-up discussion.
Reference
Tools Required
- Soldering gun, approximately 35W or higher
- Solder
- Wire stripper and cutter
- Scissors
- Heat gun or hair dryer for heatshrink
- Trim removal tools
- Ratchet with 8mm socket
- Rubber mallet
- Honda pin removal tool (04321-SM4-409)
Parts Required
-
HomeLink overhead console with connectors, e.g. 2004-2008 Acura TSX, in grey or clear-grey, with a Door/Off switch (buy used)
-
Honda A-pillar clip, 91561-TA0-A11
-
Wire: 70-inch pair for the ambient LED, 26-inch single for the door-switched ground tap, 5-inch length for the 12V map-light extension
-
Heatshrink tubing and electrical tape
-
30mm festoon LED bulb (optional, for matching the ambient light color)
Safety Warnings
- ⚠ The 12V map-light pin is permanently live; let it short and you can blow a fuse, so work carefully during the pin transfer.
- ⚠ The HomeLink module grounds through its mounting bolt, so only judge whether it works after the base is bolted to the roof.
- ⚠ Tap only one wire at the power-mirror switch for the ambient feed; extra taps here commonly stop the LED from lighting.
- ⚠ The ambient LED comes on only with the parking or headlights active, so switch those on before assuming a wiring fault.
- ⚠ When working up against the roof, avoid pushing on the panel hard enough to leave dents from inside.
Step-by-Step Instructions
1 Choose a compatible donor console
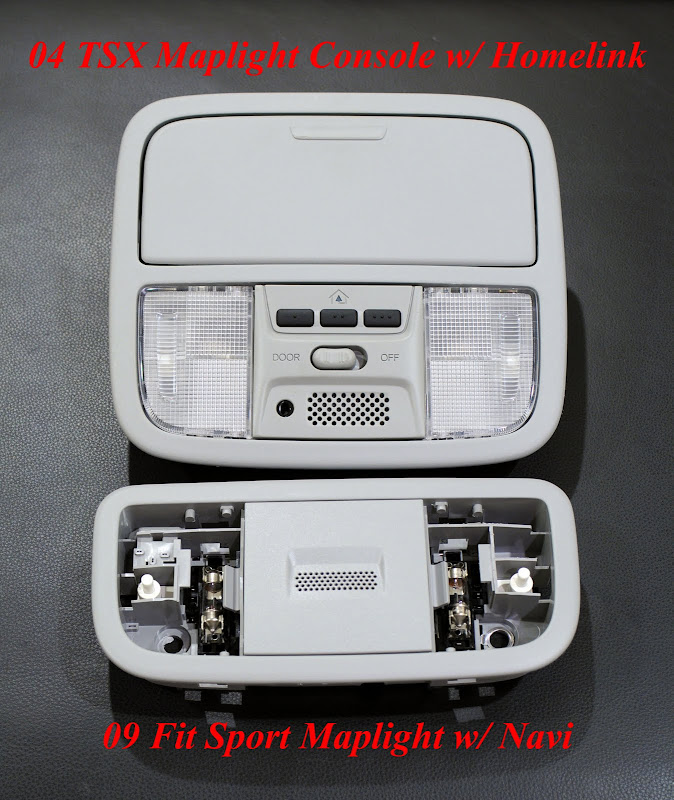
The retrofit is built around an overhead HomeLink console sourced from a Honda or Acura. A 2004-2008 Acura TSX unit is the reference part; equivalent consoles come from the 2005-2008 Odyssey EX(L), the 2003-2007 Accord EX with factory Navigation and HomeLink, the 2006-2008 Pilot EXL, and the 2006-2008 Ridgeline RTL. Pick a grey or clear-grey piece so it blends with the GE8 cabin. Confirm the module carries a Door/Off switch, because a unit without one (for example a 2006 Odyssey module) will run the map and dome lights but cannot shut them off automatically after the door closes. Favor a roughly 2006-or-newer console, since the two forward mounting holes on those align with the Fit's base; pre-2004 units from the 1999-2003 TL, 1998-2002 Accord, and 1999-2004 Odyssey sit about an inch wider and will not bolt up without drilling. Remove and set aside the sunglass holder unless you intend the extra headliner work.
2 Prepare the wire lengths and A-pillar clip
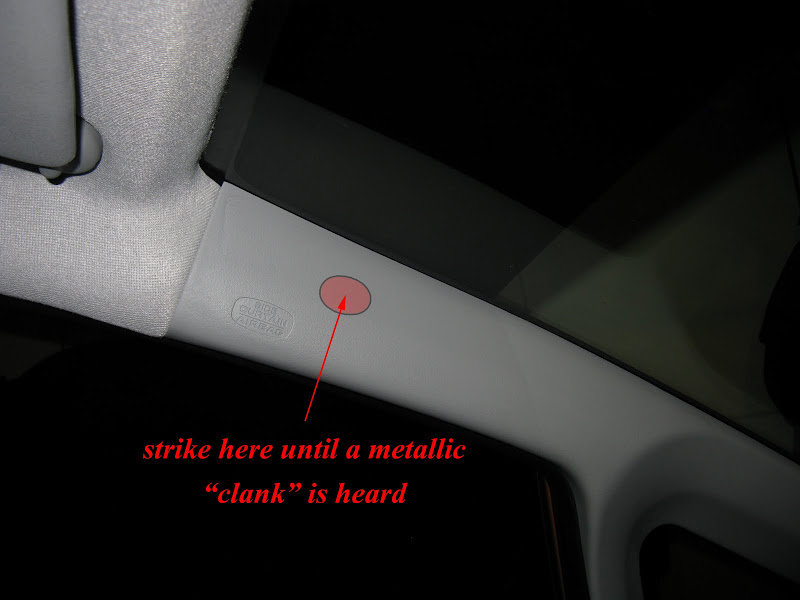
Cut and label the harness wire before touching the car: a 70-inch pair for the ambient LED, a 26-inch single conductor for the door-switched ground, and a 5-inch length to extend the 12V map-light feed. Have heatshrink and electrical tape on hand, plus solder for the joints. Order a fresh Honda A-pillar clip (part 91561-TA0-A11), since the original is destroyed on removal and resetting it is more trouble than the small cost of a replacement. If you want to change the ambient color, a 30mm festoon LED bulb drops into the housing.
3 Remove the factory map-light and microphone assembly
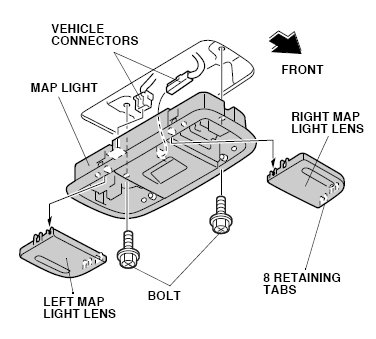
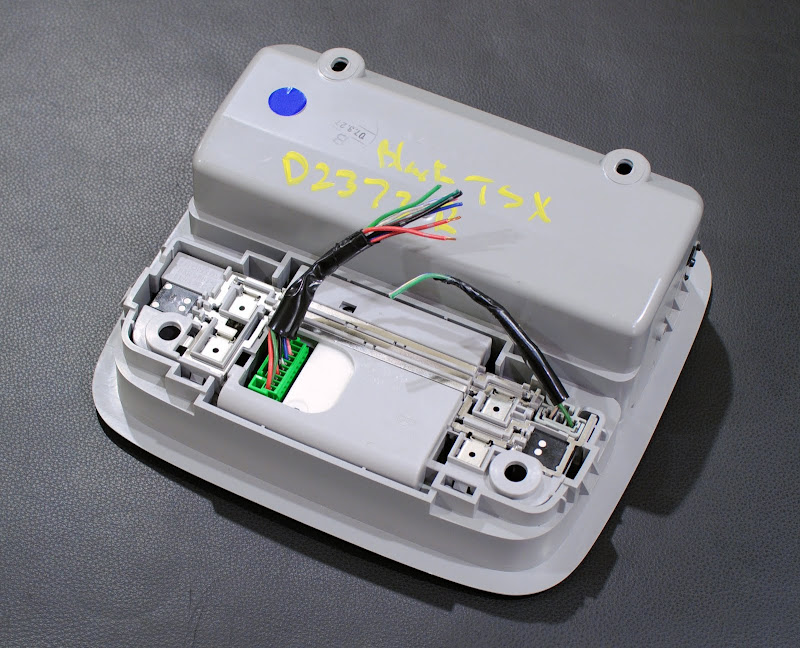
Pry the lens covers off the Fit's map light, then remove the two 8mm bolts holding the housing to the roof. Unplug the two harness connectors and take the assembly down. Keep this connector shell nearby, since it receives transferred pins later. Flip the removed housing over to reference its pin layout while you build the harness.
4 Move the navigation microphone into the donor console
To keep voice control working, transfer the Fit's navigation microphone unit into the TSX console in place of the console's own mic block. Remove the mic from the Fit assembly and seat the donor console's HomeLink block in its place, so the finished unit combines the Fit's nav mic with the TSX HomeLink hardware. This step mirrors the standard Fit mic-replacement procedure, so consult a dedicated mic-swap writeup if the block is stubborn.
5 Fabricate the wiring harness and transfer pins

Two of the HomeLink connections reuse pins pulled from the TSX map-light connector, which handle chassis ground and an intermediate ground. Extract those two pins with a Honda pin removal tool (04321-SM4-409), then temporarily seat them on the map-light housing to measure the exact wire length needed to reach pins 2 and 6 on the HomeLink connector, and solder them in. With those grounds set, solder on the three feed wires: the 70-inch ambient LED pair, the 26-inch door-switched ground, and the 5-inch 12V lead. Sleeve every joint in heatshrink so nothing shorts against the roof structure.
6 Splice the microphone leads
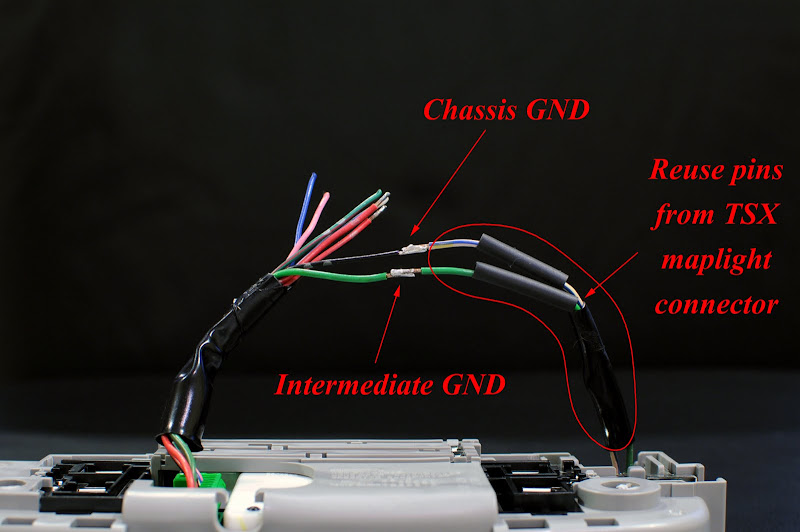
Cut the three-pin microphone connector off the donor harness. Join the Fit's purple and green leads to the TSX's pink and blue microphone wires, and leave the Fit's red lead (labeled SW/MIC ADPT) unconnected. If you run an aftermarket head unit rather than factory Navigation, this splice may not carry the signal cleanly and the mic can be relocated instead.
7 Route the ambient LED feed to the mirror switch

Take out the driver's sun visor and its clip, then release the A-pillar trim (its retaining clip breaks, which is why you staged the 91561-TA0-A11 replacement). Feed the 70-inch ambient pair up behind the headliner, then guide it down inside the A-pillar to reach the power-mirror switch, and tap into it there. Tap only a single wire at the mirror switch; adding a second tap here is a common reason the ambient LED never lights. This circuit is switched by the parking lights, so the ambient glow appears only when the exterior lights are on.
8 Tap the door-switched ground at the dome light
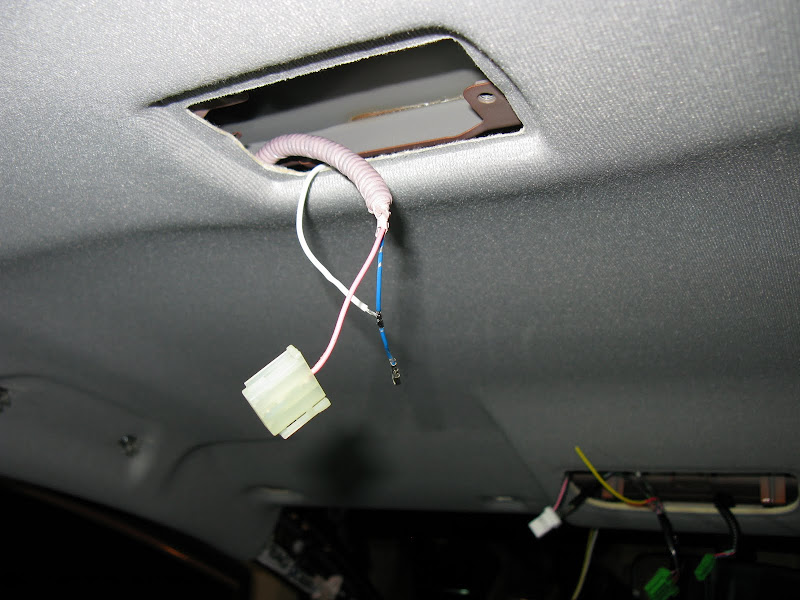
Run the 26-inch wire through the headliner to the dome-light connector, which sits near the rear-view mirror area, and tap the dome harness blue wire to obtain a door-open controlled ground. In wiring terms, the TSX green-with-red-stripe lead lands on the Fit's dome blue. On a base or non-Sport GE8 that lacks the factory map-light supply, also tap the dome pink wire to pick up 12V.
9 Complete the map-light connector pins and 12V tap
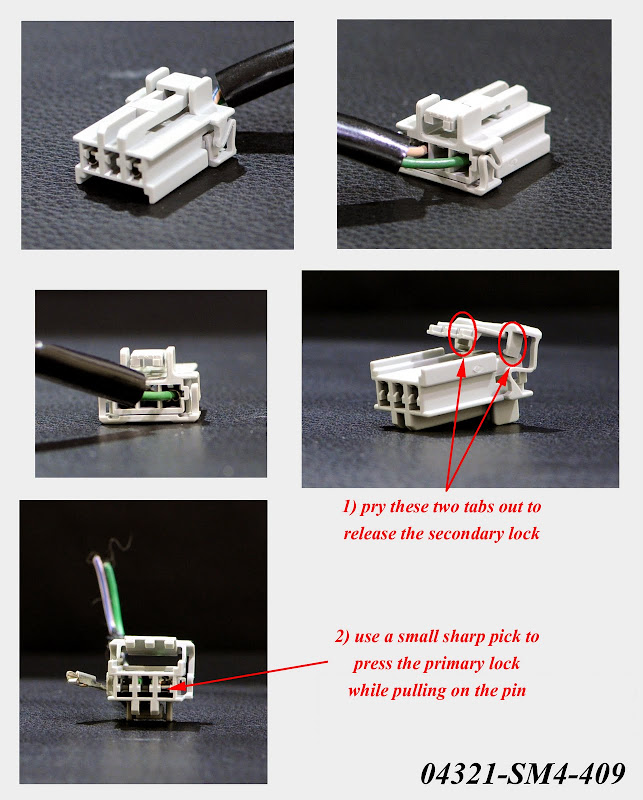
Open the pin retainer on the Fit's map-light connector to insert the transferred TSX pins. Note that although the tab widths match, the TSX 12V pin is about 4mm longer and its housing differs, so seat the TSX pins fully toward the front face of the connector for a reliable transfer. On this connector the pink wire occupies pin 1 (12V from the dome), and the TSX solid-green transferred pin goes to pin 3; do not land the dome blue wire on pin 3. Finally tap the Fit's 12V map-light wire to power the HomeLink unit. This pin is permanently live, so keep it from shorting or you can blow a fuse.
10 Mount the console and reassemble the trim

Bolt the console base back into the roof. The HomeLink module grounds through its mounting bolt, so the ground path is only complete once the base is fastened. Reinstall the A-pillar trim with the new clip, refit the sun visor and clip, and press the lens covers back on. Aim the ambient LED as you close things up; in the Fit it tends to point too far rearward, so the housing usually needs slight modification to direct the light correctly.
11 Test and program the system
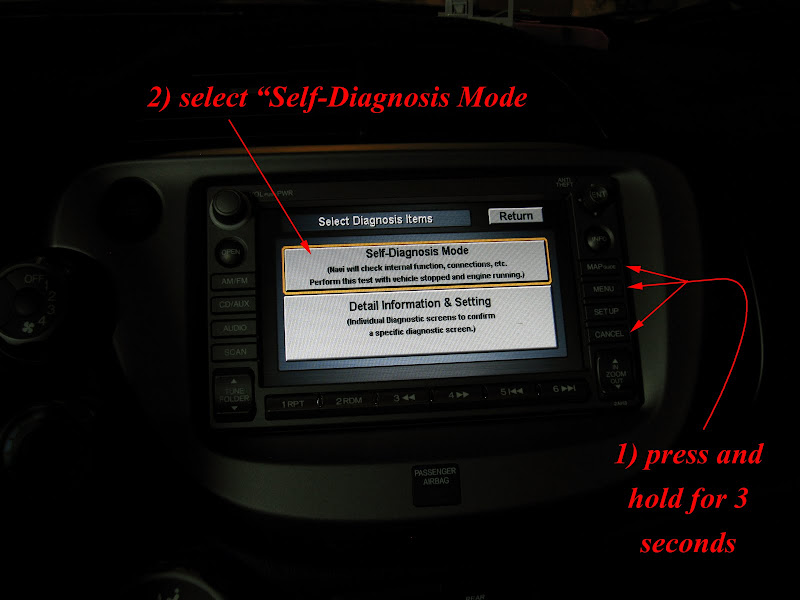
Verify the map lights by pressing the lens covers manually, then set the toggle to Door and open a door to confirm they illuminate. Turn on the parking lights to check the ambient LED. Press any HomeLink button and confirm its red indicator lights, then program the buttons to your remotes. To check the navigation mic, switch the ignition on without starting, press and hold the three HomeLink buttons for about three seconds until the diagnostic menu appears, choose Self-Diagnosis Mode, then Mic. Press Talk on the steering wheel and speak while watching the mic level meter respond, then back out. If the mic was disconnected when you entered the test, clear the logged fault under Error History.
Pro Tips
- 💡 If you run an aftermarket head unit with voice control, splicing into the factory mic cable may not work; relocating the aftermarket mic just behind the console grille is a reliable fallback.
- 💡 A base (non-Nav) car can still gain HomeLink by installing the whole console and simply leaving the microphone unconnected.
- 💡 A 30mm festoon LED bulb from a bright-LED supplier lets you change the ambient color to match the rest of the interior lighting.
- 💡 If you also want the sunglass holder to sit flush, plan to cut the headliner, add roughly 1.75-inch tapered wood spacers between headliner and roof, and fit bolts about half an inch longer; a straight HomeLink-only swap needs none of this.
Was this guide helpful?
