Honda Prelude JDM Digital Climate Control (DCC) Conversion
Introduction
This guide covers retrofitting the Japanese-market digital climate control (DCC) system into a Honda Prelude originally fitted with the manual push-button and slider climate controls. The DCC replaces that manual head with a slim smoked-glass panel of soft-touch buttons and a single physical switch for the rear demister, and it automates the cabin climate using six inputs: cabin temperature, heater-core temperature, evaporator air temperature, outside temperature, vehicle speed and direct sunlight. From these it manages the air conditioning, the heater water valve, the air blend, the fan speed and the vent modes. Because the DCC controller cannot run on its own, you must gather the full parts set (all sensors, the air-mix motor, power transistor and blower high relay) before starting; expect to pay roughly $150-$450 for a complete set. This is a major job that involves recovering the A/C refrigerant, draining the coolant, re-soldering the wiring harness, and removing the dash, evaporator and heater unit, so the car will be off the road for several days. Right-hand-drive installations need extra fabrication because the air-mix motor has no factory mounting point and drives the blend door in the wrong direction if fitted in the original spot. Adapted from a community writeup by Street_Lude on PreludePower (https://www.preludepower.com/threads/jdm-digital-climate-control-write-up.409497/), including corrections from the follow-up discussion.
Reference
Tools Required
- Flat-blade and Phillips screwdrivers, including a short/stubby Phillips
- Metric socket set (10, 12 and 14 mm) with an extension and a 12 mm deep socket
- Multigrip and long-nose pliers plus an adjustable spanner
- Wire cutters/strippers and a utility (Stanley) knife
- Soldering iron (ideally temperature-controlled) and solder
- Car ramps or stands and a jack, plus a coolant/oil drain tray
- Working light, rags, and a scrubbing brush
Parts Required
-
JDM DCC main control unit with its harness connectors
-
The five DCC sensors: sunlight, in-cabin air temperature, heater-core temperature, evaporator temperature, and outside-air temperature
-
Air-mix (blend-door) motor
-
Power transistor
-
Blower motor high-speed relay
-
Optional: JDM electric water valve and solenoid
-
Heater hoses: Honda 79721550000 (short, to valve) and 79725550010 (long, to head); optional third hose near the distributor
-
Hook-up wire in two gauges, heat-shrink tubing, electrical tape, cable ties, plastic gear grease
-
R134a refrigerant recharge (plus R12-to-R134a conversion on 1992-1993 cars) and fresh coolant
Safety Warnings
- ⚠ Never vent refrigerant to the atmosphere. R12 and R134a must be recovered by a qualified technician; releasing them is illegal.
- ⚠ The car becomes immobile once the heater hoses and evaporator are removed. Do not start without alternative transport for several days.
- ⚠ Support the car on proper ramps or stands before working underneath it.
Step-by-Step Instructions
1 Evacuate the A/C system and set up the car
Have a qualified air-conditioning technician recover the refrigerant; venting it yourself is both illegal and environmentally damaging. Cars from 1992-1993 typically use R12, which usually must be converted to R134a before the system can be recharged, so budget around $300 for that conversion versus about $100 for a standard R134a recharge. Park on firm, level ground with room to work for a week or more, and drive the car onto ramps now: one heater hose has to be reached from underneath, and the car will not be drivable once the teardown begins.
2 Remove the centre console and shifter boot

Take out the two fasteners above the stereo and the screws down each side of the console (about six). Lift the console up and rearward, letting its top edge clear the stereo before drawing it back. Underneath, two screws hold the gear-shift boot; remove them, unclip the boot once you have clearance, then lift the console out of the car.
3 Remove and disconnect the stereo assembly

Four screws hold the stereo cage to the frame; support its weight as you free the final one. Shift into reverse or fourth so the gear lever clears the opening, then draw the assembly toward you. Reach behind it and unplug the head-unit loom, the antenna coax, and the light-grey cigarette-lighter connector (roughly four wires) before lifting the assembly out of the car.
4 Remove the factory manual climate control unit

Reach beneath the old control head and find two connectors on the right-hand side: a light-grey plug that feeds the vent, recirculation, demister, air-conditioning and panel-lighting circuits, and a brown plug with heavier wires running to the blower motor and its resistor block for fan speed. Unplug both. Remove the two screws at the lower front corners and the single screw at the rear underside (a stubby Phillips helps here), then ease the unit forward until its clips let go. On the left side, detach the air-mix control cable that links to the heater unit.
5 Drain the coolant and remove the heater and evaporator units

With the refrigerant already recovered, disconnect the A/C lines and withdraw the evaporator unit. Drain the cooling system, then free the two heater hoses where they meet the copper pipes at the firewall; the lower one is reached from under the car. These hoses seize onto their fittings over the years and often have to be sliced off with a utility knife, so plan on replacing them. Pull the dash as needed and extract the heater unit so the blower, evaporator and heater box are all accessible on the bench.
6 Splice the DCC harness into the car's wiring
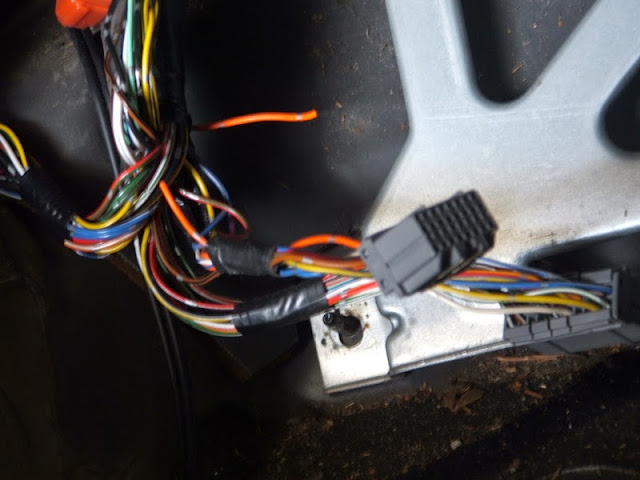
Work one lead at a time so you never lose track of a circuit. Clip a single wire from the old connector, strip 5-7 mm of insulation from both it and the matching tail on the JDM connector, twist and tin each end, then solder and seal the joint with heat-shrink. A temperature-controlled iron set between 180 and 300 degrees suits most solder; wipe the tip on a damp sponge before every joint. Where a new signal is needed, such as the vehicle-speed signal picked up near the ECU, run fresh hook-up wire of matching gauge and use distinct colours to avoid confusion.
7 Wire the power transistor and blower high relay

The digital system meters fan speed through a power transistor rather than the manual resistor block, and it adds a dedicated 'high' relay for the blower's top setting. Fit the transistor at the resistor-box location and wire the transistor and relay to the DCC diagram, using the heavier-gauge wire for the high-current blower feeds and the lighter gauge for signal lines.
8 Clean the evaporator and fit the DCC evaporator sensor

Split the evaporator housing; a few screws, several U-clips and foam sealing strips hold the two halves together, so remove the foam carefully to reuse it. Vacuum debris from the core's blower side with a soft brush, being careful not to crush the cooling fins (they carry no refrigerant and only add surface area, so minor damage is not critical). While the case is open, replace the original thermostat with the DCC evaporator temperature sensor, and leave the clips and screws off until that swap is confirmed.
9 Service the blower motor and heater box

Inspect the blower motor. If it has grown noisy or weak, have an auto electrician check the windings, lubricate the spindle and, if needed, fit new brushes. Clean the graphite dust and grime from its housing. Open the heater box and clean it out, but be gentle with the aged foam flap seals inside, which crumble easily; replace any that have perished.
10 Install and clock the air-mix (mode) motor

On right-hand-drive cars the air-mix motor cannot bolt into the factory position: the mounting holes are absent and, fitted there, the motor would drive the blend door the wrong way. The original author flipped and custom-mounted the motor; a later builder found the output arm sat a full 180 degrees off and, on the author's advice, simply removed the retaining nut and repositioned the arm. Establish the full-hot end of travel by powering the motor from a 12-volt source and letting it run until it stops with the arm driven away from the heater box, then fabricate a bracket to hold it in that orientation.
11 Mount the temperature and sunlight sensors

Fit the cabin sensor, sunlight sensor, outside-air sensor and heater-core sensor in their respective locations. The sunlight sensor sits in the top of the dash; trim its opening so it seats flush without dropping through. For the heater-core sensor, mark and cut a pass-through in the heater unit, aiming to land the probe cleanly between the foam pads on the core, and secure the sensor wiring so it cannot hang loose.
12 Fit the JDM water valve/solenoid and renew the heater hoses

Optionally install the JDM water valve and solenoid, which lets the control unit open and close coolant flow electrically instead of through the temperature-slider cable at the firewall; the original cable-operated valve also works if you prefer to keep it. Fit new heater hoses while access is easy. The short hose to the valve is Honda part 79721550000 (about $17.75) and the longer hose to the cylinder head is 79725550010 (about $45.97). A third hose near the distributor (part number not listed, roughly $50) is worth renewing at the same time.
13 Reassemble, recharge and test
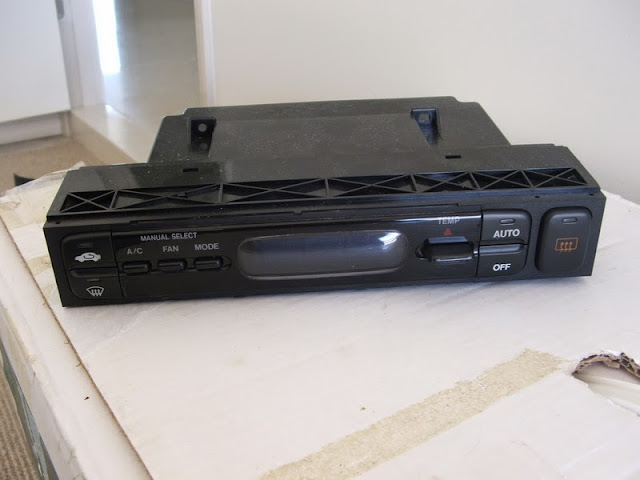
Reconnect every harness plug, then refit the heater unit, evaporator, dash, stereo and console in reverse order and top up the coolant. Have the A/C system evacuated and recharged. Power up the digital control unit and verify both auto and manual modes: temperature setpoint, fan speed, vent selection, recirculation, defrost and the rear demister, confirming the blend door reaches both full-hot and full-cold.
Pro Tips
- 💡 Tackle the conversion in stages: fitting the control head and manual fan/vent wiring can be done over a weekend, leaving the A/C, coolant and heater-box work for a later block of at least four days.
- 💡 The bare DCC control head will not function alone; source the full sensor set, air-mix motor, power transistor and blower relay together.
- 💡 A JDM front cut supplies every part you need plus a working reference for how the system is assembled before you pull it out.
- 💡 Bench-test the air-mix motor direction before final mounting so you know which way is full hot.
- 💡 Buy the two firewall heater hoses new from a Honda parts counter for a guaranteed fit; expect around $64 for the pair.
Was this guide helpful?
