Honda Civic CRX Rear Drum-to-Disc Brake Conversion (Scarebird Adapter Kit)
Introduction
This guide covers converting the rear drum brakes on a first-generation Honda Civic CRX to disc brakes using a Scarebird adapter bracket kit together with rear disc calipers and rotors sourced from later Honda models such as the Integra. Many economy Hondas of this era left the factory with rear drums that are adequate for the street but limit performance and heat capacity on track. The adapter mounts to the original backing-plate surface and repositions late-model rear disc hardware onto the CRX spindle so the components line up correctly. The result is an inexpensive, reliable upgrade -- one build was completed for under $500 including stainless lines -- that has proven durable under repeated hard track use, including sustained stops from well over 100 mph. Because the kit ships without instructions and depends on mixing parts from several models, the trickiest part is identifying which parking brake cables, lines, and small hardware actually fit; this guide consolidates the part choices that worked so you can skip much of the trial and error. Adapted from a community writeup by rallyrcr on Honda-Tech (https://honda-tech.com/forums/suspension-brakes-54/civic-crx-scarebird-rear-brake-disk-conversion-review-instructions-3252027/), including corrections from the follow-up discussion.
Reference
Tools Required
- Floor jack and jack stands
- Lug wrench and socket set
- Torque wrench (capable of 140 LB-FT)
- Line/flare wrenches for brake fittings
- High-temperature thread locker
- Brake bleeding kit
- File or cutoff tool for trimming a parking brake cable end
- Angle grinder or cutting tool (only for larger-diameter caliper/rotor combinations that require notching)
Parts Required
-
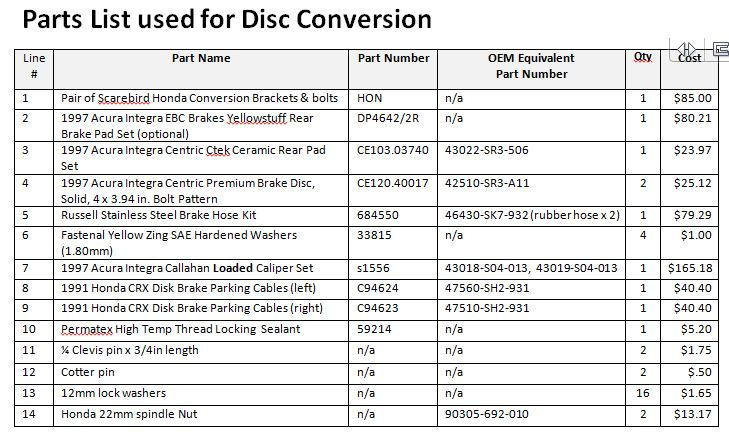
Scarebird rear disc conversion adapter bracket kit (ships with 12x1.25 mm x 20mm and 12x1.25 mm x 25mm bolts)
-
Rear disc calipers, loaded (e.g. refurbished Callahan Integra-style calipers with bleeder, banjo fitting, and parking-brake bracket installed)
-
Rear brake rotors sized to the chosen caliper
-
Rear brake pads (e.g. EBC Yellow Stuff)
-
Parking brake cables off a 1990-91 Honda CRX Si
-
Rear brake lines (stainless steel recommended) and banjo bolts
-
Hardened washers for caliper-centering shims
-
High-temperature thread locker
Safety Warnings
- ⚠ Support the vehicle on jack stands before working underneath; never rely on a jack alone.
- ⚠ Brake fluid is corrosive and strips paint -- keep it off bodywork and flush any spills immediately.
- ⚠ This is a non-OEM, safety-critical modification. Confirm the setup meets your local vehicle compliance and engineering requirements, and re-check line routing and torque values before driving at speed.
- ⚠ Route brake lines with full chassis clearance; a line that contacts a frame rail can wear through and fail under hard braking.
Step-by-Step Instructions
1 Strip the rear drum brake assembly
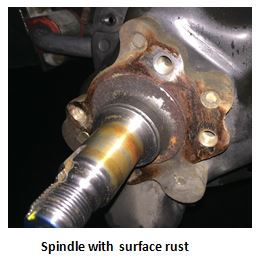
Raise and support the rear of the car on jack stands and remove the wheel. Dismantle the entire drum setup: pull the drum, the shoes and internal drum hardware, and the backing plate, then disconnect the drum-specific parking brake cable and rubber brake hose. Every one of those parts is discarded -- only the hub and its staked spindle nut are kept for reuse. Scrape the exposed mounting face clean of all rust and grime so the new adapter can seat flat against it.
2 Bolt on the Scarebird adapter bracket
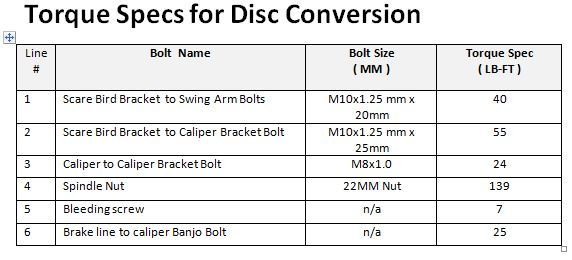
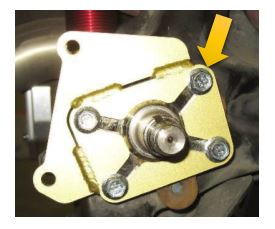
Fit the Scarebird adapter to the machined face where the drum backing plate previously sat. Secure it with the supplied 12x1.25 mm x 20mm bolts torqued to 40 LB-FT, coating the threads with high-temperature thread locker first. Bracket geometry varies between chassis and caliper combinations, so the piece in hand may not match a reference photo exactly.
3 Reinstall the hub
Mount the original hub back onto the spindle using the factory bolts you set aside during teardown, and torque them to 139 LB-FT. No thread locker is needed on the spindle nut because it is held by staking the collar into the spindle groove rather than by friction.
4 Dry-fit and center the rotor within the caliper
Slide a rotor onto the spindle and snug it flat with a few lug nuts. Loosely attach the caliper mounting bracket to the adapter -- firm enough to hold position but not fully torqued. Sight the rotor inside the caliper opening: it should sit centered, with no more than 1mm of side-to-side offset. Because replacement calipers differ in bracket spacing, insert hardened washers as shims between the adapter and the caliper bracket until the rotor is centered. Record how many washers each side needs, then back everything off and remove the rotor and the caliper bracket.
5 Final-torque the rotor and caliper bracket
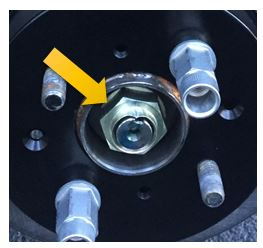
Reinstall the rotor and seat it flat with the lug nuts, then bolt the caliper mounting bracket to the Scarebird adapter for good. Use the 12x1.25 mm x 25mm bolts torqued to 55 LB-FT with high-temperature thread locker, and refit exactly the shim washers you determined during centering so the alignment is preserved.
6 Install the pads and caliper
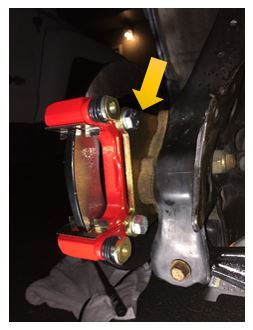
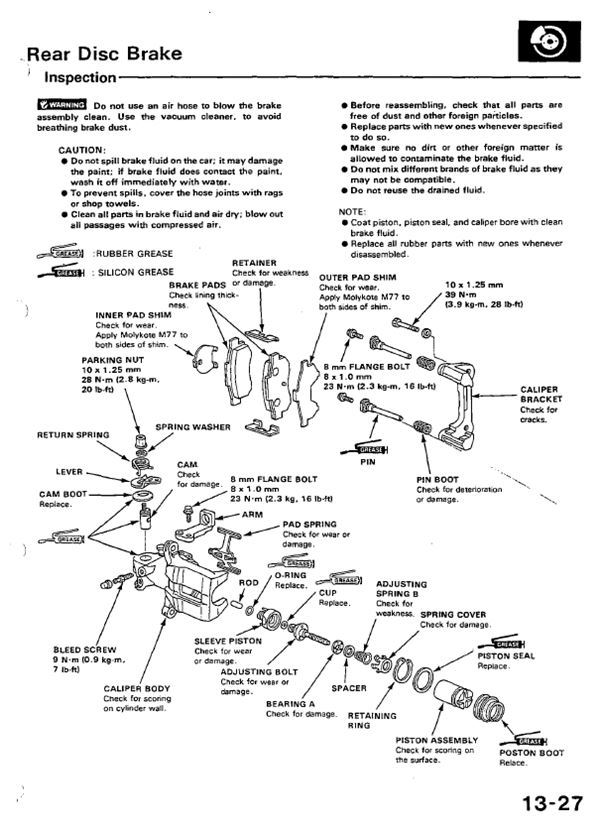
Seat the brake pads into the caliper per the caliper manufacturer's diagram, then hang the caliper over the rotor and onto its bracket, confirming the pad retaining spring is properly captured and the caliper slides freely. Buying loaded refurbished calipers -- such as the Callahan sets that arrive with the bleeder, banjo fitting, and parking-brake bracket already fitted -- avoids sourcing that hardware piecemeal; banjo bolts run about $12 and cable brackets about $15 each.
7 Connect the parking brake cables
The drum-era cables will not carry over. Source the parking brake cables off a 1990-91 Honda CRX Si; the Integra and Civic cables proved too long for the CRX. The CRX Si ends mate to the Integra-style calipers, though the cable tip may need a light trim to pass through the eyelet of the cable retainer.
8 Plumb and bleed the brake lines
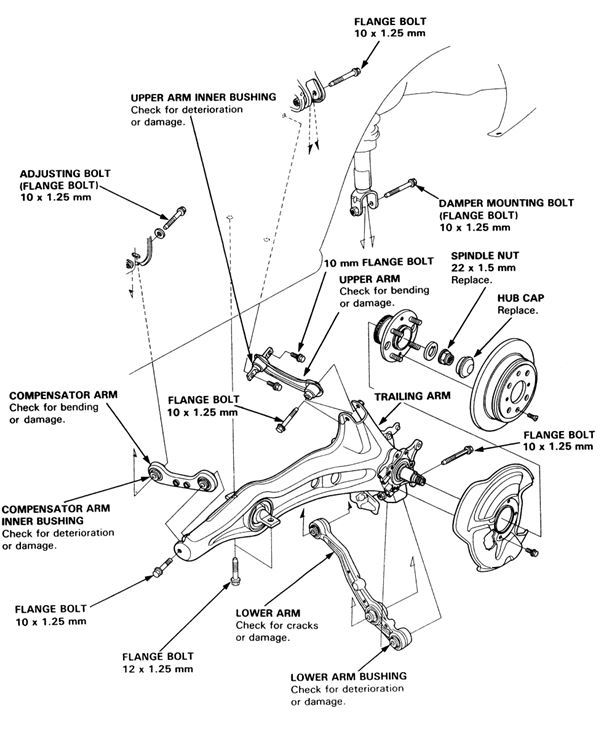
Connect the rear brake hoses, with stainless steel lines a worthwhile upgrade here. Route each line with deliberate attention to chassis clearance: one side has limited room, and a poorly routed line can chafe against a frame rail, so confirm the hose stays clear through full suspension travel. Bleed the system thoroughly to purge all air, starting at the caliper furthest from the master cylinder.
9 Verify brake balance with the factory hydraulics
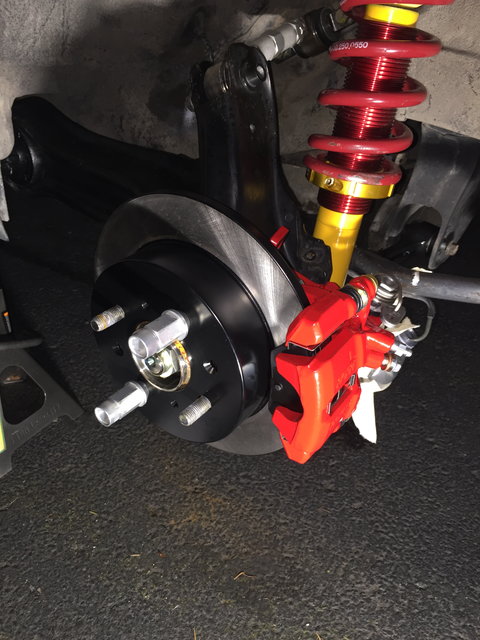
This conversion works with the CRX's stock hydraulics -- the OEM 1725 CRX proportioning valve and the 13/16 master cylinder -- with no changes required. Bed the pads in, then test brake balance. Paired with a matched front upgrade, the rear should contribute braking without locking ahead of the front axle; taking tire temperatures front-to-rear is a reliable way to confirm the bias is sane before hard driving.
Pro Tips
- 💡 Order parking brake cables, lines, and small hardware from vendors with generous return policies; matching non-OEM parts to this swap involves trial and error, and finding the correct parking brake cable took several attempts.
- 💡 The 9.5-inch conversion clears the trailing arms without modification; larger caliper and rotor combinations may not.
- 💡 Powder-coated or otherwise finished calipers resist the surface rust that bare refurbished units can develop within a day of wet weather.
- 💡 EBC Yellow Stuff pads suit combined street-and-track use and resisted fade, though a more aggressive compound gives stronger initial bite for dedicated track work.
Was this guide helpful?