
Civic Type R 5-Lug Brake and Suspension Conversion for the 1996-2000 Civic (EK)
- Do not clamp flexible brake hoses with Vise-Grips or sharp-jawed clamps. Multiple experienced members note the hose's inner liner can be crushed or torn, causing a permanent restriction or internal leak that is invisible from outside. Let the fluid drain instead, or use a smooth round-jawed hose clamp very gently.
- This is a brake system modification. Bleed thoroughly, check every fitting for leaks, and verify braking at low speed before normal driving.
- Running rear discs with the stock DX 3030 proportioning valve leaves the system front-biased; upgrade the proportioning valve (Si 4040) and master cylinder for safe, balanced braking.
Introduction
This conversion fits the complete Civic Type R (EK9) 5-lug hub, brake, and suspension package to a USDM 1996-2000 Civic (EK), converting a drum-braked 4-lug car to 5-lug hubs with four-wheel disc brakes and, optionally, CTR springs, dampers, and front sway bar. The parts are a near-direct fit: the CTR e-brake cables hook up without modification, the stock front brake lines work when rerouted, and the stock rear lower control arms can be reused. Expect the full package (with wheels, tires, and lug nuts) to cost on the order of $2,100 in used parts, so treat it as a braking and track-day upgrade rather than a cosmetic one. This is not an exhaustive teardown manual; it assumes you can handle basic hub and suspension disassembly and focuses on the conversion-specific details and part interchange. Adapted from a community writeup by Aquafina on Honda-Tech (https://honda-tech.com/forums/suspension-brakes-54/diy-%5Bhow-%5D-civic-type-r-brakes-suspension-onto-96-00-civic-ctr-5-lug-1112213/), including corrections from the follow-up discussion.
Procedure
9 steps-
Step 1: Gather and verify the conversion parts
Source a CTR 5-lug conversion (the original set came from H Motors Online with the optional front sway bar). Kits often include only the front knuckle/hub/brake assemblies, so confirm you also have the rear disc trailing arms. Buy the shocks and springs as a complete matched set rather than mixing unknown-mileage fronts and rears. If you intend to run the front sway bar, you must also have CTR or Si front lower control arms; the follow-up discussion confirmed EX arms do NOT work because their sway bar mounting point differs. Pick up Integra rear flexible brake lines and CTR e-brake cables. Your existing 96-00 Civic axles are retained regardless of whether the car runs a D-series or a swapped B-series engine, though fitting new axles while everything is apart is cheap insurance.
-
Step 2: Remove the stock front brakes, hubs, and knuckles
Work one end of the car at a time so it is never stranded mid-job. Disconnect the front flexible brake lines and let the fluid drain into a catch container rather than clamping the hoses shut (see warnings). Break the 32 mm axle nuts loose with a breaker bar, then remove the stock 4-lug front brake, hub, and knuckle assemblies. Leave the upper A-arms in place; the conversion does not require removing them.
-
Step 3: Install the CTR front knuckles and brakes, and reconnect the lines
Fit the CTR front knuckle/hub/brake assemblies over the original axles. The stock Civic front brake lines work with the CTR calipers; the only change is rerouting each line around the caliper-area bolt so it sits clear. Torque the brake line fittings correctly; an improperly seated fitting will not pass fluid to the caliper. The original installation survived hard repeated braking with the stock lines routed this way.
-
Step 4: Fit the CTR shocks, springs, forks, and front sway bar
Install the CTR springs and dampers. If you are installing the CTR/Si front sway bar, fit the CTR or Si lower control arms with it; the CTR damper fork is visibly wider at the bottom than the USDM fork, providing the extra clearance for the sway bar. If you are NOT running the sway bar, transfer your USDM damper forks onto the JDM CTR shocks. For reference, count the coils: 11 on the stock DX springs versus 10 on the CTR springs; the CTR setup rides noticeably firmer than stock.
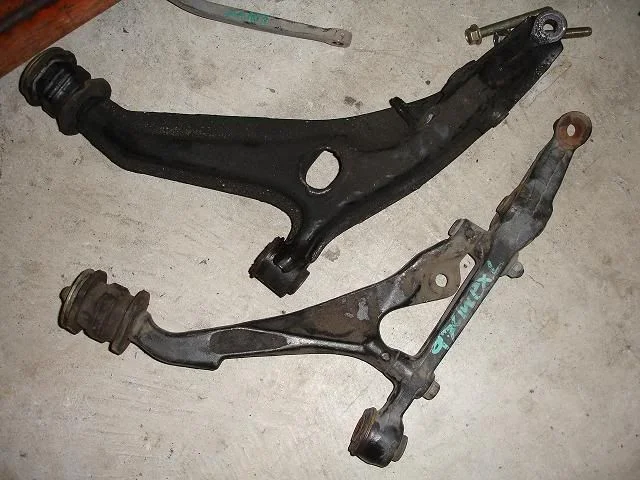
FIG. 2.4 -
Step 5: Remove the rear drums and drum hardware
Let the fluid drain from the rear brake lines before starting. At each rear flexible line, unscrew the soft line from the hard line BEFORE removing the retaining clip, then pop the clip off by working a flat-head screwdriver behind its lip and levering it free.
-
Step 6: Swap the e-brake cables
Remove the two clips holding each side of the e-brake cables, release the e-brake, and unbolt the two cable bolts, then rotate the cables and pull them out to the side. Install the CTR e-brake cables in reverse order; they hook right up with no modification. When fitting them, seat the cable gasket into the body using a flat-head screwdriver.
-
Step 7: Install the CTR rear disc trailing arms and Integra brake lines
Fit the CTR rear disc trailing arm assemblies. Reuse the stock rear lower control arms; aftermarket rear arms only add unsprung weight for no benefit here. Connect the Integra rear flexible brake lines between the hard lines and the calipers. While the hubs are accessible, clean up the wheel stud threads with a thread-cleaning tool and replace or restore any damaged studs.
-
Step 8: Bleed the brakes and road test
Bleed all four corners exactly as you would on a stock car; the CTR calipers bleed the same as USDM Integra Type R units and need no special procedure. Torque the 32 mm axle nuts, fit the 5-lug wheels, and verify pedal height and e-brake operation before careful low-speed test stops.
-
Step 9: Upgrade the proportioning valve and master cylinder (strongly recommended)
The stock DX proportioning valve is a 3030 unit, biased toward the front because factory rear drums generate little braking force. With rear discs fitted, the follow-up discussion reports a night-and-day improvement from fitting the Civic Si 4040 proportioning valve, and ideally the Integra Type R 1-inch master cylinder and booster (a 15/16 master cylinder also works, but the 1-inch CTR/ITR unit is better). Without this, braking remains front-biased and the pedal feels long.
- Budget reference from the original build: about $2,100 all-in, including roughly $1,200 for the 5-lug kit with rear sway bar, $200 for the CTR shock/spring set, plus wheels, tires, and lug nuts.
- Cheap 5-lug daily-driver wheels: CR-V steel wheels bolt straight on and can be found used for around $120.
- If your conversion did not include e-brake cables, cables from a 99-00 USDM Civic Si (Canadian SiR) are reported to work.
- Engine choice does not change axle selection: whether D-series or B-series swapped, use the axles that fit a 96-00 Civic.
- Do the job indoors or on a lift where possible, in case a snag leaves the car apart for a day or two.
Related procedures
All guides →
Tap right for next · left for back · Keys: ← → step · Space / PgUp / PgDn scroll · Esc exit