Honda Civic Front Fog Light Kit Installation (8th Generation, 2006 onward)
Introduction
Adding factory-style front fog lamps to an eighth-generation Honda Civic (2006 onward) that left the showroom with blanking plates is a satisfying weekend project that restores a genuine OEM look and avoids the substantial labour charge a dealer asks for the same work. This guide covers the complete Honda fog light kit, which comprises the two lamp units, the wiring loom, the relay and its bracket, the replacement indicator and lighting stalk, and the fuse. The job strings together several sub-tasks: taking off the front bumper, drilling the marked apertures, seating the lamps from behind, routing the loom through the wheel arch into the cabin, mounting the relay, tapping into the fuse box, and swapping the column stalk. No single step is hard, but the bumper has to come off because the lamps seat from the rear and the drilling guides are moulded on the inner face. Set aside roughly two hours and work patiently, since most of the front end is held by clips that break if forced. The lamp units take H11 bulbs. Adapted from a community writeup by civicsport on Civinfo (https://www.civinfo.com/threads/how-to-fog-lights-installation.510/), including corrections from the follow-up discussion.
Reference
Tools Required
- Trim removal tool / plastic pry lever
- Phillips and flat-blade screwdrivers
- Socket set with 3/8in or 1/4in drive (a 1/2in drive is too large for the bumper access holes)
- 10mm socket with extension bar
- Electric drill
- Small pilot drill bit and a 20mm hole cutter or step drill
- Trolley jack and axle stand (optional, for underside access)
Parts Required
-
Genuine Honda front fog light kit (two H11 lamp units, wiring loom, relay and mounting bracket, replacement column stalk, and kit fuse)
-
Replacement washer fluid to top up if the reservoir was opened
Safety Warnings
- ⚠ Support the car on an axle stand, never on the jack alone, whenever you work underneath it or at a wheel.
- ⚠ The front-end panels are held largely by plastic clips that crack if forced; release each clip gently and in sequence.
- ⚠ Cap the headlight washer line before drawing the bumper away, or the reservoir will drain out.
Step-by-Step Instructions
1 Raise the front and remove the lower arch trim
Chock the rear wheels and, for easier reach to the underside of the bumper, lift one front corner of the car and rest it on an axle stand. Working one side at a time, take out the fixings holding the small flaps beneath the bumper: a single screw plus a pair of push studs on each side. Next, free the wheel arch trim by removing its screw and stud and carefully unclipping it from the wing. Keep every fastener sorted, as many are refitted later.
2 Detach the front bumper
Underneath the bumper, undo the two bolts and two studs, then take out the single screw at the top edge that sits hidden behind the arch trim on each side. With all fasteners removed, the bumper is now held only by clips running along the top. Work it free gradually and evenly rather than yanking it, releasing the clips a section at a time so none snap. A second pair of hands to steady the panel helps here.
3 Free the headlight washer plumbing if fitted
Cars specified with headlight washers carry a large reservoir behind the front bumper. Before pulling the bumper fully clear, disconnect the washer hose and plug or cap the line so the reservoir does not empty onto the floor. Keep a rag ready for residual fluid. If the car has no headlight washers, skip this step.
4 Drill the apertures and fit the lamp units
The inner face of the bumper carries moulded marks showing where each lamp passes through; note that on some kits only one side is pre-marked, so check both faces before cutting. Begin each opening with a small pilot bit, then enlarge it to the finished 20mm diameter, drilling from the outer face for a clean edge. Pop out the blanking covers, pass each lamp in from behind, and secure it with the bolt supplied in the kit. The bulbs used are H11.
5 Route the lamp loom to its connector
Take out enough studs from the offside inner wheel arch to peel the liner back and reach behind the washer reservoir. Tucked in there is a blue cable ending in an unused connector; mate the lamp loom to it. Run the loom across the front of the car, secure the earth lead to a suitable ground point, and clip the harness along the inner face of the crossmember, carrying it over to the nearside lamp.
6 Refit the bumper and reconnect everything
Reverse the removal sequence to reinstall the bumper: engage the top clips first, plug the fog lamp connectors together, and reattach the washer hose if you disconnected it. Fit the underside bolts and studs, the top screws, the arch trims, and the lower flaps. If the washer system was opened, top up the fluid and prime it afterward.
7 Mount the relay beneath the dash
Move into the cabin. Remove the end cap from the dashboard to expose a screw and take that out, then unclip the lower dash cover and find the mounting bolt behind it. Secure the relay to its bracket and fix it in place. Connect the blue cable into the switch loom, orienting the assembly with the relay at the lower centre position and its connector at the upper centre.
8 Wire into the fuse box and fit the fuse
Find the multi-way plug above the fuse box; it is the second one up. Release it, insert the two feed wires from the loom into their positions, and reseat the plug fully. Install the fuse supplied with the kit into fuse position 6. Push every connector firmly home, because a joint left only partly engaged is a common reason for the lamps failing to light.
9 Swap the lighting stalk
Undo the three screws beneath the steering wheel and lift away the column cowling. The original stalk has no fog switch, so remove its retaining screws and fit the replacement stalk from the kit in its place, transferring the connector across. This new stalk is what provides the fog lamp control on the column.
10 Reassemble the interior and test
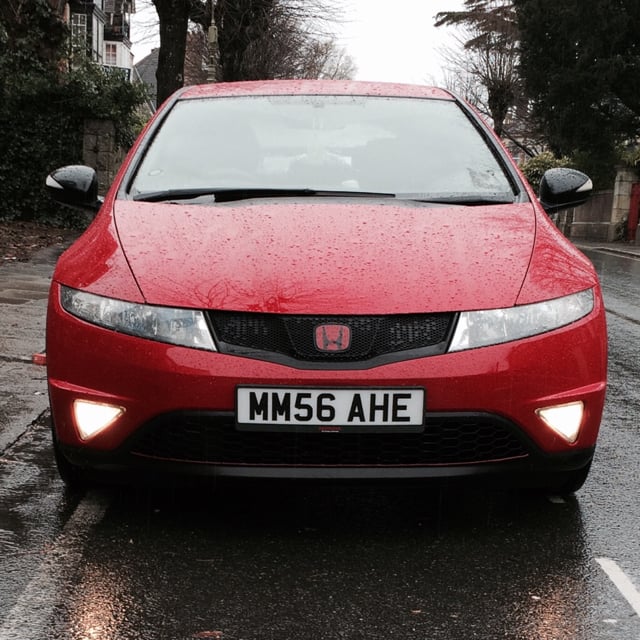
Refit the column cowling, the lower dash cover, and the dash end cap. Reconnect the battery if it was disconnected, switch on the sidelights or headlights, and operate the new stalk to confirm both fog lamps illuminate. Check the beam aim and adjust if needed before the final tidy-up. A correctly completed install looks factory-fitted.
Pro Tips
- 💡 Replacing a broken fog lamp does not require removing the bumper. Two holes sit in the underside of the bumper below each lamp: one adjusts the aim, the other reaches the retaining bolt. Pass a 10mm socket on an extension through the access hole, undo the bolt, and the lamp lifts out in minutes.
- 💡 Use a 3/8in or 1/4in drive socket for those underside access holes; a 1/2in drive will not pass through them.
- 💡 Jacking the front up by one wheel makes the underside access holes far easier to reach and lets you see which bolt to undo.
- 💡 The two screws on the underside are different sizes: the smaller one goes to the outside and the larger one nearer the centre.
- 💡 Release the bulb connector by pressing the central tab and drawing it off downward.
- 💡 If you add stone-guard protectors to the lamp glass, fit them with the units out of the car so you can clean and prep the glass thoroughly first.
Was this guide helpful?

