Honda Civic (Mk8) Gear Knob and Shift Gaiter Replacement
Introduction
A worn or cracked factory gear knob and a scuffed shift surround let down an otherwise smart interior, and the plastic original fitted to many eighth-generation Civics (FK/FN, 2006-2011, including Type S and Type R models) feels cheap in the hand. This guide covers swapping both the knob and the shift gaiter (boot) for better-quality items, giving a noticeable lift in look and feel for very little money. Popular choices pair a leather, suede or genuine Alcantara Audi TT gaiter, which matches the Civic's cloth, leather or Alcantara trim in several stitching colours, with a Nissan 350Z leather knob, a genuine Honda Type R ball, or an aftermarket Richbrook or Skunk2 knob. The task needs no special tools and is normally finished in well under half an hour, making it a sound first modification. Note that the display trim shown in many eBay gaiter photos is not supplied; only the fabric boot ships. Adapted from a community writeup by Yannis on Civinfo (https://www.civinfo.com/threads/another-gear-knob-and-gaiter-how-to.64809/), including corrections from the follow-up discussion.
Reference
Tools Required
- Plastic trim removal tool or an old credit/bank card
- Side cutters or scissors for trimming cable ties
- Allen/hex key (only for grub-screw knobs such as Richbrook)
- Sharp knife or scissors (only if the gaiter edge needs trimming)
Parts Required
-
Replacement gear knob (e.g. Nissan 350Z, genuine Honda Type R, Richbrook or Skunk2)
-
Replacement shift gaiter/boot (e.g. Audi TT leather, suede or Alcantara)
-
One or more cable ties
-
Locking nut sized to the shift thread (optional, for knobs that will not seat square)
Safety Warnings
- ⚠ Do not lever the silver shifter trim with a bare metal screwdriver; it scratches very easily. Use a plastic trim tool or a credit card and work from the inside edge.
- ⚠ Ensure the handbrake is applied before working around the shifter.
Step-by-Step Instructions
1 Choose and check compatible parts
Select a gaiter and knob before starting. An Audi TT boot is a common match and comes in leather, suede or Alcantara with a range of stitching colours; genuine Honda, Nissan 350Z, Richbrook and Skunk2 knobs are all used successfully. Most knobs simply thread onto the standard shift shaft, but confirm the fitting method first: some clamp with three grub screws instead of screwing on, and a few will not run fully down the thread. If you want the gaiter to stay retained neatly, a genuine Honda knob has a plastic lip moulded to hold the boot in place.
2 Remove the original gear knob
With the handbrake on, take hold of the factory knob and turn it anticlockwise until it spins free of the shift shaft; it releases by hand and needs no tools. Set it aside. On cars with a smooth-topped shaft, note whether a lock nut is present so you can reuse or replace it later.
3 Release the base trim surround
The silver trim around the shifter unclips, but on many cars it is stubborn, so work carefully to avoid scratching it. The reliable method is to slide a plastic wedge or one or two old credit cards under the trim from the opening where the shaft passes through, rather than levering from the outer edge, then ease the panel up. Free the upper end first (opening the cubby above can help), then work down; a retaining tab at the lower rounded end is the last point to come loose. Keep metal screwdrivers away from the visible silver surface, as they mark it easily.
4 Fit the new knob and get it sitting square
For a threaded knob, wind it on clockwise until snug and facing forward. If it stops a fraction of a turn out of alignment, thread a lock nut onto the shaft first, seat the knob to the desired position, then run the nut up against the knob's base to lock the angle; alternatively, pack a folded strip of thin card into the knob's cavity so it tightens square. For a grub-screw type such as a Richbrook, slide it on and tighten the three bolts a little at a time in rotation rather than fully seating one before the others, otherwise it will not clamp evenly on a slim shaft.
5 Slide on the gaiter and secure it
Feed the gaiter down over the shaft. To stop it sagging, cinch a cable tie around the boot where the shaft necks down to its narrower diameter. If the boot has slipped for you before, keep adding ties progressively down the shaft until you reach the wider section lower down, where the gaiter can no longer drop past; using a thicker tie or two at the top and smaller ties below works well. Trim the tail off each tie flush.
6 Refit the trim surround flush
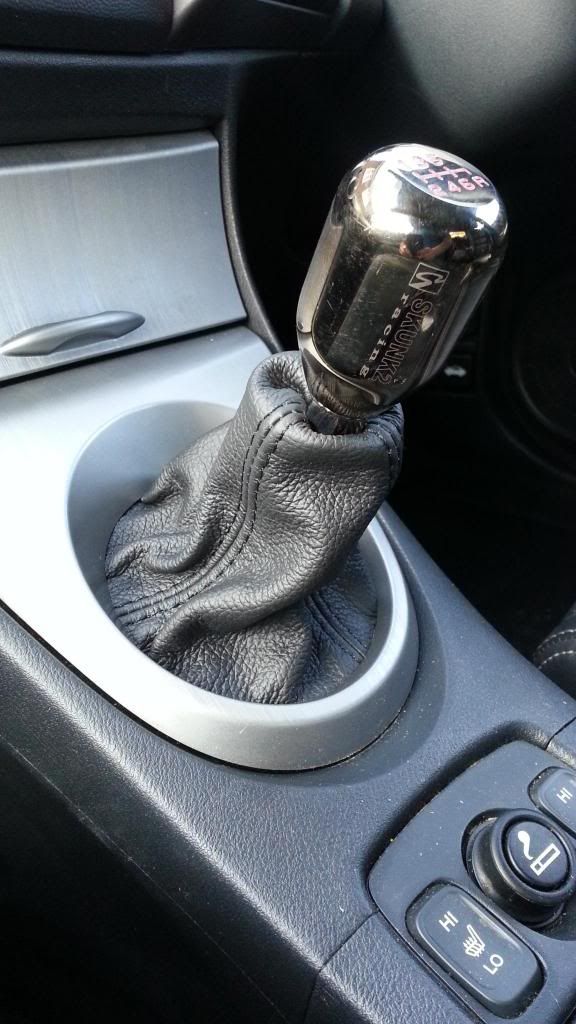
Tuck the lower edge of the gaiter neatly under the trim and clip the panel back, engaging the lower tab last. If the leather thickness stops the panel snapping fully home, trim roughly 15mm off the bottom edge of the gaiter, leaving small tabs at intervals, and rotate the boot so its seam does not sit over the panel's retaining tab; both let the surround seat flush again. Check the knob orientation and gaiter tension, then confirm the trim is level.
Pro Tips
- 💡 Audi TT gaiters are sold in leather, suede and genuine Alcantara with several stitching colours, so pick one that matches your seats and interior trim.
- 💡 The metal display ring pictured in many eBay gaiter listings is only for illustration and is not included; you receive the fabric boot alone.
- 💡 A genuine Honda knob has a plastic lip that grips the gaiter, avoiding the need for cable ties.
- 💡 Most people finish the whole job in 10 to 15 minutes.
- 💡 Knob threads and fittings vary between sellers; a few clamp-on designs grip poorly on the slim Civic shaft, so check reviews before buying.
Was this guide helpful?