Convert DVD-Audio Discs to 5.1 FLAC for the Acura RDX ELS Studio 3D
Introduction
This guide walks through turning DVD-Audio (DVD-A) discs into 5.1 surround FLAC files that a 2019 or 2020 Acura RDX can play from a USB flash drive through its ELS Studio 3D audio system. Many owners still hold surround discs bought for older Acuras whose head units had optical drives; because the current RDX replaces the disc slot with USB and Bluetooth, that multichannel content has to be ripped off the disc and re-encoded into a form the head unit accepts. The single most important requirement is that the finished files be 24-bit, 48 kHz FLAC with zero compression, since anything running at 96 kHz or carrying compression is refused by the player. The process uses free Windows software: one tool extracts the surround tracks from the disc as WAV, and a second re-encodes them to tagged FLAC. Be aware that only the 2019/2020 RDX with ELS Studio 3D supports this route; earlier disc-based ELS head units, such as the one in the 2017 TLX, will not play USB 5.1 FLAC. Adapted from a community writeup by oblio98 on AcuraZine (https://acurazine.com/forums/3g-rdx-audio-bluetooth-electronics-navigation-455/dvd-5-1-flac-step-step-971819/), including corrections from the follow-up discussion.
Reference
Tools Required
- Windows PC with an optical drive that reads DVDs
- DVD-Audio Explorer (free ripping utility)
- foobar2000 (free audio player/encoder)
- foobar2000 Free Encoder Pack (adds the FLAC encoder)
- USB flash drive
Parts Required
-
DVD-Audio (DVD-A) disc you own
-
USB flash drive formatted FAT32 or exFAT
Safety Warnings
- ⚠ This USB 5.1 FLAC method works only on the 2019/2020 RDX with ELS Studio 3D. Disc-based ELS systems, including the 2017 TLX, will not play these files.
- ⚠ The finished files must be 24-bit, 48 kHz FLAC with zero compression. Any other sample rate, bit depth, or compression level can cause the RDX to refuse the file.
- ⚠ Rip only discs you own; distributing ripped surround files is illegal.
Step-by-Step Instructions
1 Confirm compatibility and install the software
Verify the target car is a 2019 or 2020 RDX with ELS Studio 3D; the USB surround-playback path does not exist on earlier disc-based ELS systems. On a Windows PC, install three free programs: DVD-Audio Explorer (pulls audio off the disc), foobar2000 (the encoder and tag editor), and the foobar2000 Free Encoder Pack (which supplies the FLAC encoder). Install foobar2000 before the Free Encoder Pack so the pack registers against that installation.
2 Open the disc in DVD-Audio Explorer
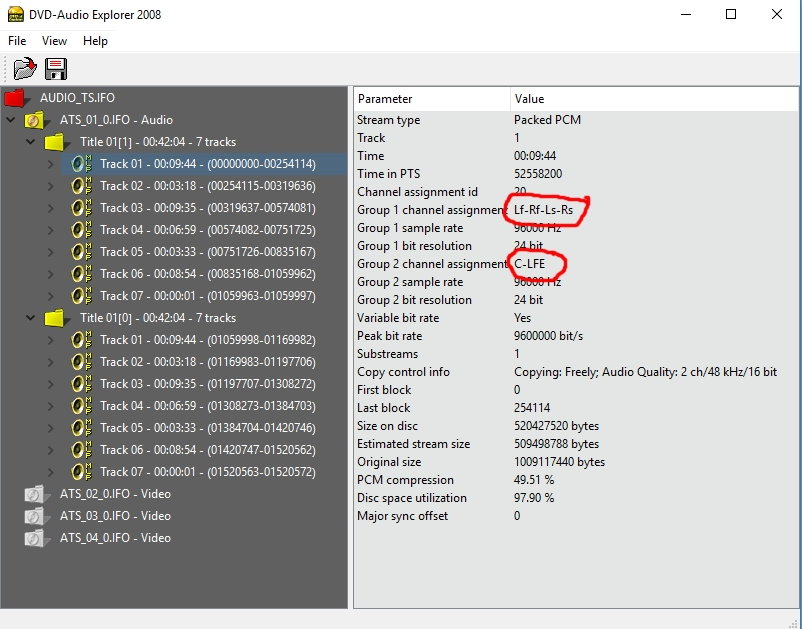
Insert the DVD-Audio disc into the PC optical drive. Launch DVD-Audio Explorer and use the Open Folder command on the toolbar, located just under the File menu, to point the program at the disc drive. A genuine DVD-A carries an AUDIO_TS folder holding an AUDIO_TS.IFO file; select that. If an 'Encrypted stream' error appears instead of the audio, the disc is almost certainly a DTS-CD rather than a true DVD-Audio title (see the tips for how to tell them apart).
3 Read the track groups on the disc
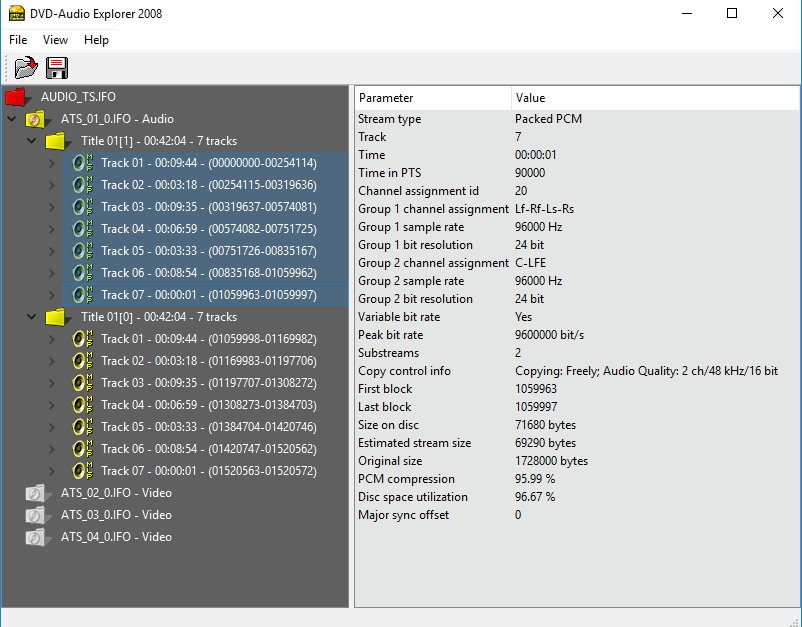
Once the disc loads, DVD-Audio Explorer lists the track groups it finds and shows channel information for each in the right-hand pane. Use that pane to distinguish the plain stereo mix from the surround mix before selecting anything.
4 Select the 5.1 group and extract to WAV
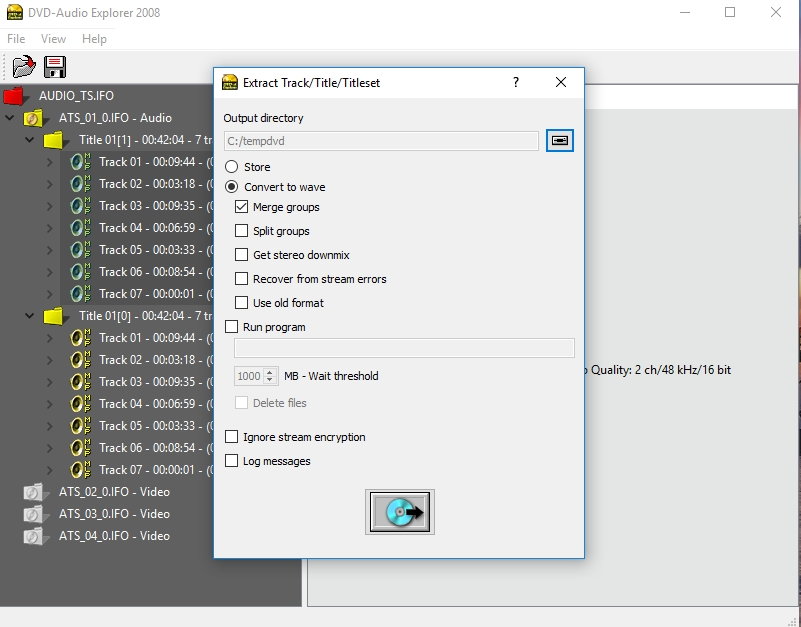
Most DVD-A titles carry both a two-channel and a multichannel version of every track. The 5.1 group is the one whose channel layout lists Lf-Rf-Ls-Rs together with C-LFE; choose that group rather than the stereo one. Highlight the first track, hold Shift, then select the final track in the group to capture all of them. Open the Extract window with the save (floppy-disc) icon, set an Output Directory to an empty folder using the drive icon, tick Merge Groups, leave the rest at their defaults, and start extraction. This produces a set of 5.1 WAV files.
5 Import the WAV files into foobar2000 and check the rate
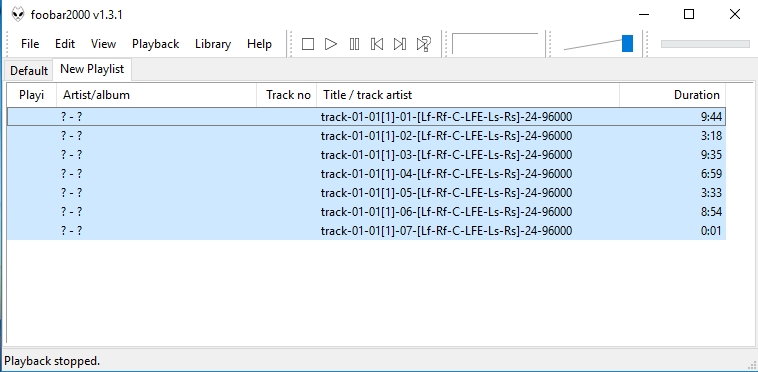
Open foobar2000, create a new playlist (File > New Playlist), then use File > Add Folder to load the WAV files just extracted. Inspect the reported sample rate. Tracks shown as 24-48000 are already correct and need no resampling; tracks shown as 24-96000 must be downsampled during conversion, because the ELS head unit will not play 96 kHz material properly.
6 Set the output format to zero-compression 24-bit FLAC
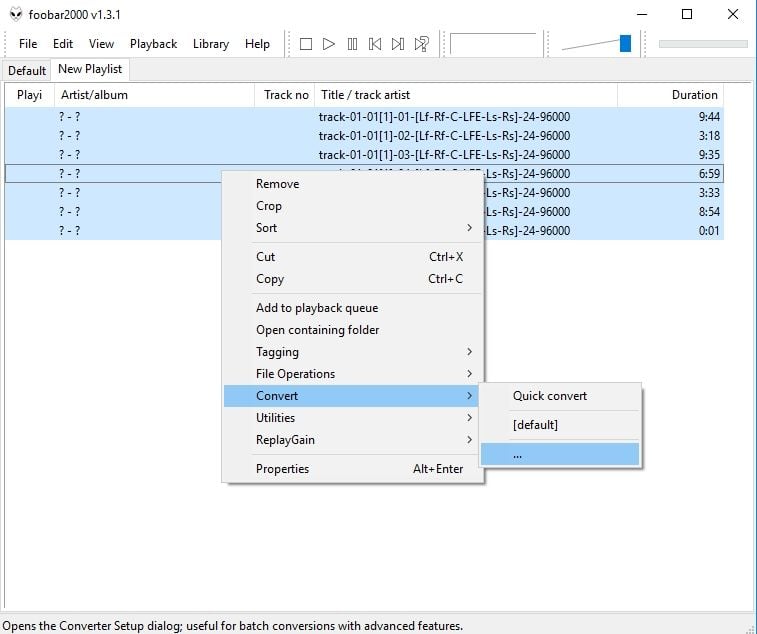
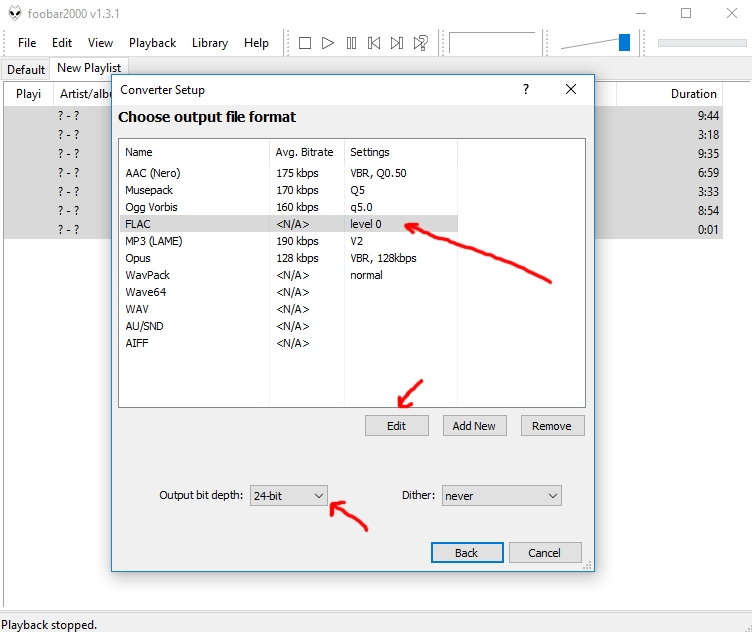
Select every WAV track, right-click, choose Convert, then the '...' entry to open the full Converter Setup. Open the Output Format setting, pick FLAC, and press Edit: drag the Compression Level slider fully to the left for zero compression, and switch the Output bit depth field away from Auto so it reads 24-bit. That Auto default often encodes at 16-bit, which shrinks the files and can block playback, so choosing 24-bit explicitly is essential.
7 Set the destination folder
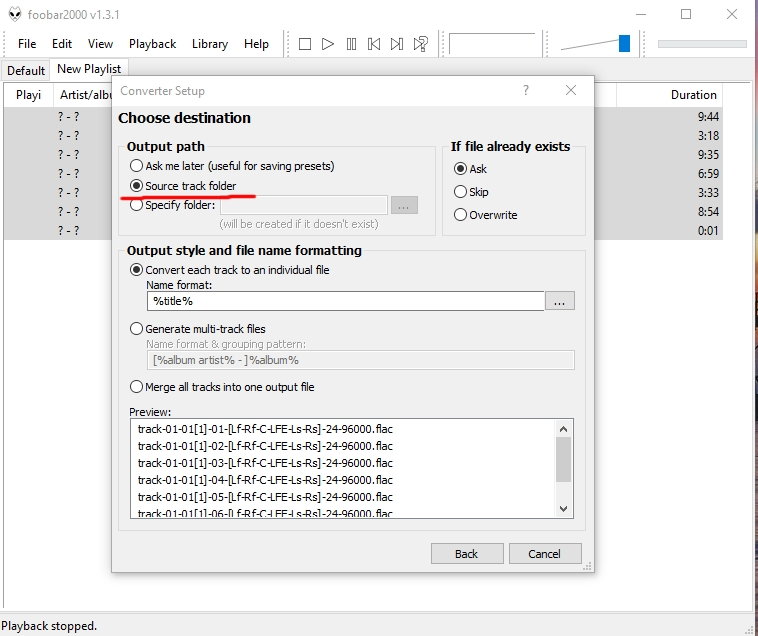
Back in Converter Setup, open the Destination setting and point it at the source track folder so the new FLAC files land alongside their WAV originals. Leave the remaining options at their defaults.
8 Downsample 24/96 material with the PPHS resampler
Skip this step if the tracks are already 24-48000. For 24-96000 material, open the Processing section, double-click Resampler (PPHS) in the Available DSPs column so it moves to the Active DSPs column, then use Configure Selected to set the Target Sampling rate to 48000. This brings the files down to the required 48 kHz.
9 Convert, tag, and load the USB drive

Start the conversion. When it completes, use foobar2000 to tag each FLAC with album, title, artist, and cover art, then rename the files to their song titles. Copy the finished 24-bit/48 kHz zero-compression FLAC files onto a USB flash drive formatted FAT32 or exFAT and plug it into the RDX USB port. If a particular drive is not recognized, try a different, good-quality stick; some USB drives have been reported to fail where others work.
Pro Tips
- 💡 Do not re-encode FLAC to FLAC in foobar2000; the RDX may reject the result. Always start from WAV and encode once to zero-compression FLAC.
- 💡 WAV files at 24-bit/48 kHz will also play, but they cannot hold tags. Use FLAC when you want album, title, artist, and cover-art metadata.
- 💡 Telling a DTS-CD from a DVD-A: a real DVD-Audio disc shows an ATS file in DVD-Audio Explorer and carries the DVD logo on the disc face, whereas a DTS-CD triggers the 'Encrypted stream' error and usually states that a compatible player is required.
- 💡 DVD-Audio copy protection only matters to hardware DVD-Audio players checking for the watermark; once a track is ripped and played on other equipment, the encryption is ignored.
- 💡 DTS-CDs can be handled with foobar2000 alone: install the DTS decoder component (foo_input_dts), load the disc via File > Open Audio CD, then convert exactly as for the DVD-A tracks.
- 💡 For concert Blu-rays, use MakeMKV to pull the audio into an MKV, then a converter such as AudioMUX or Amvidia's tool to produce 6-channel FLAC.
- 💡 Both FAT32 and exFAT USB formats are accepted by the RDX.
Was this guide helpful?
.JPG)

