BuddyClub Extended Front Lower Ball Joint Installation (RSX / EP3 Civic Si)
Introduction
BuddyClub extended ball joints replace the front lower ball joints on the Acura RSX (DC5) and 2002-2005 Honda Civic Si (EP3) with units that relocate the lower control arm's outer pivot roughly three-quarters of an inch below stock. On a lowered car the factory geometry leaves the control arms angled upward at rest, which produces excess positive camber and bump steer as the suspension compresses; dropping the ball joint restores a flatter arm angle and tames that behavior. This guide covers pulling the front knuckle, separating the old ball joint, having the new one pressed in, and reassembling to factory torque, using the front spindle-out procedure shared by these chassis. The new joint must be installed with a proper ball joint press (a shop or a rented kit), never driven in with a hammer. The torque figures given here are taken from the 2002-2003 Civic Si service manual. Adapted from a community writeup by j21857 on Club RSX (https://www.clubrsx.com/threads/diy-buddyclub-extended-ball-joint-install.854192/), including corrections from the follow-up discussion.
Reference
Tools Required
- 32mm socket (front spindle/axle nut)
- 17mm socket
- 19mm socket
- 10mm socket
- 12mm socket
- Ball joint separator tool (not a pickle fork)
- Ball joint press kit with Honda-specific adapters (or access to a shop press)
- Impact wrench
- Torque wrench
- Heavy ball-peen hammer and a sledge hammer
- Soft-face (wooden or dead-blow) mallet
- Flathead screwdriver
- Floor jack and two jack stands
Parts Required
-
BuddyClub extended front lower ball joints (one pair)
-
New cotter pins for the lower ball joint castle nuts
Safety Warnings
- ⚠ Support the car on rated jack stands; never work under a vehicle held up by the jack alone.
- ⚠ Never let the brake caliper dangle by its hose; hang it with wire to avoid damaging the line.
- ⚠ Do not use a pickle fork on Honda ball joints; it destroys the boot. Use a ball joint separator instead.
- ⚠ Have the new ball joints pressed into the knuckle, not hammered in.
Step-by-Step Instructions
1 Raise and support the front end, then break the spindle nut loose
Crack the front lug nuts, lift the front of the car with a floor jack, and set it down on two rated jack stands. Take off both front wheels. At the hub, break loose the large axle nut with a 32mm socket; an impact wrench makes this far easier, as this fastener carries 134 ft-lb of torque. This nut retains the outer CV axle stub inside the hub.
2 Detach the ABS wheel-speed sensor
Unbolt the ABS sensor from the knuckle using a 10mm socket. The sensor tends to seize in its bore, so rotate and rock it gently while easing it out rather than pulling hard, which can crack the tip. Tuck it clear of the work area so nothing damages it. On reassembly it needs only 7.2 ft-lb, essentially hand-snug.
3 Release the lower ball joint castle nut
Straighten and withdraw the cotter pin from the lower ball joint stud, then back off the castle nut with a 17mm socket. Discard the old cotter pin; a new one goes in at reassembly. The castle nut is torqued to 43-51 ft-lb.
4 Remove the brake caliper and bracket
Undo the two caliper bracket bolts with a 17mm socket and lift the caliper and bracket clear of the rotor. Hang the caliper from the coil spring or chassis with wire or string so its weight never loads the flexible brake hose. Slip the pads out and set them aside. These bracket bolts torque to 80 ft-lb on reinstallation.
5 Free the knuckle from the damper pinch joint
The base of the knuckle is clamped to the damper by a pinch bolt. Remove that bolt and its nut with a 19mm socket so the knuckle can slide off the damper. This fastener is torqued to 116 ft-lb when rebuilt.
6 Slide the axle out of the hub
Ease the CV axle stub out of the hub splines. Use a soft-face or dead-blow mallet and light taps to spare the axle boot and thread the joint out cleanly. Move the axle aside and support it so the inner CV joint is not overextended.
7 Separate the ball joint from the lower control arm
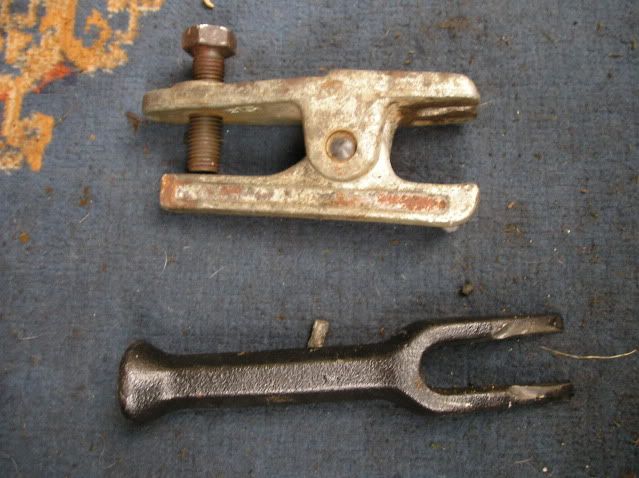
With the knuckle loose, wedge a proper ball joint separator between the ball joint stud and the lower control arm. Rotate the knuckle so you can attack the joint from whichever side offers clearance, then drive the separator with a hammer, stepping up to a heavier one for stubborn joints, until the tapered stud lets go. Do not substitute a pickle fork on Honda ball joints: it shreds the boot and is the wrong tool here. Seized joints can take many blows, so keep at it.
8 Press in the extended ball joints
With the knuckle in hand and the original ball joint still attached, have the old unit pressed out and the extended BuddyClub joint pressed in. A machine or brake shop can do this, or rent a ball joint service set together with the Honda-specific press adapters from a parts store; one writeup noted a refundable tool deposit of about $216. Never try to hammer the joint into place.
9 Reassemble to factory torque
Rebuild in reverse of disassembly. Seat the knuckle, pass the axle back through the hub, and reconnect the ball joint. Torque the castle nut to 43-51 ft-lb and fit a fresh cotter pin, clamp the damper pinch bolt to 116 ft-lb, bolt the caliper bracket to 80 ft-lb, snug the ABS sensor to 7.2 ft-lb, and tighten the spindle nut to 134 ft-lb before staking it. Refit the pads, wheels, and lower the car.
Pro Tips
- 💡 The extended joints drop the lower control arm's outer pivot about 0.75 in below stock, which recovers suspension geometry on a lowered car and reduces both bump steer and excess positive camber.
- 💡 Book a front-end alignment after the job, since relocating the ball joint changes camber and toe.
- 💡 One owner reported roughly 70,000 miles from a set before the boot tore and grit worked into the joint, so inspect the boots periodically.
- 💡 The ball joint press set can usually be rented on a refundable deposit, making the tool cost effectively nothing once returned.
Was this guide helpful?

