Acura RDX SH-AWD Rear Differential Fluid Change
Introduction
The rear differential in Acura's SH-AWD system uses a specialized dual-pump fluid whose friction modifiers degrade over time, even when the fluid still looks clean and thick on the way out. Changing it yourself on an RDX (and other Honda and Acura SH-AWD vehicles) is quick and cheap, sparing you the roughly $120-130 a dealer charges for the same work. Acura's schedule calls for the first change at 15,000 miles and every 30,000 miles afterward. The job is usually prompted by a maintenance-minder code ending in 6 (such as A6, A16, or B16), where the 6 designates rear-differential service on all-wheel-drive cars; that code can appear a bit earlier than the mileage interval because the system flags it ahead of the next scheduled visit. The whole procedure typically takes 15 to 30 minutes and needs no shop equipment beyond a hand pump and basic wrenches. Adapted from a community writeup by Mustachio on AcuraZine (https://acurazine.com/forums/3g-rdx-diy-faq-460/how-replace-rear-differential-fluid-%2430-983828/), including corrections from the follow-up discussion.
Reference
Tools Required
- Fluid transfer pump that threads onto a quart bottle
- Drain pan
- 3/8-inch breaker bar or slim/flat-headed torque wrench (tight clearance at the fill plug)
- 3/8-inch ratchet or socket wrench
- Torque wrench
- Shop towel or rag
- Floor jack (optional, for extra working room)
Parts Required
-
Acura DPSF-II dual-pump differential fluid, P/N 08200-9007A (or compatible Honda DPF-II / Eneos DPSF), about 2 quarts
-
20 mm fill crush washer, P/N 94109-20000
-
18 mm drain crush washer, P/N 90471-PX4-000
Safety Warnings
- ⚠ Never substitute conventional gear oil such as 75W-80; it is not the dual-pump fluid the SH-AWD differential requires.
- ⚠ Do not overfill; stop pumping the moment fluid weeps out of the fill hole.
- ⚠ A maintenance-minder code ending in 6 can show up before the mileage interval; it is the system flagging the next service, not a fault.
- ⚠ Always fit new crush washers; reusing a flattened washer risks a slow leak.
Step-by-Step Instructions
1 Gather the correct fluid, crush washers, and a pump
Buy the dual-pump fluid specified for the SH-AWD differential. Acura lists it as DPSF-II, part number 08200-9007A, at roughly $10 per quart from the dealer; plan on just under 2 quarts. Honda's equivalent, sold as DPF-II (Dual Pump Fluid II), meets the same specification, and Eneos markets a compatible DPSF that has been found online for around $7.37 per quart. Do not substitute conventional gear oil: one member reported that 75W-80 was clearly the wrong product once he saw the color and consistency of what drained out. Note also that the Acura fluid (08200-9007A) is not interchangeable with the plain 08200-9007 'Dual Pump 2' used in the Honda CR-V. Pick up two new crush washers as well: a 20 mm fill washer (P/N 94109-20000) and an 18 mm drain washer (P/N 90471-PX4-000), about $2 each. Some years or configurations may use different sizes, so confirm by comparing the old washers when they come off. Finally, use a hand pump that threads onto the quart bottle, which makes filling far easier than a grease-gun style pump.
2 Make room under the rear of the car
Both plugs sit low on the rear differential and can be reached without lifting the vehicle, though the space is cramped. Remove the spare tire first: several people found it is the main obstacle to swinging a wrench on the fill plug, and pulling it lets you check the spare's air pressure while you are there. If you want more room you can jack up one side, but avoid raising the whole rear on ramps or blocks, because tilting the tail up can trap fluid and keep the differential from draining fully. A common approach is to lift the right rear slightly so old fluid runs toward the left, then set the car back level before refilling.
3 Loosen and remove the fill plug first
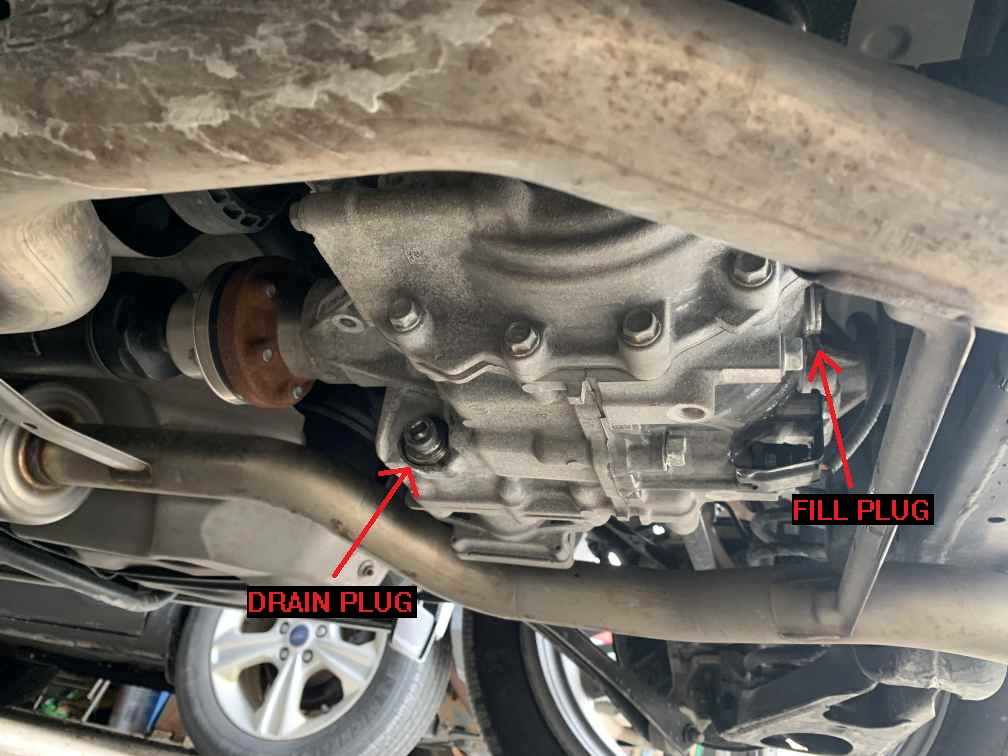
Break the fill plug loose before draining anything, so you never end up with an empty differential you cannot refill. Clearance around the fill plug is tight, and a standard 3/8-inch ratchet head often will not fit between the plug and the suspension arm. A 3/8-inch breaker bar or a slim, flat-headed torque wrench usually slips in where a bulky ratchet cannot. Set the plug and its washer aside. Expect little or nothing to run out at this stage; on many cars the factory fill level sits at or slightly above the plug.
4 Drain the old fluid and clean the magnetic plug
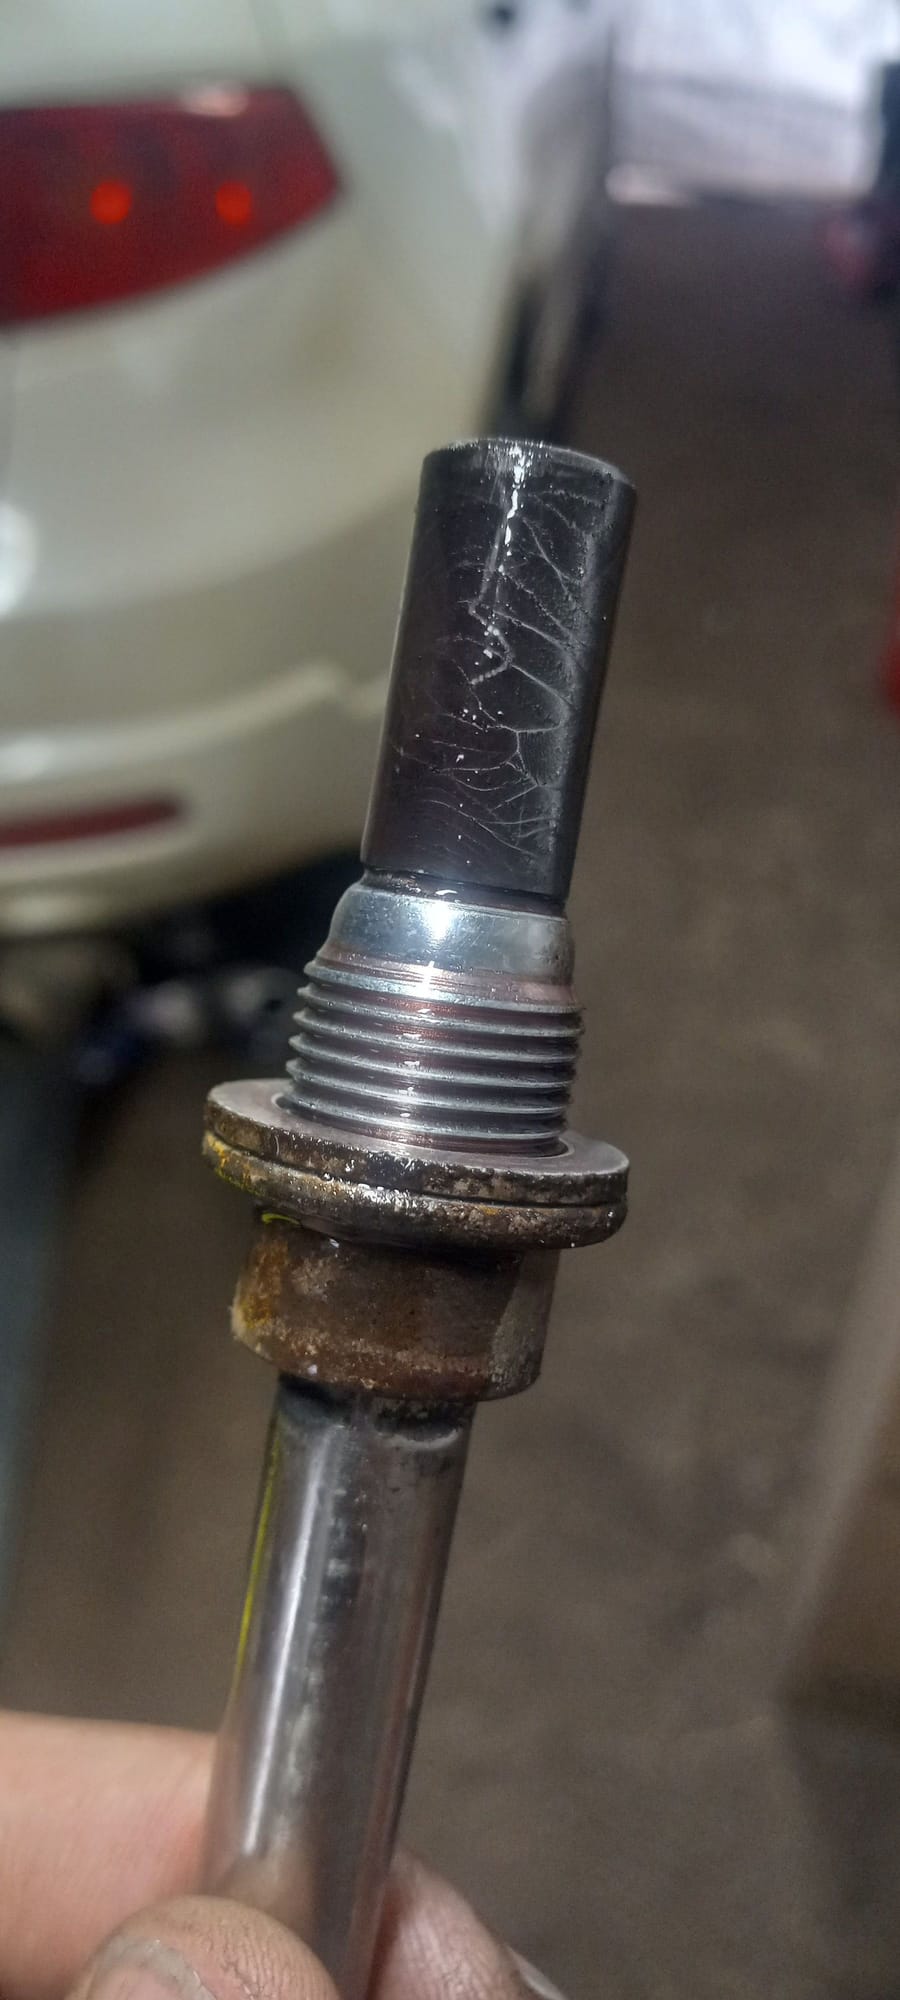
Position the drain pan and remove the drain plug, letting the fluid empty completely. Typical drained volume runs about 1.3 to 1.8 quarts depending on model and how level the car sits; first-generation RDXs hold closer to 3 quarts. The drain plug is magnetic, so wipe it clean and inspect the metal it has collected. A light fuzz of fine particles is normal, especially during early break-in mileage, and is exactly why the fluid is worth replacing even when it still looks and feels fine.
5 Reinstall the drain plug with a new washer
Fit a fresh 18 mm crush washer to the drain plug and thread it back in. The original writeup recommends tightening to 29 lb-ft. Because Acura's owner's manual does not publish a spec for these plugs, community figures range from about 24 to 36 lb-ft, so aim within that range or snug it firmly by feel if a torque wrench will not fit the space. Do not overtighten and crush the washer flat.
6 Pump in fresh fluid until it overflows
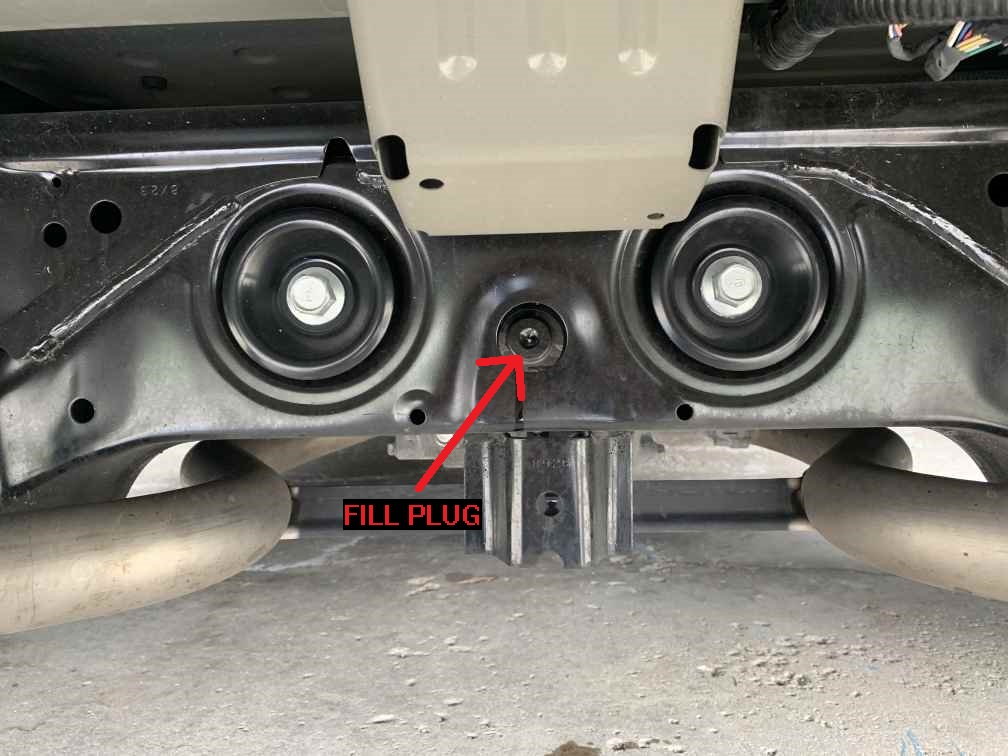
Thread the pump onto the fluid bottle and feed the hose into the fill hole. Pump steadily until fluid just begins to weep back out of the opening, which marks the correct level. This takes roughly 1.75 quarts; the factory refill figure is 1 and 3/4 quarts, and measuring what you drained gives a useful target. Stop once it overflows rather than forcing in more, to avoid overfilling.
7 Cycle the engine and top off (optional official step)
Some service data adds a leveling step: install the fill plug hand-tight with the old washer, start the engine and idle it for about a minute, shut it off, then reopen the plug and top up. Members who tried this could add only a small amount more, on the order of 1 to 1.5 ounces, so the step makes a minor difference at most, but it mirrors the documented procedure.
8 Reinstall the fill plug with a new washer
Wipe the fill plug, fit the new 20 mm crush washer, and thread it home. Torque it to the same target used on the drain plug (the writeup's 29 lb-ft, within the roughly 24 to 36 lb-ft community range), using the slim tool that fits the confined space. Wipe up any spilled fluid and the job is complete; start to finish it runs about 15 to 30 minutes.
Pro Tips
- 💡 Remove the spare tire before you start; it is the single biggest obstacle to reaching the fill plug, and it lets you check the spare's pressure while you are there.
- 💡 A 3/8-inch breaker bar or a flat-headed torque wrench clears the tight space around the fill plug better than a standard ratchet head.
- 💡 Keep the car level or lift only one side; raising the whole rear can stop the differential from draining completely.
- 💡 Look beyond the dealer for fluid: Eneos DPSF has been found online for around $7.37 per quart versus roughly $10 at the counter.
- 💡 Total parts cost is about $25-30, compared with the $120-130 dealers charge for this service.
- 💡 Measure the fluid you drain so you know how much to pump back in.
Was this guide helpful?
