Acura RDX (1st Gen) Rear Damper Replacement
Introduction
The first-generation Acura RDX (2007-2012) is prone to rear dampers that wear out early, weeping hydraulic fluid past the plastic dust shroud and producing a clunk over sharp bumps. This guide covers removing a worn or leaking rear shock absorber and fitting the current OEM replacement, part# 52610-STK-A03, which supersedes the earlier -A02; the same unit is used on either side of the vehicle. Because no alignment-adjustment fasteners are disturbed, a wheel alignment is not required afterward. Throughout these instructions, left and right refer to the driver and passenger sides of the car itself, regardless of which way you happen to be facing. Adapted from a community writeup by 737 Jock on AcuraZine (https://acurazine.com/forums/1g-rdx-diy-faq-161/diy-replace-leaking-rear-damper-shock-absorber-794969/), including corrections from the follow-up discussion.
Reference
Tools Required
- 5 mm Allen (hex) key
- 14 mm dogbone (crow-foot) wrench
- 10 mm open-end wrench
- 17 mm socket
- 19 mm socket
- Breaker bar with short extension
- Torque wrench
- 14 mm ratcheting wrench (recommended for speed)
- 17 mm ratcheting wrench (recommended for speed)
- Floor jack and rated jack stands
- Eye and face protection, gloves, protective clothing
Parts Required
-
Rear damper, OEM part# 52610-STK-A03 (supersedes -A02; same unit fits left or right)
-
Lower upper-mount rubber cushion (included with the new damper)
-
Lower arm flange bolt, Honda part# 90174-SP0-003 (optional but recommended)
-
Penetrating oil such as PB Blaster
-
Blue threadlocker
-
Spare upper-mount cushion for the cargo-compartment side (same part number, optional)
Safety Warnings
- ⚠ The RDX weighs about 3,950 lb. Never work beneath a vehicle supported only by a jack; use rated jack stands on level concrete and confirm stability before reaching under.
- ⚠ Orient the breaker bar and torque wrench so you pull on them from beside the car, not from underneath, in case a fastener frees suddenly.
- ⚠ Disconnect the negative battery cable before beginning.
- ⚠ On OEM dampers the service manual shows the cupped washer lip turned up; some aftermarket kits (for example KYB) specify the cup facing down, so always follow the instructions supplied with aftermarket parts.
Step-by-Step Instructions
1 Prepare and lift the vehicle
Park on a level concrete surface and set the parking brake. Loosen the negative battery cable with a 10 mm wrench and disconnect it before doing any other work. Break the rear lug nuts loose while the wheel is still on the ground, then raise the corner you are servicing and lower it onto a jack stand rated for the load. The RDX weighs roughly 3,950 lb, so confirm the support is solid and stable before any part of your body goes under the vehicle. Remove the rear wheel with a 19 mm socket.
2 Confirm the damper has failed
With the wheel off, inspect the lower body of the shock beneath its plastic shroud. A serviceable unit may be coated in dry dust but should not be wet. A failed one shows a slick film of oil-soaked grime seeping down from below the shroud, and a persistent clunk or squeak over hard bumps often accompanies the leak.
3 Open the upper mount access panel
The top of the damper is reached from inside the cargo area, not through the wheel well. Gently pry the trim cover at its upper edge to release it and expose the mounting stud and nut. Note two details for reassembly: on OEM units the cupped mounting washer sits with its lip turned upward, and roughly 18-19 mm of stud thread should protrude above the nut once tightened.
4 Loosen the upper stud nut
The upper nylock nut spins the shaft unless the shaft is held. Grip the damper shaft with a 5 mm Allen key and turn the nut with a 14 mm dogbone (crow-foot) wrench, whose open top clears the Allen key where a standard socket would not. Pull the side trim back a little if you need more room. Slacken the nut but leave it threaded on the stud for now.
5 Locate and free the lower mounting bolt
At the bottom, the shock joins the lower suspension link with a single 17 mm bolt. Its head is on the rear face of the link; two bolts pass through to the front face, and the damper bushing is the inboard one (nearer the vehicle centerline). A captive nut collar is welded to the link, so only the bolt rotates. Soak the head and threads with penetrating oil such as PB Blaster and give it time to work.
6 Support the link and back out the lower bolt
Slide a floor jack beneath the lower link, directly under the bushing, and raise it just until the spring begins to load; this relieves tension on the bolt. Fit a 17 mm socket on the breaker bar and loosen the bolt. Position the bar so you can pull on it from beside the vehicle rather than from underneath, slipping the jack handle over the bar for extra leverage. A 17 mm ratcheting wrench speeds the rest of the removal. Wipe the bolt clean and dry the threads.
7 Remove the upper nut and withdraw the damper
Return to the cargo area and run the nylock nut off, holding the shaft with the 5 mm Allen and turning with the 14 mm ratcheting wrench. Lift off the cupped washer, noting its upturned lip, and leave the upper rubber cushion seated. Now take hold of the lower body of the shock, push up to collapse it, and draw the bushing free of the suspension link. Keeping it compressed, ease the body down and out of the top mount and lift it from the wheel well. The lower rubber cushion normally comes away with it; if it stays behind, pry it gently from the mount.
8 Clean the mounts and compare the parts
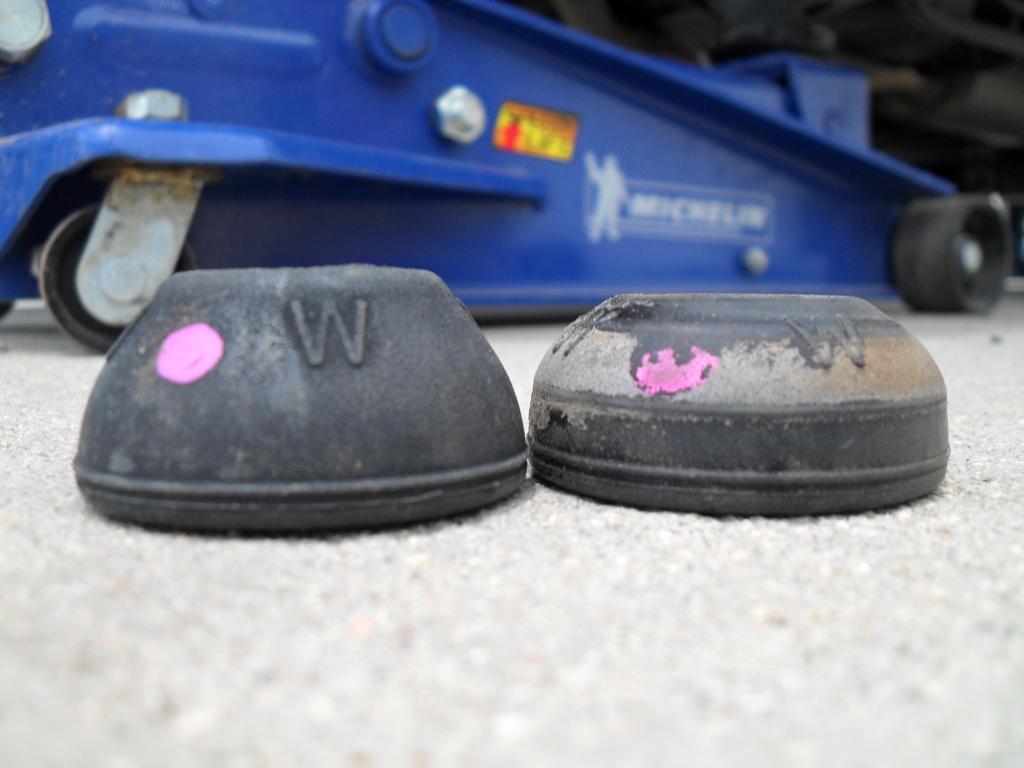
Wipe the upper mount in the wheel well clean and make sure the old lower cushion has been removed and discarded, since a fresh one comes with the damper. Check that the cushion up inside the cargo compartment is still in place; that one is reused. Set the old and new dampers side by side to verify the correct replacement, part# 52610-STK-A03 in place of the earlier -A02. The new shock arrives with its wheel-well cushion already fitted.
9 Fit the new damper
Compress the new unit and feed the shaft up into the upper mount first, then let it extend down into the lower suspension link. The fresh wheel-well cushion should seat against the frame, and the shaft must poke up through the upper cushion inside the cargo bay. Line the lower bushing up with the holes in the link and start the 17 mm bolt by hand; a dab of blue threadlocker on the threads is worthwhile. If you are renewing the lower arm flange bolt (Honda part# 90174-SP0-003), install the new one now.
10 Torque the lower bushing bolt
With the jack still under the link, raise the suspension just enough to lift that corner off the jack stand so the bushing settles at ride height. Standing beside the vehicle rather than under it, apply 103 N·m (76 ft-lb) to the lower bushing bolt.
11 Torque the upper mount nut
Back in the cargo compartment, refit the cupped washer over the rubber cushion with its lip facing up, then start the nylock nut. Hold the shaft with the 5 mm Allen and drive the nut down with the 14 mm ratcheting wrench and dogbone. Expect slow progress, since the shaft is still drawing through the cushion; you will feel a firm stop when the shaft's shoulder contacts the frame. Do not over-tighten. Torque to 29 N·m (22 ft-lb), which should leave about 18-19 mm of thread exposed.
12 Reassemble and test drive
Lower the jack until the corner rests fully on the stand again. Refit the wheel and tighten the lug nuts in a crisscross (star) sequence to 109 N·m (80 ft-lb). Snap the upper mount cover back into the cargo trim. Lower the vehicle, reconnect the negative battery terminal, and take a short test drive to check ride and steering feel. Renewing only the failed side is acceptable; the opposite damper does not have to be changed at the same time.
Pro Tips
- 💡 No wheel alignment is required afterward, because none of the alignment-adjustment fasteners are loosened during the job.
- 💡 The cargo-compartment upper cushion is technically reusable, but it is the same inexpensive part as the wheel-well cushion (both share one part number) and can be renewed at the same time if it looks dried out or compressed.
- 💡 Fitting a new lower arm flange bolt (part# 90174-SP0-003) instead of reusing the old one is cheap insurance; reported prices have ranged from roughly $8 to $22 depending on source and region.
- 💡 Prefer OEM or a high-quality damper. One contributor received a Monroe OE Spectrum unit with no damping action out of the box, and others rated the aftermarket second-generation replacements poorly.
- 💡 The rear springs are independent of the damper, so there is no need to compress or remove a coil spring to change the shock.
Was this guide helpful?

