Acura CL (2.2/2.3) Clutch and Flywheel Replacement
Introduction
Replacing the clutch on the first-generation Acura CL (2.2CL and 2.3CL, 1997-1999) is a major driveline job that requires dropping the manual transaxle out of the car. This guide covers a full clutch disc and pressure plate replacement, with the option to swap or resurface the flywheel at the same time; the original build paired an Exedy Stage 1 clutch with an ACT lightweight flywheel. Because the front-wheel-drive transaxle sits behind the engine, the axles, shift linkage, hydraulic slave cylinder, and several mounts all have to come apart before it will drop. Plan on roughly six to eight hours if everything cooperates, and expect the first attempt to run longer. Doing it yourself saves the several hundred dollars of shop labor this job commands and lets you fit a performance clutch and flywheel while you are in there. Adapted from a community writeup by Wannarace62188 on AcuraZine (https://acurazine.com/forums/1g-cl-diy-faq-74/diy-clutch-replacement-480067/), including corrections from the follow-up discussion.
Reference
Tools Required
- Socket set including 10mm, 12mm, 14mm, 17mm and 36mm sizes
- Both 6-point and 12-point sockets (12-point is required for the pressure plate and flywheel bolts)
- Deep-well sockets
- 3/8-inch and 1/2-inch drive ratchets
- Breaker bar with a cheater pipe
- Assorted extensions
- Pry bar
- Hammer
- Pliers and open-end wrenches
- Floor jack and jack stands
- Torque wrench
- Clutch disc alignment tool
Parts Required
-
Clutch disc and pressure plate kit (the original build used an Exedy Stage 1 clutch)
-
Flywheel: a new lightweight unit (an ACT lightweight flywheel was used here) or the resurfaced original; for a daily driver stay at or above about 10 lb
-
Genuine Honda manual transmission fluid (about 2 quarts)
-
Rear main seal (recommended replacement while the transmission is out)
-
New cotter pins for the ball joints and shift cable ends
-
Optional: axle and intermediate shaft seals
Safety Warnings
- ⚠ Support the car on proper jack stands; never work under a vehicle held up by a jack alone.
- ⚠ Do not press the clutch pedal once the slave cylinder is unbolted, or the piston can be forced out of its bore.
- ⚠ Avoid bending the clutch hydraulic hard lines and slave line at any stage of the job.
- ⚠ A very light flywheel (under about 10 lb) makes a daily driver harder to launch smoothly.
Step-by-Step Instructions
1 Lift the car and prepare the engine bay
Park on a flat, solid surface and raise the front of the car onto jack stands, then remove both front wheels. Under the hood, disconnect and remove the battery; pulling the battery tray as well opens up more room, though it can be left in place. Take off the intake assembly to expose the top of the transaxle. Finally, drain the manual transmission fluid using a 3/8-inch drive ratchet on the drain plug, and let it empty completely into a catch pan.
2 Disconnect the starter and slave cylinder
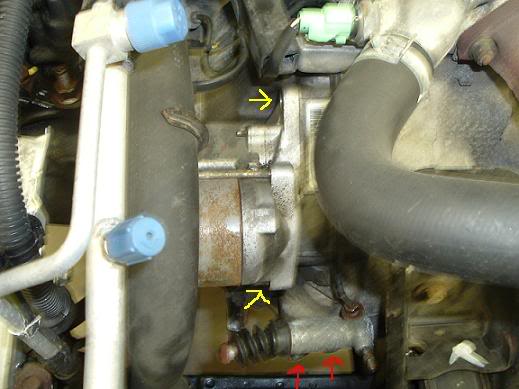
Detach the two electrical cables at the starter motor, then unbolt the starter itself, which is held by two bolts. Next, unbolt the hydraulic slave cylinder from the transmission (two more bolts) and set it aside with its line still attached. Once the slave is loose, never press the clutch pedal, as that can push the piston out. Keep all of the clutch lines from getting kinked while you work.
3 Disconnect the remaining sensors, grounds, and clamps
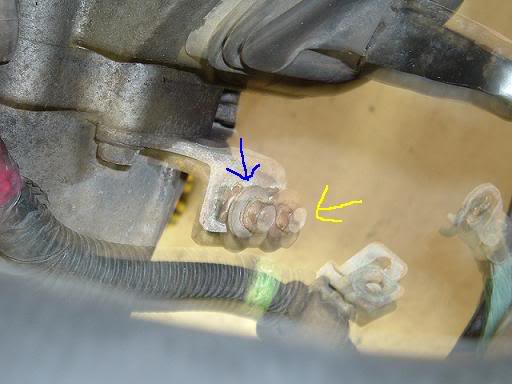
Unplug the back-up light switch connector. Remove the transmission ground strap and the starter cable clamp. Locate and unplug the vehicle speed sensor (VSS), then release the wiring harness clamp that runs along the nearby black tube so the harness can be swung clear of the bellhousing.
4 Free the shift cables and their bracket
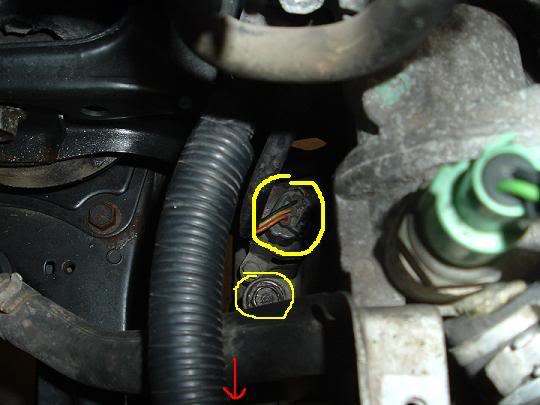
Unbolt the shifter cable bracket, held by three bolts, and move it out of the way. Detach both shift cables from the transmission: pull the cotter pin, then slide off the metal washer followed by the plastic washer, and note that exact order so it reassembles the same way. Pull each cable end off its stud.
5 Release the clutch hydraulic hard lines
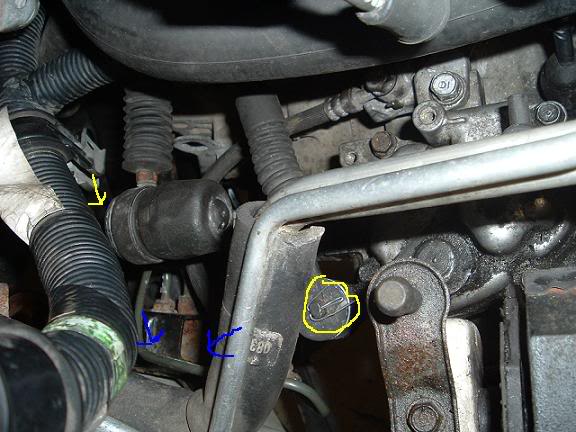
Unbolt the clutch damper bracket, which carries two hard lines, by removing its two bolts. Then trace the line from the slave cylinder back to the transmission and remove the two bolts securing the hard line there. Handle these lines carefully; bending them can damage the hydraulic circuit.
6 Remove the upper transmission bolts and splash shield
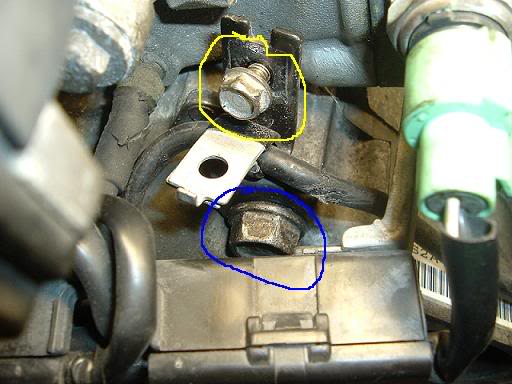
Remove the two upper transmission-to-engine mounting bolts; both are 17mm, and the rear one, toward the firewall, needs a long extension to reach. Then take off the lower engine splash shield, which is held by seven bolts and three fastener clips, and set it aside.
7 Free the axles and lower suspension
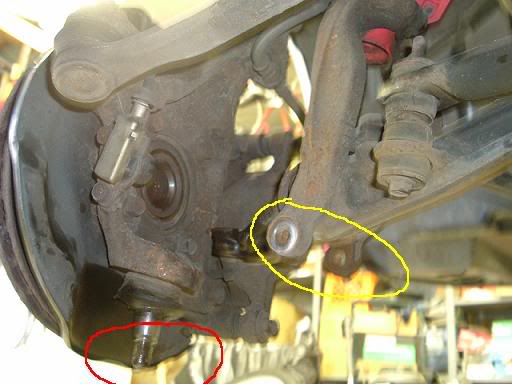
Loosen and remove both 36mm axle nuts; without air tools you will need a breaker bar and cheater pipe for the required torque. Pull the cotter pins and castle nuts from the lower ball joints on each side and separate the ball joints from the lower control arms. Loosen the lower damper fork bolt so the strut can be pushed aside (the fork does not have to come off completely). On the passenger side, remove the radius arm: two bolts at the control arm plus the single bolt at the crossmember.
8 Remove the driveshafts and intermediate shaft
Pull both driveshafts out of the hubs and transmission. Remove the intermediate shaft next by taking out its three bolts and sliding it from the transaxle. If you are reusing the driver-side axle, it can be easier to draw it out together with the intermediate shaft rather than separating the two on the car.
9 Remove the center beam, clutch cover, and intake manifold bracket
Remove the center beam, which is held by three bolts at the front and two at the rear; depending on clearance this beam can sometimes stay in place. Take off the clutch inspection cover (three bolts), which then wiggles free. Finally remove the small black intake manifold bracket near the oil filter on the passenger side, held on by two bolts.
10 Support the transaxle and remove the mounts
Slide a floor jack under the transmission to carry its weight. Remove the three bolts of the rear mount bracket. From up top, remove the upper transmission mount: three bolts into the case plus the main through-bolt in the rubber mount. Then take out the last two bolts near the rear mount and the single bolt beside the slave cylinder.
11 Separate and lower the transmission
With every fastener and mount removed, work the transaxle away from the engine. It usually binds on the firewall side even after the front breaks loose from the locating dowels; rock and pry it patiently rather than forcing it, and use only light hammer taps if it truly refuses to move. Once the input shaft clears the pressure plate, lower the unit down on the jack, taking care not to snag the hydraulic lines on the way out.
12 Remove the pressure plate and clutch disc
Unbolt the pressure plate, which is retained by six bolts of roughly 10 to 12mm. These require a 12-point socket. With the bolts out, pull the pressure plate off and the clutch disc will come away behind it. Inspect the flywheel friction surface and the release bearing while everything is exposed.
13 Remove or resurface the flywheel
If you are replacing the flywheel, remove its eight retaining bolts (17mm), again using a 12-point socket; they are torqued tight, so lock the flywheel from turning with a holding tool or a helper. If you intend to reuse the original flywheel, have it resurfaced at a machine shop to clear the glazing, since a glazed face will make the fresh clutch slip. A new lightweight flywheel is often cheap enough to simply fit instead; for a daily driver, avoid dropping below about 10 lb so the car stays easy to launch.
14 Install the flywheel and new clutch
Torque a new flywheel to 75 ft-lb. Fit the clutch disc and pressure plate, running the alignment tool through the disc hub to center the disc. Snug the six pressure plate bolts partway, then withdraw the alignment tool and sight straight through the center: an even ring of flywheel should show all the way around the hub. If it sits off-center the transmission will not slide back on, so nudge the disc by hand until it is truly centered. Finish by torquing the pressure plate bolts to 19 ft-lb.
15 Reinstall the transmission and refill
With the transmission still out, replace the rear main seal now while access is easy. Then reinstall the transaxle and reassemble everything in reverse order, torquing the mounts and reconnecting the axles, shift linkage, hydraulics, and electrical connectors. Refill the gearbox with about two quarts of genuine Honda manual transmission fluid; the fill plug takes a 17mm and sits just to the left of the passenger-side axle. Reconnect the battery, then bed in the new clutch with gentle driving before any hard use.
Pro Tips
- 💡 The center beam can sometimes be left in place depending on how much clearance you have, saving a few bolts.
- 💡 The transaxle tends to hang up on the firewall/rear side when separating; rock it and be patient rather than beating on it.
- 💡 Disconnecting the fuse box and pushing it back toward the firewall buys a little extra working room up top.
- 💡 Replace the rear main seal while the transmission is off the car; the access will never be better.
- 💡 Note the stack-up at each shift cable end (cotter pin, metal washer, then plastic washer) so it goes back together correctly.
- 💡 The kit alignment tool only gets the disc close; confirm the disc is centered by eye before reinstalling the transmission or it will not go on.
- 💡 Do not forget to refill the manual transmission fluid before driving; the author left this off the original list, and it takes about 2 quarts of genuine Honda fluid via the 17mm fill plug.
Was this guide helpful?
