Honda Fit (GE8): Accord Horn Swap and Blackout Mesh Grille Install
Introduction
This guide covers two popular, low-cost front-end modifications for the second-generation Honda Fit (GE8): replacing the weak factory horn with a Honda Accord horn, and fitting a blackout mesh panel behind the lower grille to block road debris and give the front end a cleaner look. Both jobs share the same access work, removing the engine-bay bulkhead cover and the hood-latch cover, so tackling them together saves effort. The Accord horn reuses the Fit's original mounting bolt and factory connector, while the mesh is trimmed to shape and zip-tied to the existing grille bars. One honest caveat: the Accord horn is a tone change rather than a volume upgrade. Several owners measured it as quieter and lower in pitch than the stock unit, with the decibel rating stamped right on its bracket, so choose it for a deeper sound, not more loudness. Trim requirements can differ slightly between Sport and base models, so always test-fit the mesh against your own grille. Adapted from a community writeup by soxfan0434 on FitFreak (https://www.fitfreak.net/forums/2nd-generation-ge8-specific-diy-repair-maintenance-sub-forum/67536-diy-accord-horn-mesh-grille.html), including corrections from the follow-up discussion.
Reference
Tools Required
- 12mm socket or wrench
- 10mm socket
- Scissors
- Trim-panel removal tool (optional, protects the plastic clips)
- Bench vice (helpful for freeing the stiff horn bracket bolt)
Parts Required
-
Honda Accord horn (PN: 38100-STK-A02)
-
Hood-latch cover clips (PN: 91518-SM4-003), quantity 2
-
Plastic mesh, one 8"x32" panel (cut from a 3 ft wide roll)
-
Zip ties, approximately 11 (any color)
Safety Warnings
- ⚠ The horn only works once it is bolted to the chassis, because the mounting bolt serves as its ground. Do not assume a new horn is defective while it is still loose.
- ⚠ When cutting the tape that bundles the horn wire, cut only the tape. Nicking the wiring can cause a short or a dead horn.
- ⚠ Mount the horn in the upright orientation so water cannot pool inside it.
Step-by-Step Instructions
1 Cut and square the mesh panel
Measure and cut the plastic mesh to roughly an 8"x32" panel with scissors. Take time to keep all four edges straight and the corners square. Mesh sold on a roll often arrives with an uneven factory edge, so trimming it true at the start makes the later fitting far cleaner. Base-model Fits may need slightly different coverage than the Sport, so hold the panel up to your own grille as a rough check before final trimming.
2 Remove the engine-bay bulkhead cover
Open the hood and release the long plastic bulkhead cover that spans the top of the engine bay. It is retained by eight push clips. Pry each one out, noting that the outermost clip on each side runs longer than the others, so set those two aside separately for correct reassembly. With all clips freed, lift the cover up and off over the hood latch.
3 Detach the hood-latch cover
Below the bulkhead cover sits a smaller plastic cover over the hood latch that conceals the horn. Free it by gently working each side loose; a trim-panel tool greatly reduces the chance of snapping its clips. One tester found that unhooking this cover from its lower edge first relieves tension and lets the remaining clips release more easily. Keep a couple of spare latch-cover clips (PN: 91518-SM4-003) handy in case any break.
4 Remove the factory horn
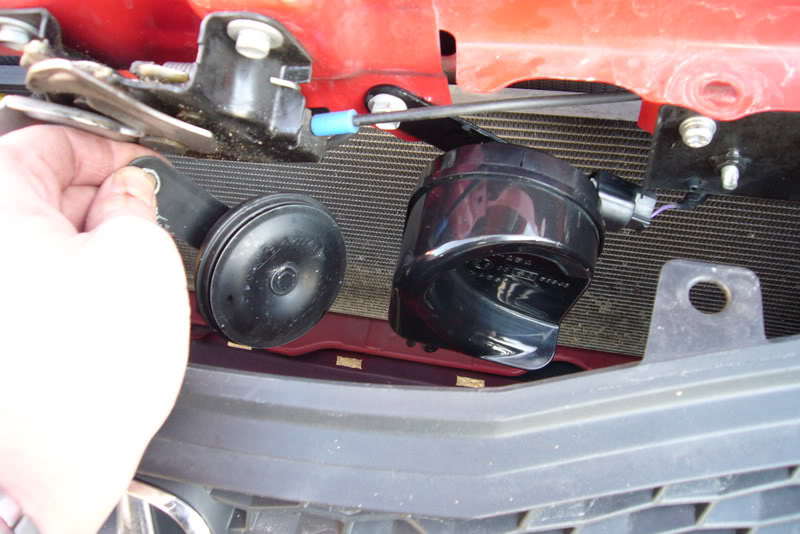
Locate the factory horn behind the latch, unplug its connector, and back out the 12mm mounting bolt. Lift the horn away and keep that bolt, because you will reuse it for the Accord unit. Compare the two horns now: the Accord horn is clearly larger and snail-shaped, and its electrical connector sits in a different spot, which is why its bracket will need re-clocking before installation.
5 Locate the lower grille clips and test-fit the mesh
With the horn out of the way there is now room to reach the pocket ahead of the A/C condenser. Two clips secure the lower edge of the grille here, one to each side, seated in shallow divots roughly beneath the front clip holes of the bulkhead cover. Slide your cut mesh down into the pocket and mark where each of those two clips lands on the panel.
6 Cut clip holes and contour the mesh
Pull each lower clip, cut a small hole in the mesh at your marks, pass the clip back through the mesh, and refit it so the panel is captured and held taut between the two points. To help the flat sheet wrap the curved bumper, snip short relief slits along the bottom edge so the mesh can fold over itself. Optionally trim the top edge to keep an even gap from the grille along its full length.
7 Zip-tie the mesh to the grille
Anchor the mesh to the grille bars with zip ties. The grille has four vertical columns and three horizontal bars; skip the thick center bar and use only the thinner upper and lower bars. Fit five ties along the upper bar, one in each of the five gaps between the columns. Add one tie at each far outboard end of the lower bar. Finally run four ties across the very bottom of the columns, pulling the mesh tight because it tends to sag toward the condenser. That comes to eleven anchor points. For a more hidden result, adhesive cable-tie mounts around the grille perimeter are an alternative to tying directly onto the bars.
8 Re-clock the Accord horn bracket
Before mounting, reposition the Accord horn's bracket so the horn will hang upright. Loosen the 10mm bolt at the rear of the horn body; expect it to be stiff, and be prepared to clamp the bracket in a vice and lean your weight into the wrench to break it loose. Rotate the bracket relative to the horn body, then retighten the 10mm bolt. Keeping the horn upright prevents moisture and debris from collecting inside it.
9 Free up slack in the horn wire
The horn lead can be short. Behind the small black rectangular component beside the horn location, the horn wire is bundled to a neighboring set of wires with electrical tape. Carefully cut only the tape to release the horn wire and gain slack, taking great care not to nick either wire underneath.
10 Mount and connect the Accord horn
Position the Accord horn at the mounting point behind the latch. Two punched ridges there act as alignment guides for the bracket, so seat the bracket between them, which leaves the horn sitting roughly level. Thread in the reused 12mm bolt and tighten it down, then reconnect the electrical plug.
11 Reassemble the covers and test
Refit the hood-latch cover, then the bulkhead cover, seating all eight clips, including the two longer outboard clips in their original corners. Remember that the horn will not sound while it is loose, because the mounting bolt is its ground path, so bolt it down before deciding whether it works. Close the hood and give it a test.
Pro Tips
- 💡 Manage volume expectations: multiple owners report the Accord horn is actually lower in decibels and lower in pitch than the stock Fit horn, with the rating stamped on the bracket. Treat it as a tone change; for a genuinely louder horn, a dedicated aftermarket unit such as a Stebel or Supertone-type is the better route.
- 💡 Verify the part before installing. At least one buyer received a horn that looked identical in size and decibel rating to the stock Fit horn, so confirm the 38100-STK-A02 part number and compare it against your original.
- 💡 Trim-panel removal tools make clip removal far cleaner and safer than prying by hand.
- 💡 The upper grille itself is held by four clips (and, on some cars, two screws) if you want to remove it for better access.
Was this guide helpful?


