Devcon Block Fill: Reinforcing a Honda B-Series Open-Deck Block for Boost
Introduction
This procedure reinforces the thin, cast-in sleeves of an open-deck Honda or Acura aluminum block so they can survive high boost, using Devcon Liquid Aluminum F-2 epoxy poured into the water jacket. It is a low-cost alternative to a steel block guard or a full resleeve: rather than pressing a thin metal ring against the sleeves, which can shift or distort them, the epoxy bonds to the outer jacket and forms a thick, rigid collar of metal-filled material around the lower portion of each cylinder, resisting the sleeve flex that cracks stock blocks under detonation. It applies to B-series blocks (B16A, B18/LS, B20) and D-series blocks, and the same method scales to F- and H-series castings. Contributors in the thread report stock-bore B-series builds surviving in the 400-plus whp range at over 30 psi with this treatment, while the original author targeted roughly 400 whp at 20-25 psi. It is a budget, experimental modification, not a factory-sanctioned repair, and it trades some cooling capacity for strength, so fill thickness and thorough flushing matter. Adapted from a community writeup by ccfab on Honda-Tech (https://honda-tech.com/forums/welding-fabrication-53/diy-filled-b-series-block-writeup-comments-welcome-1444721/), including corrections from the follow-up discussion.
Reference
Tools Required
- Engine stand or a solid, level bench
- Level
- 80-grit sandpaper
- Contact or brake cleaner
- Hacksaw blade (used as a depth gauge)
- Marker / Sharpie
- Funnel and a zip-top bag (for piping the epoxy)
- Mixing stick and container
- Drill and assorted bits
- 19mm wrench (for the freeze/drain plug)
- Garden hose
- Space heater and an enclosure to cure at 200 degrees
- Cylinder hone, or access to a machine shop for boring
Parts Required
-
Devcon Liquid Aluminum F-2 epoxy (1 lb for a B-series block, 3/4 lb for a D-series)
-
Table salt (fine; sugar is an alternative but can leave residue)
-
Old head gasket (used as a drilling template)
-
Assembly or light machine oil
Safety Warnings
- ⚠ Curing at 200 degrees with a space heater inside a cardboard box is a fire hazard; never leave it unattended.
- ⚠ Keep the fill below the deck and leave roughly 1/16 inch of sleeve exposed. Epoxy standing proud of the gasket surface, or a block sealed under a torqued head before curing, can distort the bores.
- ⚠ Limit fill thickness to about 1.25 inches on a street engine; thicker fills reduce the block's ability to shed heat and can cause overheating.
- ⚠ Ensure the epoxy is fully cured before the engine sees coolant temperature, since it is only rated to 120 degrees F while wet.
- ⚠ This is a budget, non-factory modification. A cracked sleeve in a bonded block is generally not recoverable, so treat the block as sacrificial.
- ⚠ Wear eye protection and work in a ventilated area when using contact cleaner and when drilling the cured epoxy.
Step-by-Step Instructions
1 Prepare and level the bare block
Strip the block down to a bare casting and mount it on an engine stand or set it on a solid bench. Shim or adjust until the deck reads dead level in both directions, front-to-back and side-to-side. Epoxy that cures on a tilt will pool unevenly around the cylinders and leave an inconsistent fill.
2 Scuff and degrease the water jacket
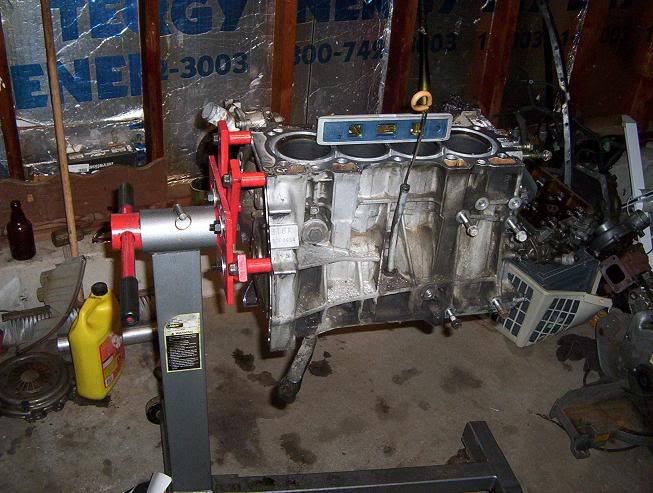
Rough up the exposed water-jacket walls and the outer sleeve surfaces with 80-grit sandpaper so the epoxy has tooth to grip. Blow out the abrasive dust, then spray everything down with contact cleaner to strip oil and grit. A clean, keyed surface is what lets the Devcon bond permanently to the jacket.
3 Establish the fill height
Use a hacksaw blade as a simple depth gauge. Stand it against the outside of a sleeve with its end aligned to the top of the water-pump passage, then mark the deck where the blade crosses it. That mark sets how high to build the salt, which corresponds to a fill of roughly 1.5 inches. Keep the layer no thicker than about 1.25 inches on a street engine to avoid choking off heat rejection.
4 Pack the water jacket with salt
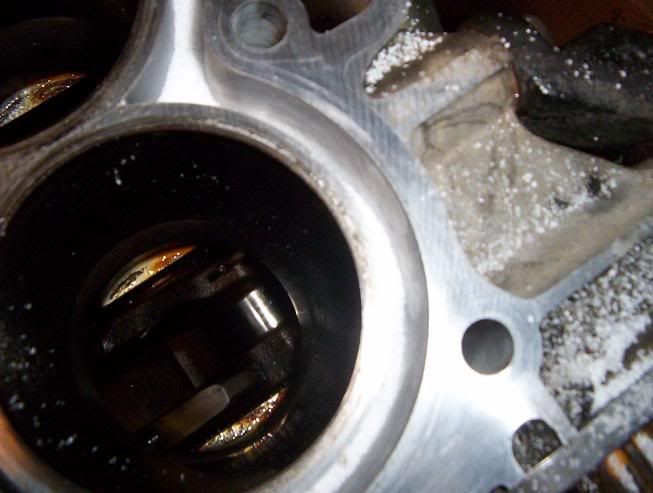
Pour table salt into the water jacket, distributing it evenly around every sleeve up to the line you marked. Pack it down firmly and prod it with the blade to collapse any voids so it sits level and dense. Fine table salt is preferred over coarse rock salt because it compacts tighter. This packed salt is a sacrificial dam: it stops the thick epoxy short and preserves the coolant passages beneath.
5 Mix and pour the Devcon
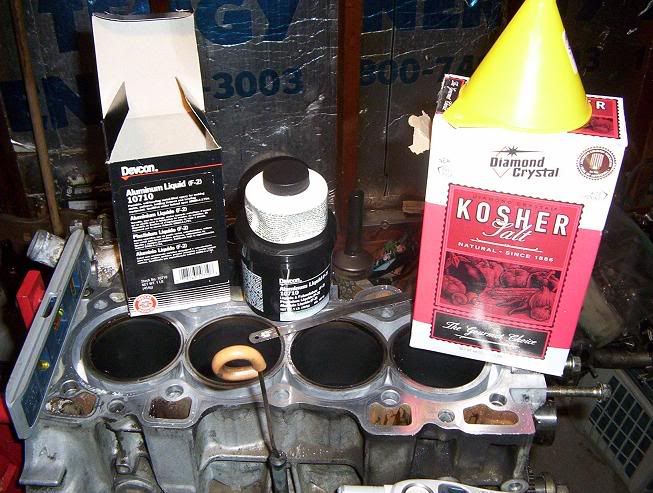
Combine the two Devcon components and stir continuously for at least 4 minutes, until the mix turns an even grey with no streaks. Pour it through a funnel into the jacket on top of the salt. To minimize trapped air, transfer the mixed epoxy into a zip-top bag, snip off one corner, and pipe it down into the cavity like a pastry bag. One pound of Devcon yields about a 1 inch layer on an F- or H-series block.
6 Screed the surface below the deck
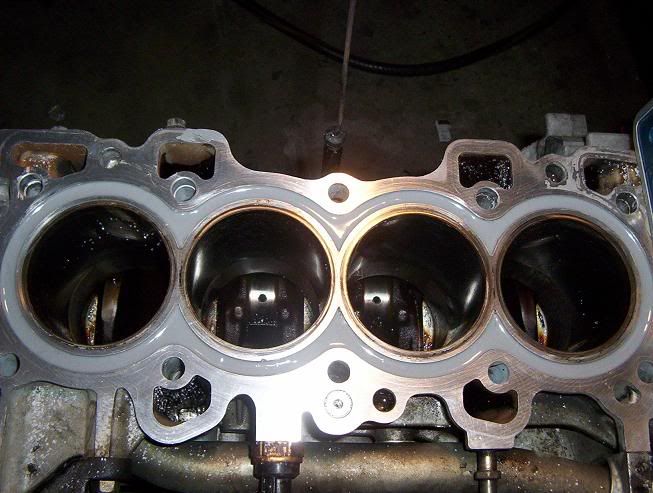
Run a gloved finger around the top of each sleeve to level and smooth the fresh pour. Keep the epoxy below the gasket surface, leaving about 1/16 inch of the sleeve top exposed. Nothing should stand proud of the deck. The material shrinks slightly as it cures, so a pour that sits a hair high usually settles flush.
7 Cure the epoxy in stages
Allow the poured fill to set at room temperature for 4 hours. Next, hold it at 200 degrees for 4 hours; the writeup improvised an oven from a space heater inside a large box. Finally, let the block rest a further 18 hours before handling. Devcon Liquid Aluminum F-2 is rated to 120 degrees F while still wet and 250 degrees F once cured, so it must be fully cured before it ever sees coolant temperature.
8 Mark and drill the coolant passages
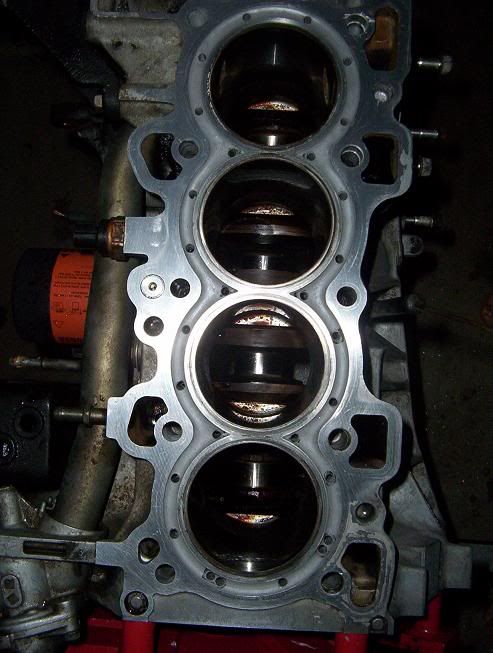
Once the fill is hard, set an old head gasket over the deck and trace each coolant port onto the cured epoxy with a marker. Drill each passage back open through the fill, using a bit one size smaller than the gasket opening so a clean shoulder of material remains around every hole.
9 Flush out the salt

Back out the freeze/drain plug with a 19mm wrench and run a hose through the block. Keep flushing until the water runs clear and streams evenly from every coolant hole you drilled, which confirms the salt has fully dissolved and washed out. Reinstall the plug once the passages run clean.
10 Protect the bores and finish the rebuild
Wipe the cylinder walls with light oil to prevent flash rust. Give the bores a final hone, or have the block bored oversize at a machine shop, then assemble the short block as normal. Because the epoxy exerts no clamping pressure on the sleeves, the bores keep their shape; a light hone is usually all that is needed if they were already finished.
Pro Tips
- 💡 Piping the mixed epoxy from a corner-snipped zip-top bag injects it into the jacket with far fewer trapped air bubbles than pouring.
- 💡 Sugar can substitute for salt and does not corrode metal, but any left behind can turn gummy over time, so flush thoroughly whichever medium you use.
- 💡 Fill only the lower and mid portion of the jacket; sleeves flex most around the thrust face midway down, and leaving the upper jacket open keeps coolant moving past the head-to-sleeve junction.
- 💡 After the initial hose flush, run the engine on plain water with the thermostat removed and drain/refill several times to clear residue that reaches the water pump and radiator.
- 💡 Off-the-shelf block fillers such as Moroso and Hardblok exist with expansion rates matched to iron or aluminum blocks if you prefer a purpose-made product over Devcon.
Was this guide helpful?
