Curt Class III Trailer Hitch and Wiring Installation on the 2G Acura RDX
Introduction
This guide covers bolting a Curt #13130 Class III receiver hitch and its matching #57008 harness to a second-generation Acura RDX (the 2017 Elite is the reference vehicle) and stowing the wiring inside the spare-tire well for a factory-clean result. It suits owners who need occasional towing capacity for a small utility trailer, a bike rack, or a cargo basket. Rated capacity on this platform is only about 1500 lb, so treat the hitch as a light-duty accessory rather than a heavy-hauling upgrade. Two details separate a smooth job from a frustrating one: the frame weld-nuts arrive coated in zinc and must be cleaned with a tap before any bolt will start, and the receiver's rear mounting points sit against a step in the frame rail that lets the tube push up into the bumper unless it is shimmed, exactly as Acura's own hitch does with factory spacers. The manufacturer's published torque figure also proved too aggressive in practice and is addressed below. Adapted from a community writeup by rubinox on AcuraZine (https://acurazine.com/forums/2g-rdx-diy-faq-406/trailer-hitch-led-lighting-dashcam-install-989797/), including corrections from the follow-up discussion.
Reference
Tools Required
- M12 x 1.25 thread tap
- Tap wrench or T-handle
- Penetrating oil (WD-40 works)
- Brass brush, ideally one that chucks into a power drill
- Torque wrench (capacity to at least 110 lbf-ft)
- Metric socket set and ratchet
- 10 mm socket for the chassis ground bolt
- Straightened wire coat hanger for fishing the harness
- Zip ties
Parts Required
-
Curt #13130 Class III 2-inch receiver hitch
-
Curt #57008 vehicle-specific wiring harness
-
Curt #21728 receiver tube cover (optional, cosmetic)
-
Thread-mounting hardware supplied in the Curt kit
-
Stainless steel fender washers roughly 3 mm thick, used as frame-rail spacers
-
Anti-seize or grease for the mounting bolts
Safety Warnings
- ⚠ Do not blindly follow the printed torque figure; it was high enough to strip fasteners on this install. Around 60 lbf-ft on greased bolts is the corrected value.
- ⚠ Without spacers at the rear holes, the receiver tube can press up into and deform the lower bumper.
- ⚠ Re-check all mounting torques after the first few loaded trips.
Step-by-Step Instructions
1 Confirm parts and vehicle fitment
Gather the Curt #13130 receiver, the #57008 harness, and, if you want the cleaner look, the #21728 tube cover. All three are matched to this chassis. Read the torque and hardware callouts on the Curt instruction sheet before touching the vehicle, but plan to deviate from the stated torque as noted in a later step. Keep in mind the roughly 1500 lb rating when sizing whatever you intend to pull.
2 Chase the frame weld-nut threads with an M12 x 1.25 tap
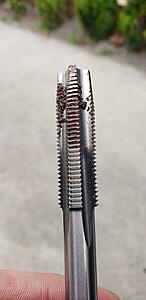
The captive weld-nuts on the frame carry a zinc coating that will fight every bolt you try to start; forcing a fastener here risks a stripped, botched thread. Clean each nut first with a tap sized M12 x 1.25. Flood the threads with penetrating oil, then run the tap in a few turns and back it out repeatedly so the coating, rust, and debris clear rather than pack. A brass brush spun in a drill helps knock loose surface buildup beforehand, but on this frame the tap still does the real work. Have the tap in hand before you begin rather than discovering the need mid-install.
3 Shim the rear mounting points to clear the bumper

Each frame rail has a step at the rear holes, and the factory Acura hitch uses spacers there for a reason: without them the top of the receiver tube contacts and lifts the lower bumper. Stack stainless fender washers of about 3 mm thickness at the two rear bolts to space the tube down. One washer per side may not be enough. In the follow-up discussion the writer needed to double them up for eight washers total to nearly clear a bumper that had its own upward contour, so test-fit and add washers until the tube no longer pushes on the fascia.
4 Raise and start all four mounting bolts
Support the hitch up to the frame and thread the supplied bolts, with your washer spacers at the rear positions, into the freshly chased weld-nuts by hand. Grease each bolt before it goes in. Start all four before snugging any of them so the receiver can shift into alignment; running one bolt fully home early can bind the others.
5 Torque the bolts to a sane value, not the sheet maximum
The Curt instructions call for a torque that proved too high on this hardware: the writer stripped a handle-nut before even reaching 100 lbf-ft and twisted a second fastener trying for 110 lbf-ft. A more reliable approach, confirmed in the thread, is about 60 lbf-ft on all four bolts with the threads well greased, which yields effective clamp load without destroying the fasteners. This is a correction to the printed spec, applied because the published figure caused failures during the actual install.
6 Route the trailer harness into the spare-tire well
Work from the rear driver-side interior access panel and feed the #57008 harness down into the spare-tire cavity. You do not need to strip out every trim piece the Curt video removes; a straightened coat hanger pushed through and taped to the wires lets you draw them through with minimal disassembly.
7 Connect to the OEM trailer connector
Locate the factory trailer harness plug and mate the Curt connector to it. The connection is made largely by feel in a tight space, so register the orientation of the plug before you commit so you seat it correctly on the first try rather than fighting it blind.
8 Secure the module, fit the cover, and plan a re-torque
Zip-tie the harness module and dress the wiring so nothing rattles or chafes; stowing it with the spare is fine if you tow rarely. Slide on the #21728 tube cover for a finished appearance when the receiver is empty. After the first few trips under load, return and re-check the mounting torque, since initial use can settle the joint.
Pro Tips
- 💡 Buy or borrow the M12 x 1.25 tap before starting; the zinc-coated weld-nuts make it effectively mandatory, not optional.
- 💡 Grease the mounting bolts before torquing so the clamp load is consistent and the fasteners survive.
- 💡 A vinyl-coated wire or a straightened coat hanger makes pulling the harness far easier than removing large amounts of trim.
- 💡 If you tow only occasionally, keep the harness coiled in the spare well instead of mounting it externally.
- 💡 The receiver cover fades in sunlight over time; a trim-restoring dressing brings the finish back.
Was this guide helpful?


