Acura CL (1G) Power Window Regulator and Motor Replacement
Introduction
The power window regulator on the first-generation Acura CL (1997-1999) is a known weak point, and the driver's-side unit in particular tends to fail more than once over a car's life. This guide covers removing the failed regulator-and-motor assembly through the door's service opening and installing a replacement, using the electrically driven glass itself to help set the mechanism's position. The driver's regulator on the 1G CL interchanges with the 1994-1997 Accord two-door driver's side, so replacement units are widely available; expect budget online parts to start around $37.95 plus shipping and name-brand parts from a chain store to run closer to $100. Doing this yourself instead of paying a shop can save on the order of $300. Read the failure notes and the reply corrections below before buying a part, since not every replacement restores the one-touch-down feature and cheaper units have a reputation for short life. Adapted from a community writeup by mitch14 on AcuraZine (https://acurazine.com/forums/1g-cl-diy-faq-74/window-regulator-replacement-diy-762884/), including corrections from the follow-up discussion.
Reference
Tools Required
- 10mm socket and ratchet
- Phillips screwdriver
- Metal putty knife or thin scraper
- Needle-nose pliers
- Interior trim / panel removal tool
- Rubber stopper or wooden wedges to prop the glass
- Silicone spray
Parts Required
-
Driver's-side window regulator with motor assembly (1G CL, interchangeable with 1994-1997 Accord 2-door driver's side)
-
Butyl door sealant, as needed to reseal the vapor barrier
-
6mm nuts (only if the replacement unit ships with studs instead of bolts)
-
Silicone spray for the window tracks
Safety Warnings
- ⚠ Support the glass firmly at every stage. An unsupported window can drop inside the door and shatter.
- ⚠ The plastic vapor sheet is a moisture seal; reinstall it fully to keep water out of the door cavity and cabin.
Step-by-Step Instructions
1 Confirm the failure and source the correct part
The usual cause of a dead or sagging window on these cars is a cracked plastic pulley or guide inside the regulator, which lets the lift cable go slack or snap. Typical symptoms are glass that suddenly drops on its own, a window that strains and stalls partway up, or one that quits only in cold weather. The cable cannot be reliably repaired on its own, so plan to swap the complete regulator-and-motor unit. Because the 1G CL part matches the 1994-1997 Accord two-door driver's side, replacements are easy to find at a range of prices and quality. Note that budget units may run about a second slower and some arrive without one-touch-down; one member reported that part number 741-715 gave that feature back. Keep the receipt, as many of these carry a lifetime warranty.
2 Remove the door panel and peel back the moisture barrier
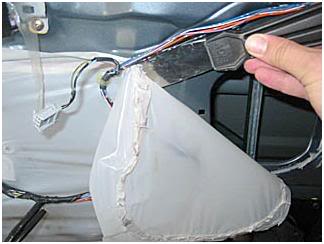
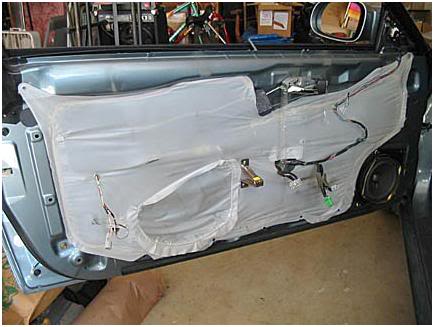
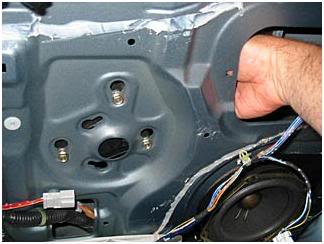
Take off the interior door panel and set the switch panel where its wiring can still reach the motor connector, since you will use the switch to position the mechanism later. Behind the panel is a plastic vapor sheet bonded on with tacky butyl sealant. This sheet is a moisture barrier and must be reinstalled, so free only the portion covering your work area. Work a putty knife between the sheet and the metal to break the sealant loose; it stays flexible enough to reseal. Pull any wiring retainer clips out of the sheet with pliers, unscrew the small armrest bracket (two screws) if it blocks access, and let the loosened sheet hang out of the way.
3 Identify the three fastener groups
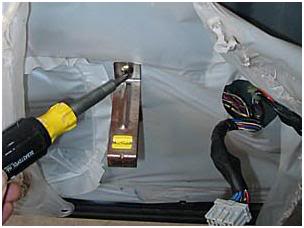
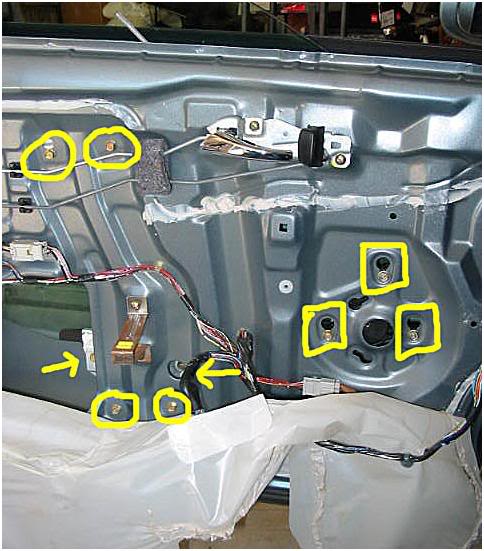
Every fastener in this job takes a 10mm socket. There are three sets to locate: four bolts holding the regulator body to the door, three bolts securing the motor (these sit in slotted holes), and two bolts clamping the window lift bracket to the glass. The outboard of the two lift bolts can only be reached through a round port in the outer door skin, so the glass must be raised to the height where that bolt aligns with the hole.
4 Prop and secure the glass
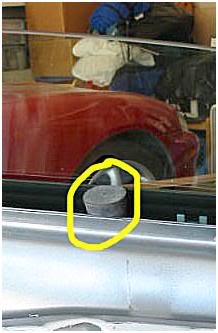
Before disturbing anything on the glass, wedge it firmly so it cannot drop and shatter. Reaching through the large service opening, lift the window until the lift bolts line up with the access port. A rubber stopper jammed into the window channel at the sill holds well; short pieces of wood or wedges placed between the glass and the sill also work if you have suitable ones on hand. Double-check that the glass is locked solidly in place.
5 Unbolt the glass from the lift bracket
With the window fully supported, take out the two 10mm bolts that join the regulator's lift bracket to the lower edge of the glass, reaching the outer one through the round access port in the door skin.
6 Raise the glass clear and re-secure it
Slide the freed glass all the way to the top and re-wedge it there. Getting the window up and out of the lower door opens the room you need to maneuver the regulator out later.
7 Disconnect the motor wiring
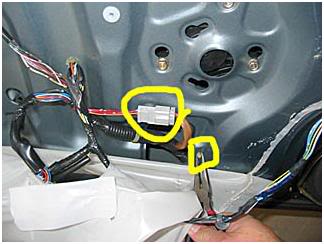
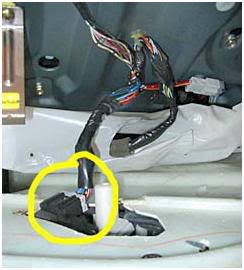
Unplug the motor's electrical connector, which sits within easy reach unlike some of the connectors met during panel removal. A small harness clip passes through the door skin next to it; squeeze it with needle-nose pliers and push it back through toward the inside, where it stays attached to the motor harness. Many replacement assemblies come with this clip already fitted.
8 Free and extract the assembly
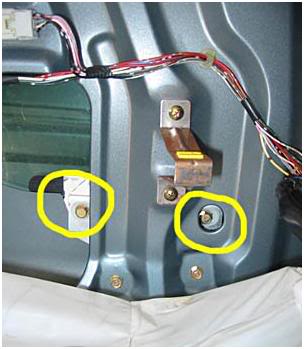
Remove the four regulator bolts. Because the three motor bolts sit in slotted holes, just loosen them rather than backing them all the way out. Work the regulator through the large opening; since its cables tie it to the motor, it will only come part way. Reach through the access hole to the side of the motor, lift the motor off its slots, then guide the motor and regulator out together through the big opening. Keep all of the removed bolts, as you may reuse them on the new unit.
9 Install the new regulator and motor
Thread the three motor bolts a few turns and leave them loose, then hook the new motor into its location from inside the door and snug the bolts. Check what came in the box first: some replacement units ship with studs rather than bolts and require 6mm nuts. Set the regulator into position and start its four bolts. These thread into thin door metal and strip if overtightened, so do not crank them down. Leaving the four regulator bolts slightly loose until after the glass is reattached lets the mechanism settle into alignment.
10 Reconnect wiring and set the lift height
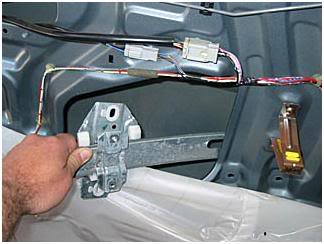
Plug the motor connector back in and seat the harness clip through the door skin. If the lift bracket is not positioned to meet the glass and will not move by hand, temporarily reconnect the switch panel, jog the motor with the switch until the bracket lines up, then disconnect the switch again before continuing.
11 Lower the glass and bolt it to the lift
Release the stopper and let the glass down by hand onto the lift bracket. It should rest securely on the bracket without extra support while you start the two lift bolts. Snug them without overtightening. If you left the four regulator bolts loose earlier, tighten them now.
12 Test operation before closing up
Reconnect the switch and run the window fully up and down several times. If nothing happens, confirm every connector is seated and that the window-lock button on the master switch is not engaged. Note that a fuse or two can blow during the swap, so check them if the window is dead. A window that will only power down, or only up, can point to the relay or the auto-down switch. Confirm one-touch-down if your replacement supports it.
13 Reseal the barrier and refit the door panel
Press the plastic vapor sheet back into its sealant to restore the moisture barrier, and reinstall the armrest bracket. Refit the door panel by hooking its top felt lip over the door's metal edge first, working along it at an angle from front to back, then pressing the retaining clips home.
Pro Tips
- 💡 If a window still strains and stalls after a new regulator, flood both window tracks with silicone spray from top to bottom and cycle the glass; sometimes sticky tracks, not the regulator, are the real problem.
- 💡 Lubricate the whole assembly generously on install, since the plastic parts in the pulley are the known weak link and fail often.
- 💡 Keep your receipt: many replacement regulators carry a lifetime warranty, and given how often these break, a free replacement later is likely.
- 💡 Cheap overseas units have a reputation for failing within months; an OEM Honda part or a warrantied unit tends to last longer.
- 💡 When refitting the door panel, set the top edge over the metal lip first and go in at an angle rather than pushing it straight on, which risks tearing the flimsy top felt.
Was this guide helpful?