Honda Fit (GE8) Door Panel Reupholstery and Aftermarket Speaker Mounting
Introduction
This guide covers two interior jobs on the second-generation Honda Fit (GE8, roughly 2009-2013): swapping the factory door speakers for an aftermarket set and re-covering the door-card insert with a fabric you actually like instead of the coarse original cloth. Both jobs start by pulling the same door panel, so it makes sense to tackle them together. Expect the reupholstery to be the demanding part: the insert has a deep hollow and a raised hump that stiff materials refuse to wrap, and several people in the source thread abandoned the fabric swap after their material wrinkled or lifted. Success hinges on picking a genuinely stretchy fabric and taking your time on the lower corner. The speaker side is more forgiving and rewards you with better sound while keeping a factory-style plug connection. Adapted from a community writeup by mdbrich on FitFreak (https://www.fitfreak.net/forums/2nd-generation-ge8-specific-diy-repair-maintenance-sub-forum/31439-diy-2009-door-fabric-speaker-grill-cutouts.html), including corrections from the follow-up discussion.
Reference
Tools Required
- Phillips screwdriver
- Flathead screwdriver
- Dremel (or rotary tool) with plastic-cutting and grinding/drill attachments
- Soldering iron and solder
- Hot glue gun with glue sticks (epoxy is a fallback)
- Sandpaper
Parts Required
-
Stretchable replacement fabric, ideally a suede that flexes like the factory cloth (do not use vinyl)
-
Aftermarket door speakers (e.g. Pioneer)
-
3M Super 90 spray adhesive
-
3M Super 77 spray adhesive
-
A few extra screws for the speaker mount
Safety Warnings
- ⚠ Remove the speaker screw completely before prying the speaker out; backing it only partway can snap a lower mounting flange.
- ⚠ Vinyl and any stiff or heavy material will not conform to the insert's hump and hollow. Expect wrinkles and lifting, and keep the original panel intact so you can revert if the new covering fails.
Step-by-Step Instructions
1 Remove the door panel
Take out the single screw hidden behind the door pull and set it somewhere safe. Under the armrest, find the four flathead access points and gently bend the retaining tabs so the armrest gains some flex and releases. Lift the panel away from the door, then unplug the window and lock wiring connector before separating the panel completely.
2 Extract the factory speaker
The stock speaker is held by one screw plus two locating tabs along its lower edge. Back that screw all the way out rather than leaving it partway in, since a partially seated screw can crack a lower mounting flange. Work the foam surround loose and lift the speaker up and out of its bottom rests.
3 Grind the mount flat for the new driver
Snap off the small plastic nubs on the back of the opening, then cut away the old speaker basket and magnet. Using the Dremel, grind the raised rim down flat so the aftermarket driver sits low enough to clear the panel; skipping this causes the speaker to foul the door when you reinstall the card. Leave the screw boss intact. Test-fit the new speaker and shave a little off the factory connector housing if the magnet needs the room.
4 Splice to the factory harness and mount the speaker
Cut the original speaker leads close to the old driver so you keep as much wire length as possible. Solder those leads to the new speaker so it plugs into the factory connector for a clean, reversible install. Drive the mounting screws through the new speaker into the holder and seat it back in the door.
5 Strip the door-card insert
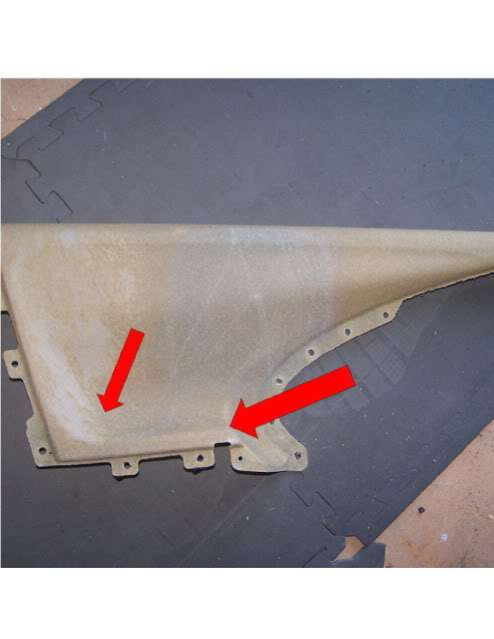
Pull the two foam pads off the top of the insert and remove the fabric-covered piece. Peel away the white liner. The insert screws are buried under a plastic filler compound: pick the caps off until you expose a black round hole, then unscrew. Release the window-sill trim by bending the prongs on its underside. Tear the old carpet/fabric off the insert and sand the surface smooth so the new adhesive grips.
6 Choose a fabric that stretches in two directions
The insert's shape is the whole challenge: a hollow plus a raised hump means the covering has to stretch every direction to lie flat. Vinyl does not work here; it refuses to wrap the second corner, and it only gets worse when the panel heats up in the sun. Follow-up posters confirmed the failure and found that even thinner materials wrinkled and would not stay seated in the hollow. Bring the stripped factory piece to a fabric store and match a stretchy suede that behaves like the original cloth.
7 Bond the new fabric to the panel
Coat the insert with 3M Super 90 in an even layer with no bumps or ridges. Spray the underside of the fabric with 3M Super 77. Let both flash for about a minute so they grab each other, then lay the fabric on working from the top downward and leaving the awkward lower corner for last. If any area stops sticking, re-spray that spot and press it down again.
8 Trim, seal, and reinstall
Cut the fabric back to the panel edges and open up the screw and speaker holes so nothing is buried. Refit the window-sill trim, then close the fastener holes with hot glue (it holds better than epoxy for this). Screw the insert down and reinstall the door panel on the door.
9 Optional: mount component crossovers inside the door
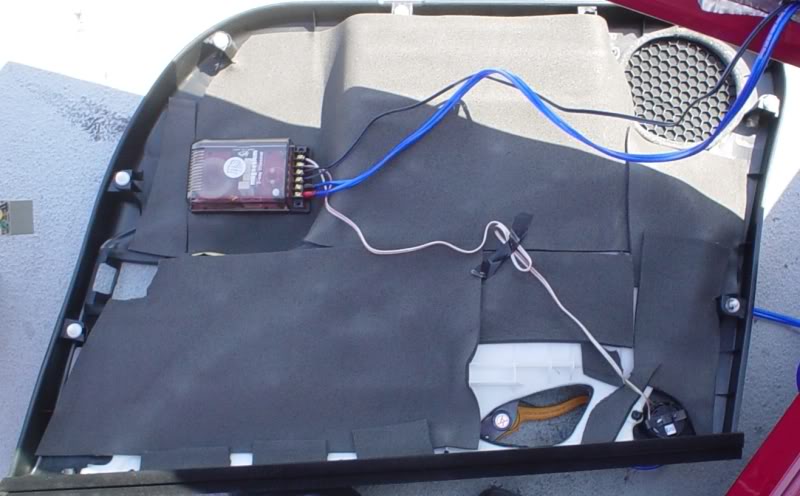
If you run component speakers, there is room for most crossovers inside the door. Dremel off the hollow plastic box on the door card and stick the crossovers down with mounting tape. If a crossover is still too large, pull out the unused foam block in the door card to free up extra clearance.
Pro Tips
- 💡 Soldering the new speaker to the cut factory leads keeps the original connector, so the install stays plug-and-play and easy to reverse.
- 💡 Bring the stripped factory insert to the fabric shop and compare stretch directly; matching the original's flex is what makes or breaks the job.
- 💡 Check your finished fabric on a hot day. Heat makes the material relax and can reveal lifting at the lower corner before you consider the work done.
Was this guide helpful?