Honda CR-Z Tein High Tech Lowering Spring and Rear Wheel Spacer Install
Introduction
This guide covers installing a set of Tein High Tech lowering springs on the Honda CR-Z (2011, ZF1) together with a pair of 20mm H&R DRM wheel spacers on the rear wheels only, using the factory OEM wheels. The Tein set is advertised at roughly 0.8 in front and 0.9 in rear; once the suspension settles, expect closer to a full 1 in of drop. The rear spacers push the back wheels out to sit flush with the fenders and even out the wheel gap without touching the fronts. The result is a modest, daily-drivable drop with noticeably less body float, reduced body roll, and a more planted feel, while keeping OEM ride comfort. The rear job is straightforward thanks to the solid rear axle; the front requires removing and disassembling each strut, so a good spring compressor and care are essential. Plan on a proper alignment afterward, since the drop typically leaves the front with slightly positive camber and toe out of specification. Adapted from a community writeup by kgb_m3&z on CRZ Forum (https://www.crzforum.com/threads/tein-high-tech-springs-20mm-h-r-spacers-installed-with-oem-wheels-pics-brief-diy.4774/), including corrections from the follow-up discussion.
Reference
Tools Required
- Torque wrench
- Impact gun or impact wrench (air tools help but are optional)
- Spring compressor
- Deep sockets: 12mm, 14mm, 17mm, 19mm
- Open-end wrenches: 17mm and 19mm
- Allen (hex) key set to hold the strut shaft while loosening the top nut
- Needle-nose pliers
- Two floor jacks (a third is helpful for lining up the rear hub)
- One or more jack stands (use at least two)
Parts Required
-
Tein High Tech lowering spring set (front and rear), advertised drop 0.8 in front / 0.9 in rear
-
H&R 20mm DRM wheel spacers, rear pair (5x114.3 bolt pattern, 64.1mm center bore, 12x1.5 studs, part# 4065640)
-
Rubber spring cups / isolators for the new rear springs
-
Wheel alignment (professional service, strongly recommended after the drop)
Safety Warnings
- ⚠ A compressed coil spring stores enough energy to cause serious injury. Use a quality spring compressor, verify it is fully seated, and never place any part of your body in line with the spring.
- ⚠ Always support the vehicle on jack stands before working underneath; do not trust a floor jack alone.
- ⚠ Do not let the brake hose or ABS/sensor cable hang from or support the weight of the removed strut.
- ⚠ Bump stops: the original poster left the bump stops uncut and confirmed with Tein that trimming is unnecessary for a drop this small, and verified the same with another owner. Note that some members point out most springs and their instructions call for trimming proportional to the drop, so confirm the requirement with your spring maker before deciding.
- ⚠ Have a professional alignment performed after the install; the drop leaves the front geometry out of factory specification.
Step-by-Step Instructions
1 Lift and support the rear of the vehicle
Begin with the rear. Raise the back of the car and support it securely on jack stands, allowing both rear wheels to hang free. Because the CR-Z uses a solid rear axle, letting both sides droop fully unloads the rear springs and makes them far easier to lift out. Never rely on the jack alone while working under the car.
2 Remove the rear wheels
Break the lug nuts loose, then remove both rear wheels using a 19mm socket. Set the wheels aside where they will not roll.
3 Disconnect the rear shock from the trailing arm
Locate the lower shock mounting point and remove the 14mm bolt that fastens each shock to its rear trailing arm. Freeing the shock lets the trailing arm swing down further, releasing tension on the rear coil.
4 Swap in the new rear springs
Press down on the rear hub to gain clearance and lift the old spring out of its perch. Fit the rubber spring cups (isolators) onto the top and bottom of each new Tein spring, then, while pushing the hub down again, seat the new spring into position with the isolators correctly located.
5 Reconnect the rear shock and torque
Use a spare jack under the hub to raise the trailing arm until its lower shock eye lines up with the shock. Start the 14mm bolt by hand, then torque it to specification. Repeat the spring swap on the opposite rear corner.
6 Install the H&R 20mm rear spacers
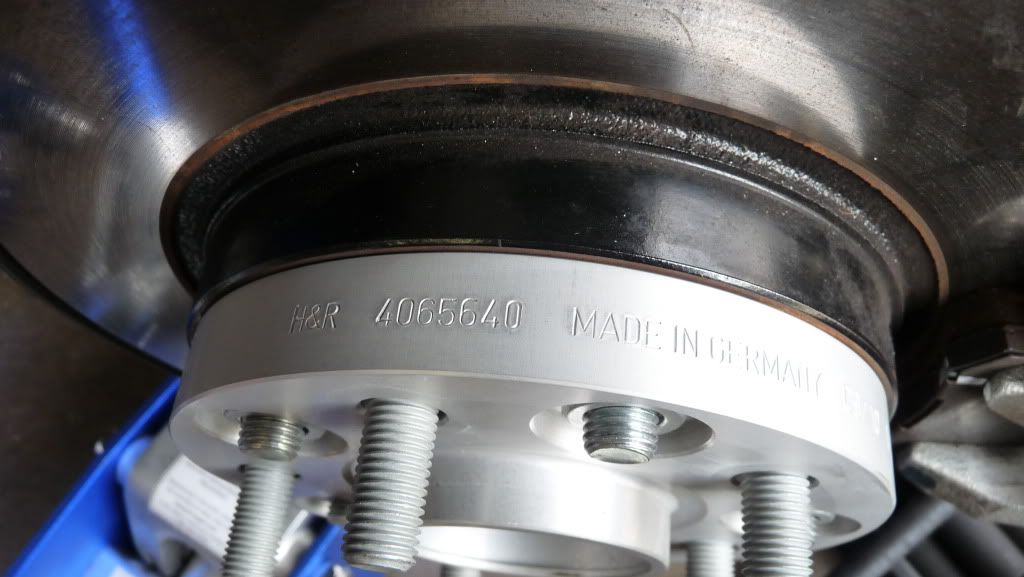
Clean the hub face and fit an H&R 20mm DRM spacer (part# 4065640) to each rear hub, then torque its mounting lugs. This is a 5x114.3, 12x1.5, 64.1mm-bore bolt-on DRM spacer that carries its own studs. Note that although H&R's vehicle lookup lists this number for the 2011 Honda Accord rather than the CR-Z, the fitment is shared and it is the correct part for OEM CR-Z wheels. On factory 16 in wheels the back of the rim is dimpled so the original hub studs clear and the wheel still seats flat against the spacer.
7 Mount the rear wheels onto the spacers
Refit each rear wheel onto the new spacer studs and torque the lug nuts to roughly 78 ft-lb in a star pattern. Lower the rear of the car.
8 Lift the front and remove the front wheels
Move to the front. Raise and support the front of the car on jack stands and remove both front wheels with a 19mm socket.
9 Free the top strut nut, brake line, and sensor cable
At the top of the strut, hold the shaft still with an Allen key seated in its center while loosening the 17mm nut with a 17mm open-end wrench, then back it off. With needle-nose pliers, detach the plastic ABS/brake sensor cable clip from the strut and pull off the rubber grommet that retains the sensor cable. Using a 12mm socket, unbolt the brake line and its bracket from the strut body so the line is not stressed when the strut comes out.
10 Detach the strut from the hub and sway bar
Steady the two large through-bolts joining the strut to the front hub with a 19mm open-end wrench while backing off the nuts with a 19mm socket, and remove both. Undo the upper sway-bar end link with a 14mm socket. The strut assembly can now be pulled free from the vehicle.
11 Disassemble the strut and fit the new front spring
Clamp the removed strut in a spring compressor and compress the coil until the top mount is unloaded. Hold the shaft with an Allen key against a 19mm open-end wrench, or use a 19mm deep socket on an impact gun, and remove the 19mm top bolt. Lift off the upper plastic bracket and spring housing, then slide off the old spring. Fit the new Tein spring, reinstall the plastic housing and bracket onto it, compress the spring lightly by hand to align everything, and reinstall the 19mm top bolt. Keep clear of the compressor at all times, as a compressed spring stores dangerous energy. Repeat for the other front strut.
12 Reinstall the front struts and torque
Refit each strut assembly into the car, reconnecting the two 19mm hub bolts, the 14mm sway-bar end link, the 17mm top nut, the brake line bracket, and the sensor cable retainers. Torque all fasteners to specification, then remount the front wheels and torque the lug nuts.
13 Get a post-drop alignment
Lower the car fully and let the suspension settle over a short drive. Have a reputable shop perform a four-wheel alignment: after this drop the front commonly shows slightly positive camber and incorrect toe, which the shop can dial back to a slight negative camber with corrected toe. This noticeably improves ride and highway stability. The rear spacers alone do not alter alignment.
Pro Tips
- 💡 Letting both rear wheels hang fully takes the load off the rear coils and makes them much easier to remove and refit on the solid-axle CR-Z.
- 💡 20mm is a good balance on the rear with OEM wheels; going to 25mm tends to make the fronts look too tucked and adds unnecessary weight and width.
- 💡 Factory 16 in CR-Z wheels have relief dimples on the back face that clear the original studs, so the rim still sits flush against the spacer.
- 💡 The rear-only spacers do not require a realignment by themselves; the alignment is needed because of the lowering springs.
- 💡 After the springs settle, the real-world drop is closer to a full 1 in even though Tein rates the set at 0.8 in front / 0.9 in rear.
- 💡 Consider re-torquing the spacer lugs after a few driving cycles as a precaution.
- 💡 A proper alignment plus tires set to about 35 psi (nitrogen fill optional) makes a noticeable difference on the freeway.
Was this guide helpful?

