Honda Accord to TSX Switchblade (Flip) Key Conversion
Introduction
This guide covers converting the standard remote key fob from a 2008-2012 Honda Accord sedan into a 2009 Acura TSX flip-out ("switchblade") key. The project transplants the Accord's remote electronics - the lock, unlock and trunk switches, plus the optional status LED - into the TSX switchblade housing, then relocates the vehicle's immobilizer transponder so the reworked key can operate the remote functions and start the car. It appeals to owners who want the folding-key look without paying dealer prices for a purpose-built remote. Be realistic before starting: this is delicate fine-pitch soldering inside a cramped shell, and the original discussion records several problems that were never fully solved (a key that would not crank, an unreliable panic button, and a board stack too thick to close). Treat it as an experiment on a spare key rather than a guaranteed result. Adapted from a community writeup by Marc08EX on DriveAccord (https://www.driveaccord.net/threads/diy-09-tsx-switchblade-conversion-for-08-sedans.23134/), including corrections from the follow-up discussion.
Reference
Tools Required
- Fine-tip soldering iron
- Solder and desoldering wick or pump
- Small precision screwdrivers (Phillips and flat)
- Fine flush cutters
- Tweezers
- Multimeter (for bench testing)
- Rotary tool or hobby knife (to shave the housing)
- Small drill bit (for backing out a stripped screw)
Parts Required
-
2009 Acura TSX switchblade (flip) key fob, uncut
-
Thin insulated hookup wire
-
Insulating material (Kapton tape or thin plastic film)
-
CR-type coin cell battery (if the original is reused elsewhere)
Safety Warnings
- ⚠ This modification has a low documented success rate; the original builder could not reliably get the key to start the car or the panic button to work. Attempt it only with a spare key, never your only key.
- ⚠ Go slowly on the immobilizer retaining screw. Stripping it can force you to drill it out and risk damaging the key.
- ⚠ Fine-pitch desoldering easily destroys the tactile switches. Practise on a scrap board if you are not experienced with small SMD-style work.
Step-by-Step Instructions
1 Source a TSX switchblade key and confirm what the dealer cannot do
Obtain a 2009 TSX flip key to use as the donor housing; forum members found them online for roughly $35 against $65-$80 at Acura dealers. Understand the core limitation first: the TSX remote transmits on a different FCC ID than the Accord, so a dealer cannot simply program a TSX remote to drive your Accord's lock, unlock and trunk buttons. A dealer can program the immobilizer alone so the blade will start the engine, but the remote buttons will stay dead. That is exactly why this build moves the Accord's own remote board into the TSX shell instead of relying on the TSX electronics. Buy the blade uncut and have it cut to your key code.
2 Disassemble the OEM Accord key fob
Split the outer case, then open the inner plastic module (the one carrying the Siemens marking). Fully apart, you should be left with the front cover, the button pad, the circuit board, the coin battery, and the back cover. Note the orientation of each piece before setting it aside.
3 Disassemble the TSX switchblade fob the same way
Open the TSX flip key to expose its circuit board and empty housing. Laying the two boards side by side is the heart of the job: the TSX board and housing define where each component must finish, while the Accord board supplies the electronics that actually talk to your car.
4 Map the Accord components onto the TSX board layout
Compare the Accord board against the TSX board and mark where the lock, unlock and trunk switches (and the LED, if you keep it) must sit so they align with the TSX button positions. Plan the routing now so the later soldering has a clear target.
5 Desolder the switches and LED from the Accord board
Gently lift the lock, unlock and trunk tactile switches off the Accord board; remove the LED as well if you want the indicator to work. Take your time - several builders snapped the tiny legs or terminals off the switches. When freeing each switch, release two opposite corners rather than adjacent ones to avoid twisting and shearing the contacts.
6 Solder fly leads to each switch and the LED
Attach a short length of fine insulated wire to each removed switch and to the LED, so every component can be repositioned away from its original pad without straining a joint.
7 Position the components in the TSX layout with insulation
Seat each switch and the LED at its planned TSX location. Slip a layer of insulating material between every component and the board so nothing shorts against the copper. This step and the two that follow can be done in whatever order the fit allows - work by feel.
8 Trim and solder the leads back to their pads
Cut each wire to length and solder its far end to the pad it originally served. Because the pads sit very close together, tin and route each lead carefully so neighbouring holes are not bridged by stray solder.
9 Cut the trunk opening and thin the TSX housing
Trace and cut the trunk-button opening out of the white plastic inner cover of the TSX key. A key correction from the thread: the rebuilt board stack ends up too thick to close, so the fob will not seat or align properly. The remedy is to shave a section of plastic out of the TSX inner enclosure (matching jayknight's photos) to make room for the taller assembly.
10 Relocate the immobilizer transponder into the blade
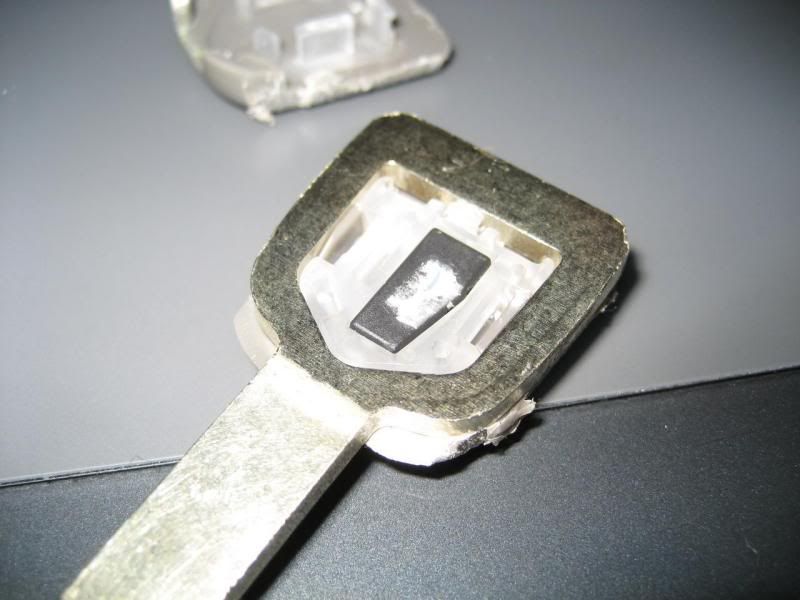
The key must carry the immobilizer to start the engine. Important: the chip may not be on the circuit board at all. As members discovered on valet and TL keys, the transponder can be buried inside the blade or rotating section of the original key, so check there before assuming it lives on the board. Extract the immobilizer from your original Honda key and fit it into the switchblade. Backing out the retaining screw can strip it easily - go slow, since one builder had to drill his out.
11 Bench-test every function, then reassemble
With the board still accessible, verify lock, unlock, trunk, panic and the LED, and confirm the key cranks the engine. Watch for the two documented failure modes: the panic button often stops responding once the halves are clamped together (a suspected pressure short), and the immobilizer or remote may not be recognized if the chip was not relocated correctly. Only close and reassemble the fob after everything checks out.
Pro Tips
- 💡 Buy the switchblade blank uncut and have a locksmith or dealer cut it to your key code before you start the electronics work.
- 💡 Consider leaving the LED out entirely. It was seen protruding past the board and was suspected of stopping the case from clipping shut, and skipping it simplifies the build.
- 💡 Leave the coin battery in its original position - it was ruled out as the cause of the fit problem.
Was this guide helpful?
