DIY Front Lip for the Honda Fit Using Garage-Door Weather Seal
Introduction
This budget mod adds an aggressive-looking chin lip to the front of a second-generation Honda Fit (GE8, roughly 2009-2013) using a length of rubber garage-door bottom seal instead of a molded plastic spoiler. The flexible weather stripping bolts and tapes to the lower edge of the front bumper, dropping the visual ride height and mimicking an OEM sport lip while costing only about $15-25 in total. Because the rubber is soft and resilient, it shrugs off the curb strikes and driveway scrapes that would crack a hard plastic lip, and it can be replaced cheaply if a rough winter finally destroys it. The technique works on base and sport trims alike, and members report success on other Honda platforms as well. Longevity depends heavily on climate: it holds up well through rain and summer heat but takes a beating from snow, salt, and ice. Adapted from a community writeup by sandblasted on FitFreak (https://www.fitfreak.net/forums/2nd-generation-ge8-specific-diy-repair-maintenance-sub-forum/59704-diy-front-lip.html), including corrections from the follow-up discussion.
Reference
Tools Required
- Phillips #2 screwdriver
- Car jack and jack stands
- Scissors or utility knife (to trim the seal to length)
- Turret punch or drill (optional, for pre-punching screw holes)
- Clean rag
Parts Required
-
Garage door bottom seal (rubber weather stripping), roughly $13 from a hardware store
-
3M double-sided tape (outdoor heavy-duty, 1 inch wide)
-
1/2" Phillips screws
-
Wide thin washers (optional, to spread load and prevent tear-through)
-
70% isopropyl alcohol (surface cleaner)
-
3/4" plastic push retainers (optional alternative or supplement to screws)
Safety Warnings
- ⚠ Support the car on jack stands before working underneath; never rely on the jack alone.
- ⚠ Do not depend on tape alone in high winds or highway speeds; add screws for security.
- ⚠ In snow, salt, and repeated hard scraping the rubber will eventually tear away, so plan on periodic replacement in harsh winter climates.
Step-by-Step Instructions
1 Gather materials and cut the seal to length
Pick up a garage door bottom seal from a hardware store; a single piece runs about $13 and provides enough rubber for one front bumper. Hold it up against the bumper and trim it with scissors or a utility knife so it spans the full width of the front end. Note that packaging and profile vary by region, so match the length to your own bumper rather than a fixed measurement.
2 Choose the seal orientation
The bottom seal has several distinct faces. Decide which face bonds to the bumper before applying any adhesive, because this sets whether the lip hangs straight down or tucks back under the car. Applying the tape to the longer face angles the rubber inward beneath the bumper for a subtle, factory-style look; other orientations leave it projecting outward like a downforce splitter. Dry-fit both ways and pick the profile you prefer.
3 Clean the bonding surfaces
Wipe both the underside of the bumper and the mating face of the rubber with 70% isopropyl alcohol and let them dry. Removing road film, wax, and mold-release residue from both surfaces is the single biggest factor in getting the adhesive to hold, especially in wind and weather. Skipping this is the most common reason the tape lets go early.
4 Apply the double-sided tape to the seal
Run 3M double-sided tape along the chosen face of the rubber. Use the outdoor heavy-duty variety in the 1 inch width so it survives moisture and temperature swings. Lay the tape in short sections rather than one continuous strip; this lets you bend and shape the rubber around the bumper's curves without the strip fighting you or peeling at the corners.
5 Raise and support the car
Lift the front of the car with a jack and set it on jack stands. The extra clearance makes it far easier to reach the lower bumper edge and to drive screws cleanly, and it keeps you from working under a vehicle held up by the jack alone.
6 Press the seal onto the bumper edge
Starting at one end, peel the tape backing and press the rubber onto the lower lip of the bumper at your chosen depth, working across in short sections. Mounting it near the outer edge gives the most pronounced lip; tucking it higher hides it more. Follow the contour of the bumper as you go so the tape stays in full contact and the rubber does not build up spring tension that later pops it loose.
7 Fasten with screws and washers
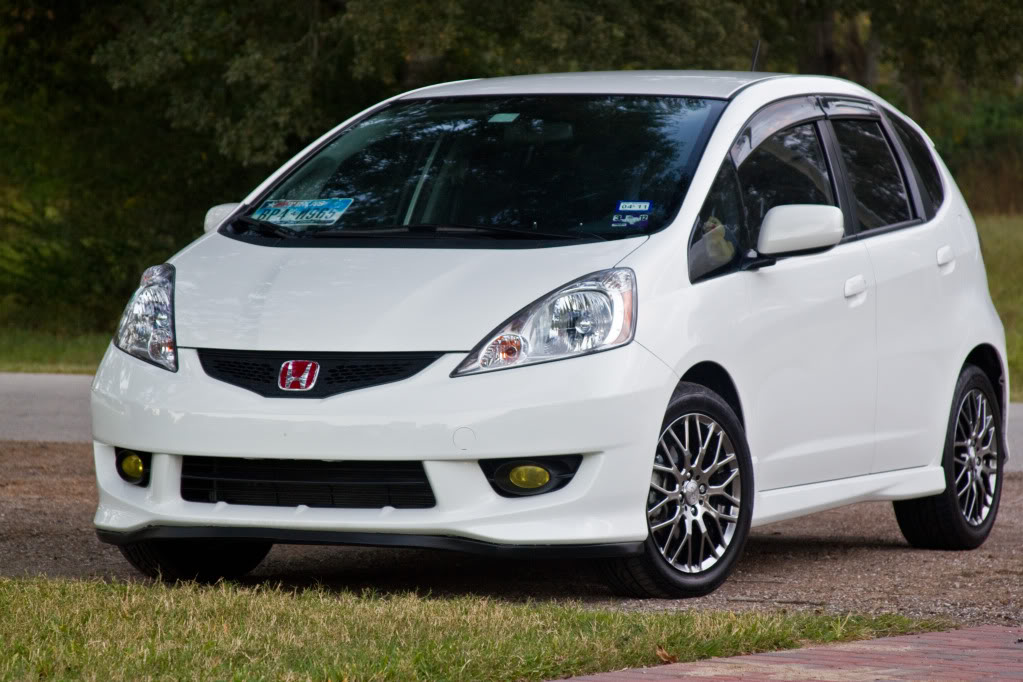
Reinforce the tape with 1/2" Phillips screws driven through the seal into the bumper every few inches, spaced closer where impacts are likely. Push each screw through the rubber first and only then begin turning it; otherwise the screwdriver spins the rubber and lifts it off the tape. A hand screwdriver gives better control than a power drill for this. Adding a wide thin washer under each screw head spreads the load so the fastener does not rip through the soft rubber during a scrape.
8 Inspect and reinforce
Walk the length of the lip and check for any section where the tape is sagging or pulling away. Add another screw wherever the bond looks weak or the rubber floats free of the bumper. As an alternative fastening method, some builders pre-punch holes in the rubber with a turret punch, bond the lip, then drill matching holes and set 3/4" plastic push retainers for a cleaner, sturdier result.
9 Dress and maintain the lip
Lower the car and finish the rubber with a tire-shine or plastic protectant spray to darken it and bring back the gloss; reapplying it periodically also keeps the rubber supple so it flexes rather than cracks on impact. If you want extra abrasion resistance or a custom look, some owners wrap the leading face in colored duct tape, applied to a clean surface for good adhesion.
Pro Tips
- 💡 Work the tape and seal in short sections so you can shape the rubber to the bumper's curves without it peeling back.
- 💡 Push each screw through the rubber before you start turning it, or the screwdriver will twist the seal off the tape.
- 💡 A hand screwdriver gives more control than a drill and reduces twisting of the soft rubber.
- 💡 Wide thin washers under the screw heads keep fasteners from tearing through when the lip takes a hit.
- 💡 A tire-shine or protectant spray both restores the black finish and keeps the rubber soft so it scrapes without cracking.
- 💡 The mod is fully reversible and cheap to redo, so if the first attempt looks off, peel it and try again.
Was this guide helpful?


