DIY Budget Short Ram Intake for the Honda Fit
Introduction
This guide covers assembling a low-cost short ram intake for the first-generation Honda Fit from off-the-shelf Spectre parts-store components, a popular alternative to spending several hundred dollars on a name-brand kit. The parts run roughly $50-65 total. The payoff is a tidy engine bay, a more assertive induction note that stays civil even at wide-open throttle, and, by many owners' accounts, a small bump in throttle response and mixed-driving fuel economy. It fits both manual and automatic cars with no clearance conflicts once the filter is positioned correctly. Because this is a short ram and not a true cold air intake, where the filter sits matters: routing it forward of the battery and away from the radiator's heat keeps intake temperatures in check. Adapted from a community writeup by Sid 6.7 on FitFreak (https://www.fitfreak.net/forums/fit-engine-modifications-motor-swaps-ecu-tuning/24533-official-ssr-intake-diy-thread-sid-short-ram-intake.html), including corrections from the follow-up discussion.
Reference
Tools Required
- Flat-blade screwdriver
- Cordless drill
- 5/8" hole saw or drill bit
Parts Required
-
Spectre 3" high-flow air filter (P/N 8132, ~$24.99)
-
Spectre chrome 90-degree elbow tube (P/N 8698, ~$10.99) — buy two for the dual-bend layout
-
Spectre 3" to 2.5" silicone coupler/reducer (P/N 8752, ~$6.99)
-
Spectre chrome breather filter (P/N 3992, ~$8.99)
-
Optional 45- or 60-degree elbow as an alternative second bend
-
Petroleum jelly to seat the IAT o-ring
Safety Warnings
- ⚠ Perform this modification at your own risk; it is not endorsed or warrantied by the vehicle manufacturer or the forum.
- ⚠ Handle the IAT sensor gently — dropping or knocking it can damage it.
- ⚠ Clear every plastic shaving from drilling before assembly so debris is not ingested by the engine.
- ⚠ A loose or crooked IAT creates an air leak that cuts suction and response; confirm a snug, square fit and inspect the plastic pipes for cracks.
- ⚠ Never hose down a hot engine, and keep water out of the filter element — cover it with a plastic bag before cleaning nearby.
Step-by-Step Instructions
1 Remove the factory intake and preserve the IAT
Remove the OEM airbox and intake tubing following the standard Fit airbox-removal procedure. Work the intake air temperature (IAT) sensor free from the factory tube gently — do not knock or drop it. Leave the sensor plugged into the harness; disconnecting it is the usual reason a temporary check-engine light appears. Save the rubber o-ring that seals the IAT to the stock tube, since it gets reused in the new elbow.
2 Seat the reducing coupler on the throttle body
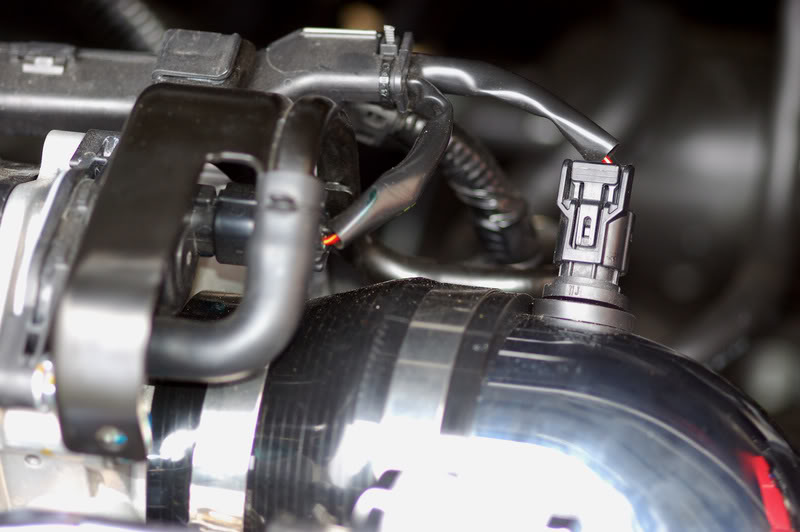
Fit the 3"-to-2.5" silicone reducer onto the throttle body with the smaller 2.5" end against it. Push it on fully until it sits flush against the locating tab — going all the way here is what gives the IAT wiring enough slack later. Keep the worm-gear clamp loose for now so the assembly can still be turned into position.
3 Drill the IAT port and transfer the o-ring
Mark a point near the midpoint of the outer curve on a chrome 90-degree elbow. Cut the sensor port with a 5/8" hole saw or drill bit, then clear away every plastic shaving so nothing gets drawn into the engine. Press the o-ring you saved from the factory tube into the new hole; a dab of petroleum jelly in the groove helps it seat and stay put, since the o-rings can be fiddly.
4 Build the elbow run and clear the battery
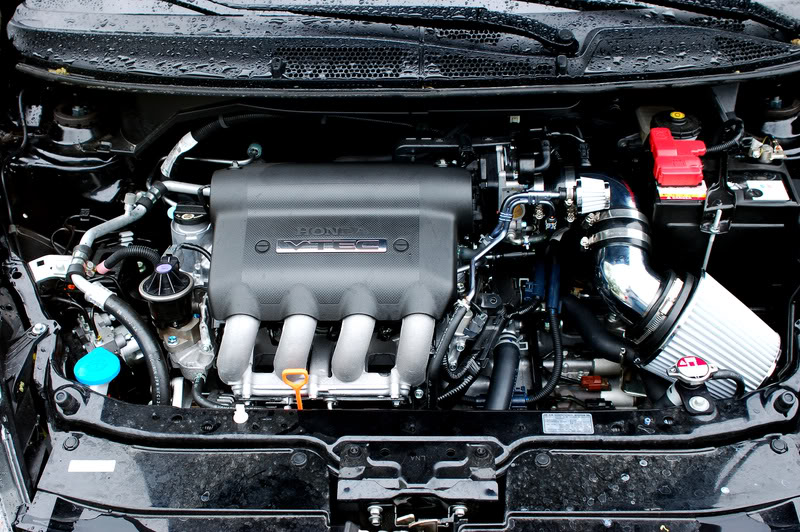
Slide the drilled 90-degree elbow into the 3" side of the reducer. For best results add a second bend so the filter ends up ahead of the battery and out of the radiator's heat path — most owners run two 90-degree elbows, though a 90 paired with a 45 or a 60 also works. To make room, loosen the battery hold-down and shift the battery toward the driver's side, and reposition the radiator hose clamp if needed. Snug the clamps just enough to hold the layout together.
5 Mount the air filter

Push the 3" open-element filter onto the free end of the elbow run and secure its clamp. Check that the filter clears the battery and the closed hood, and that its weight is not leaning on anything that could shake it loose — an unsupported filter has been reported to vibrate and fall off. The dual-bend layout generally makes the whole assembly rigid enough to stay quiet.
6 Reinstall the IAT sensor

Insert the IAT sensor into the o-ring until it is fully seated and snug, sitting as square to the tube as you can manage. A sensor that goes in crooked can leak air and dull throttle response, so relieve any wiring tension first — cutting a small semicircular notch at the edge of the coupler, or sliding the clamp slightly inboard, both free up slack. Reconnect the sensor plug if it was ever unplugged.
7 Fit the crankcase breather filter
Slide the small chrome breather filter onto the metal breather tube that used to join the factory intake. Keep in mind this port vents warm crankcase air; if you prefer, run a length of hose from it downward and rearward, below the engine, rather than fitting the filter directly at that spot.
8 Tighten, drive, and re-check
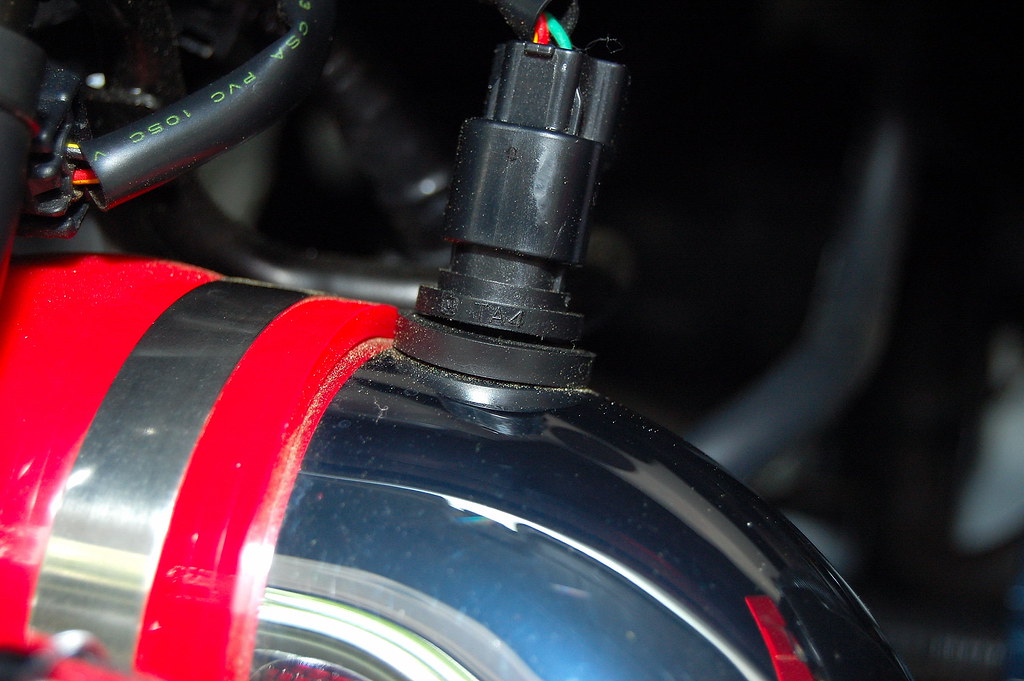
Go around the assembly with a screwdriver and firmly tighten every worm-gear clamp to seal each joint. Drive 50-100 miles, then re-tighten all clamps once the couplers have settled. If a check-engine light appeared from disturbing the IAT, it normally clears itself after several start-and-drive cycles, so no dealer trip is needed. Clean and re-oil the filter periodically per its own kit, and bag it before washing the engine bay.
Pro Tips
- 💡 Two 90-degree bends give a deeper induction note and put the filter in cooler air; a single 60-degree bend was reported to drone excessively past 2000 rpm.
- 💡 Seat the throttle-body coupler fully against its locating tab to gain enough IAT wiring slack and keep the sensor from sitting at an angle.
- 💡 A middle clamp alone can hold the two elbows together, but adding a short silicone coupler between them is more secure against leaks.
- 💡 K&N-style oiled filters use a recharge kit (~$10-15); dryflow filters clean with AEM dry cleaner (~$8), and a Fujita element washes in lukewarm soapy water, air-dries, and needs no re-oiling.
- 💡 Owners report roughly 30 mpg in mixed city driving and stronger higher-rpm pull, with some economy traded back when driven hard.
Was this guide helpful?
