Acura RDX Automatic Transmission Fluid Change and Accurate Level Reading
Introduction
This guide covers reading the automatic transmission fluid level accurately and performing a drain-and-fill on the first-generation, turbocharged Acura RDX (2007-2012). The RDX transaxle is refilled through an awkward top-mounted fill bolt and checked with a dipstick whose usable span is only a few millimetres, so getting a repeatable reading is the real challenge. You would do this to renew the fluid on schedule, to flush out break-in and clutch wear particles that the saturated internal magnet can no longer hold, or simply to confirm the level after service. The central idea is that a hot reading is a single-shot measurement that drifts as the transmission sits, while a cold reading taken after the car has rested overnight repeats reliably; once you know the fixed offset between the two you can verify the level any time from a cold check. Adapted from a community writeup by dcmodels on AcuraZine (https://acurazine.com/forums/1g-rdx-diy-faq-161/transmission-oil-level-reading-oil-change-comments-801122/), including corrections from the follow-up discussion.
Reference
Tools Required
- 1/2-inch-drive 17mm socket
- 15-inch (or longer) socket extension
- Wobble / universal adaptor
- 14-inch breaker bar
- Torque wrench
- Wide drain pan
- Quart measuring container
- Flashlight
- Quarter coin or flat blade (for the intercooler cover fasteners)
- Nitrile gloves
- Turkey baster with a small funnel (for top-ups through the dipstick hole)
- Clean plastic bags (to cap open intake ports)
- Safety-wire pliers and a 1/16-inch drill bit (optional, for safety-wiring the drain plug)
Parts Required
-
Honda ATF DW-1 (about 4 quarts per drain-and-fill; roughly 12 quarts for a triple)
-
18mm copper sealing washer for the drain plug (OEM aluminum washer is thicker)
-
Silicone / dielectric grease (anti-corrosion for the drain bolt head)
-
Superlube grease (for the intake hose ends only)
-
0.033-inch soft 304 stainless safety wire (optional)
-
Inline magnetic cooler-line filter (optional)
Safety Warnings
- ⚠ Draining fluid is very hot -- wear nitrile gloves and keep skin clear of the stream.
- ⚠ Safety-wire pig-tails are razor sharp; a stray tip can require stitches or cause an eye injury, so bend the ends safely out of the way.
- ⚠ Keep high-pressure water away from the under-hood fuse box beside the brake master cylinder.
- ⚠ Do not over-torque the drain plug into the aluminium case threads.
- ⚠ When cycling through the gears on a drive, do it in a safe place such as a parking lot, never on the roadside.
Step-by-Step Instructions
1 Rinse the fill-bolt recess a day in advance
The fill bolt sits in a pocket that collects road grime, and anything that drops in while the bolt is out goes straight into the gearbox. With the engine completely cold, the day before you service the transmission, pour roughly two gallons of water over the fill area to wash loose dirt away. If it is badly caked, first apply an aluminium-safe engine cleaner (the engine-specific Simple Green formula, not the general grocery product), then rinse. Keep any high-pressure stream away from the under-hood fuse box, which sits just inboard of the brake master cylinder; a light wetting there is harmless but a hard jet is not. Driving the car afterward lets engine heat dry the area so no water remains when you open the fill hole.
2 Expose the ATF fill bolt
The fill bolt has a 17mm head stamped "ATF" and lives on top of the transaxle on the passenger side, about 15 inches down and slightly below the brake master cylinder (the owner's manual shows its location in a line drawing). First remove the turbo intercooler cover: turn its four slotted fasteners a quarter turn with a coin, jiggle the cover so the pins release, and lift it clear. Then remove the roughly 12-inch, 90-degree air intake tube that runs from the airbox to the firewall. Before touching its two hose clamps, note the yellow index mark showing which slot the screw occupied (the fourth slot from the end on the original car); if the mark is gone, count the slots and write the number down so you can retorque to the same point. Slip the wire loom out of its rubber slot, noting the white wrap that marks its position.
3 Remove the intake tube and cap the ports
Free the airbox end of the intake tube by twisting it upward a quarter turn, then pull the other end off the firewall connection. Cover both open ends -- the airbox outlet and the engine-side intake -- with clean plastic bags so nothing falls in. Set the tube aside. When it goes back on later, wipe a very thin film of Superlube grease inside the hose ends so they do not bond themselves to the plastic fittings; do not substitute silicone dielectric grease here, as silicone products are not appropriate on this intake unless labelled emissions-safe.
4 Open finger room above the transaxle
At the rear passenger corner of the battery, two emission hoses -- each a little fatter than the positive battery cable that curves around the back of the battery -- are held by a white plastic C-clip, one hose above the other. Lift the top of the clip with one finger and push the upper hose horizontally toward the fender until it pops out; the lower hose can stay in place. Do not disturb the battery cable or its clamp, as moving it frees no useful space. This opens just enough of a gap to drop a hand down to the fill bolt. Confirm you can actually grip the bolt by hand before committing a wrench to it -- anyone with larger-than-average hands may have to pull the whole airbox instead.
5 Crack the fill bolt loose
Because the tool must angle past the brake master cylinder, reach for a 1/2-inch-drive 17mm socket carried on a 15-inch (or longer) extension with a wobble adaptor, turned by a 14-inch breaker bar. Seat the socket squarely on the offset bolt head, since the extension will sit at a slant. Expect a loud pop as it breaks free -- that is normal. Loosen it now, before draining, so you have confirmed you can open the fill point; then leave it snug until the transmission is empty. If you are right-handed you will still reach this bolt with your left hand.
6 Drain the fluid and measure it exactly
Wear nitrile gloves -- the fluid comes out extremely hot. Drain right after driving so the fluid is warm and carries more suspended sludge out with it. Remove the drain plug, loosen or pull the dipstick to vent, and let the transmission empty into a wide pan; leaving it to drain for around 20 minutes yields the most. The factory refill figure after a drain-plug drain is 3.5 quarts, but in practice just over 4 quarts usually comes out. Since that volume varies, catch every drop and measure it in a quart container to the ounce -- that exact amount is what you will put back. Inspect the magnetic drain plug: a heavily coated or saturated magnet indicates significant wear metal and argues for a more thorough fluid replacement.
7 Reinstall the drain plug
Fit an 18mm copper sealing washer (the OEM aluminium washer is about twice as thick). The factory torque specification for the drain plug is 36 ft-lbs. Some owners deliberately run it lower -- 225 in-lbs (19 ft-lbs), with the threads and washer lubed with transmission fluid -- to reduce wear of the steel bolt on the aluminium case threads; note that this is below the factory value and is paired with safety-wiring the plug. After the plug is seated, a smear of clear silicone (dielectric) grease on the bolt head with a cotton swab keeps it from corroding and wipes off easily later.
8 Refill with the measured amount
Refill with fresh Honda ATF DW-1, matching the exact volume you drained. Two routes work. Through the fill bolt you can pour all four quarts in quickly, but the deep, blind location and slipping hose connections make a clean funnel setup difficult. Many owners find the dipstick tube easier: a tube-and-funnel that fits it well lets you fill without ever reaching the ATF bolt again. For small corrections, insert a turkey baster (bulb removed) into the dipstick hole and drop a small funnel into its top -- a fast way to add a few ounces, though not to move quarts. Only one baster in a set is likely to fit, so test yours; small cosmetic funnels can also work.
9 Take a preliminary post-fill check
You do not want to drive any distance at the wrong level, so get close before checking properly. With the car stationary, start the engine and move the selector slowly through every position, including Reverse and Park, a couple of times, pausing about 3-5 seconds in each. Shut the engine off, wait 5 minutes, and read the dipstick. This is only a rough estimate, but enough to confirm you are near the correct level. If it looks right, drive once around the block, return to level ground, wait about 15 minutes, and read again, topping up with the baster if needed. Do this with the engine cold or after it has rested a couple of hours.
10 Warm the engine and take an accurate HOT reading
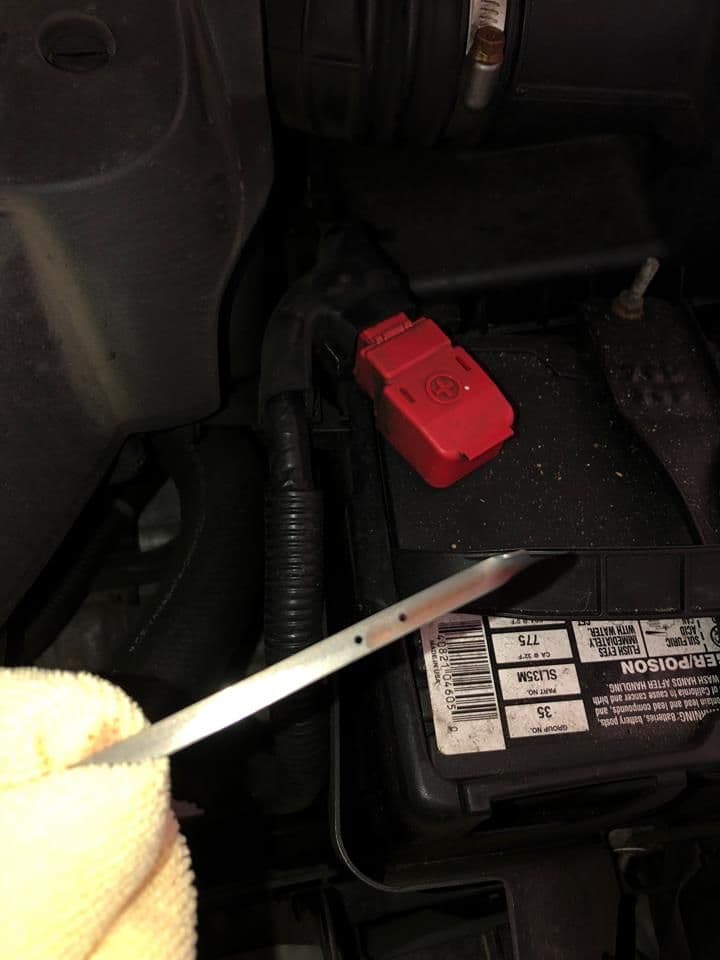
The owner's manual says to run the engine until the radiator fan cycles on once (but not twice), with the heater and A/C off. Below about 80F ambient, idling alone may never trigger the fan -- one attempt ran 38 to 40 minutes with no result. Instead, let the engine reach normal temperature at idle (the MID temperature gauge showing 7 bars), then hold 2000 rpm until the fan runs once. The original writer argues the manual's true intent -- echoed by several no-load warm-up steps in the RDX service manual -- is to hold 3,000 rpm in Park or Neutral until the fan comes on; he prefers a lower 2000 rpm after an idle warm-up to spare the flat-follower valvetrain on cold oil. When the fan stops, wait 10 seconds, shut off, and pull the dipstick right at about 90 seconds. A reading taken about 60 seconds after a single fan cycle has also proven accurate for one owner.
11 Establish a repeatable COLD reading
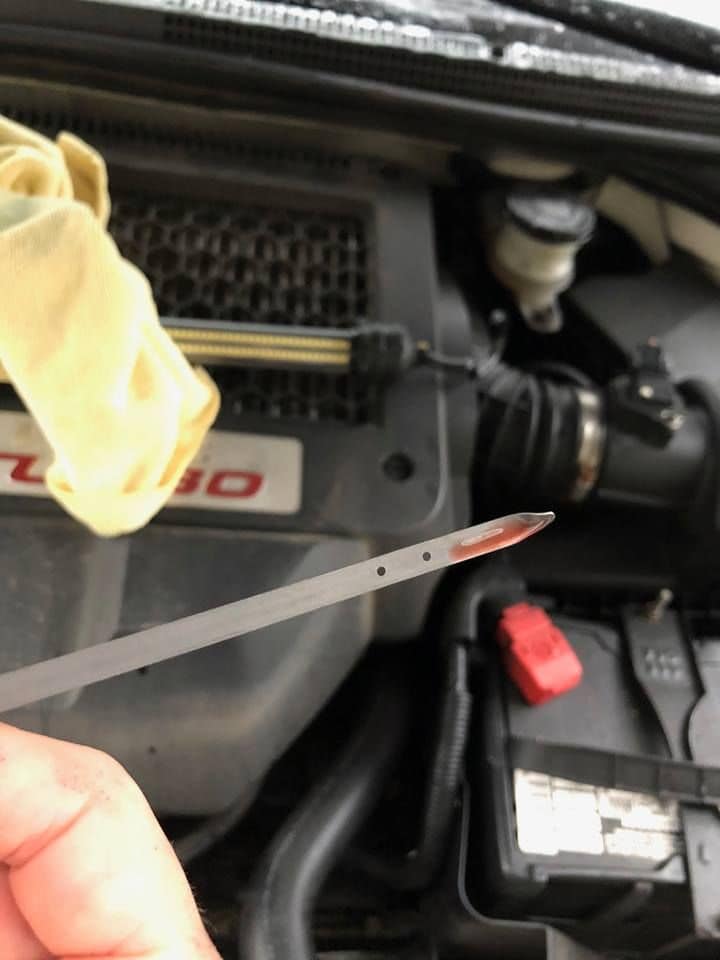
A hot reading is a one-shot measurement: the level keeps rising the longer the engine sits, so a second hot pull reads differently. A cold reading, by contrast, repeats identically every time within the same window. To make a cold reading valid after a drain-and-fill, drive the car until it is fully warm, select every gear -- Reverse and Park included -- at least twice with 3-5 second pauses, then park on level ground overnight and read it before the first start the next morning. On the RDX the hot level sits about 3 to 4mm above the cold level, so once you know that offset a quick cold check is enough to confirm the fluid. On the dipstick the span between the FULL and ADD marks is about 8mm and holds roughly 8 ounces, so each 1mm equals about 1 ounce; aim a cold level near the middle of that span. If the transmission has simply been in daily use and not recently drained, no special gear-cycling is needed -- just let it rest at least 8 hours.
12 Optional: replace most of the fluid with a triple drain-and-fill
A single drain exchanges only the roughly 4 quarts that leave through the drain plug, not the fluid held in the converter and passages. To renew most of it, perform three drain-and-fills back to back (a "3x3"), driving and cycling through all the gears between each pass to mix the new fluid in. Because most transmission wear metal is generated during early break-in and the internal magnet and filter cannot be serviced, an early and thorough exchange is worthwhile. An inline magnetic filter added to the cooler lines can capture the non-magnetic clutch particles that the drain-plug magnet cannot hold.
13 Optional: safety-wire the drain plug
To lock the drain plug against loosening, use 0.033-inch soft 304 stainless wire. Drill 1/16-inch holes through the four faces of the bolt head rather than one straight-through hole -- the opposed holes need not line up perfectly. Drill a matching 1/16-inch hole in the case web and bevel its edges. Draw the wire off the bolt head at the 3-o'clock point -- 9-o'clock wraps too far the wrong way, and 6-o'clock crowds the web hole -- then twist a length, bend it around the head, and feed one strand through the drilled web hole. Bend the pig-tail tips up and out of the way; the twin sharp ends can cut a hand or eye badly, so keep them clear of anyone working under the car.
Pro Tips
- 💡 A cold reading is far more repeatable than a hot one; establish the fixed hot-to-cold offset (about 3-4mm on the RDX) once, then verify fluid with quick cold checks.
- 💡 Measure the exact volume you drain and refill with that same amount before driving -- the amount that comes out is not consistent enough to guess.
- 💡 Lifting the back end roughly 6 cm above the front helps more fluid drain out.
- 💡 Mark the intake hose clamp position (yellow paint dot, a counted slot, or a dab of nail polish) before loosening so you can retighten to the original tension.
- 💡 Filling through the dipstick tube with a well-fitted tube and funnel is easier than reaching the deep ATF fill bolt, and a turkey baster handles small top-ups.
Was this guide helpful?