Honda Fit (GE8) Base Model OEM Map Light Retrofit
Introduction
Base-trim second-generation Honda Fit (GE8) cars, including the base models sold in Canada, ship without the overhead map/reading lights fitted to Sport and navigation trims. The roof, however, still carries the two threaded mounting holes and the dome-light circuit needed to add them, so the missing lamp can be retrofitted with genuine Honda OEM parts for a factory-correct result. This guide covers cutting the headliner opening, wiring the map light base into the existing dome-light feed, and optionally tying it into the door-controlled circuit so the lamps also switch on whenever a door opens or you use keyless entry. It applies to GE8 Fit hatchbacks (roughly 2009-2013) that lack the factory map light. Adapted from a community writeup by dela on FitFreak (https://www.fitfreak.net/forums/2nd-gen-ge8-specific-fit-interior-modifications-sub-forum/54666-english-diy-maplight-base-ge.html), including corrections from the follow-up discussion.
Reference
Tools Required
- X-Acto or hobby knife with fresh blades (the headliner is roughly 1/4 inch thick)
- Soldering iron and solder, or 0.11 inch female spade disconnects to avoid soldering
- Wire strippers
- Stiff guide rod for snaking wire, such as a brass rod or trombone slide cleaning rod (a thin coat hanger tends to flex too much)
- Heat source for shrink tubing
- Marker or pencil for templating
Parts Required
-
Map light base 34404-SNA-A01ZD (1)
-
Bulb 34253-671-003, 12V 8W (2)
-
Right lens 34405-SDA-305 (1)
-
Left lens 34406-SDA-305 (1)
-
Ground/mounting bolt 90148-S6A-013, 5x14 (2)
-
16-18 gauge wire
-
14-16 gauge quick-splice wiretap connector
-
Heat shrink tubing
Safety Warnings
- ⚠ Disconnect the battery before tapping the wiring to avoid shorting the interior lighting circuit; the radio code is required afterward.
- ⚠ A short during wiring can blow the 15 A fuse feeding the door locks and dome light, which may also disable the key fob until the fuse is replaced.
- ⚠ Cut the headliner conservatively, as over-cutting is hard to hide and the roof threads strip easily if the mounting bolts are cross-threaded or over-tightened.
Step-by-Step Instructions
1 Disconnect the battery
Before working near the interior wiring, disconnect the negative battery terminal so no power reaches the lighting circuit. This prevents an accidental short while you tap into the dome-light feed. The radio will ask for its security code once power is restored, so keep that code on hand. Working with the battery connected is possible but carries the risk of a short, and that risk is yours to accept.
2 Remove the factory dome light
Take the overhead dome-light assembly down from its mounting points. This exposes the wiring you will tap into and opens up access for feeding a new wire across to the map-light opening. Keep the fasteners and lens for reinstallation later.
3 Cut the headliner opening for the map light base
The roof already carries two threaded mounting holes at the map-light location, even on base and Canadian cars, so no extra bracket is required. Find them, then mark the outline where the base will sit. Make a small initial cut and enlarge it in stages, test-fitting the base repeatedly until it seats flush and its bolt holes line up with the roof holes. A template makes this much easier: trace the base onto cardboard, or thread a pair of 40 mm M5 bolts partway into the roof holes so the 8 mm heads protrude, seat the base over those heads, and pencil around it. The flange hides small irregularities, so err toward an undersized cut. The headliner is about 1/4 inch thick, and a fresh hobby-knife blade slices it cleanly where scissors will not.
4 Connect wiring to the map light base pins
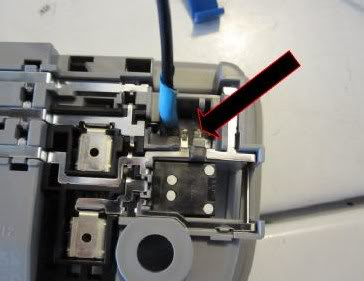
The base presents three male pins. The innermost is the switched positive (a constant 12 V feed on this circuit), the middle pin grounds to the chassis through the mounting bolt, and the outermost is the negative that, when tied to the door-controlled circuit, makes the lamps follow the doors. For a basic install, attach one wire to the innermost positive pin. The pins sit in a tight pocket; a small 0.11 inch female spade disconnect can slip over a pin, but where none fits, solder the wire directly. Insulate every joint with heat shrink, sliding it clear of the base first and shrinking it down in stages.
5 Route the wire to the dome light opening
Feed the new wire through the headliner from the map-light cutout across to the dome-light hole. Push a stiff guide rod through first, tape the wire to its tip, and draw it back through. Expect resistance, since the liner is bonded to the roof in places; a rigid brass rod or a trombone slide cleaning rod pushes through far better than a flimsy coat hanger, which tends to buckle.
6 Tap into the dome light circuit
Use a quick-splice wiretap to join the map-light positive wire to the dome light's constant-power lead, the pink wire. Wired this way the map lamps operate only from their own switches. To also have them illuminate with the doors or keyless entry, run a second wire from the outermost pin to the dome light's MICU-controlled ground, the blue wire. Keep the two straight: if both lamps glow at half brightness whenever either switch is pressed, the pink and blue leads have been swapped.
7 Mount the base and restore power
Fasten the base to the roof with the two ground bolts through the mounting holes; these bolts also complete the chassis ground for the middle pin. Snug them gently, because over-tightening or cross-threading can strip the roof threads. Reconnect the battery and re-enter the radio security code.
8 Test and reassemble
Fit the bulbs and lenses, then confirm both lamps work from their switches and, if you ran the second wire, that they respond to the doors and keyless entry. Reinstall the dome light and any covers. If accessory circuits such as the door locks or key fob suddenly stop responding, check the 15 A fuse feeding the locks and interior lights, as a short during wiring can blow it.
Pro Tips
- 💡 Even base-model and Canadian cars keep the two threaded mounting holes in the roof, so no additional bracket is needed.
- 💡 Build a template before cutting: a cardboard tracing or the M5 bolt-head alignment trick keeps the opening accurate.
- 💡 Start with a small opening and enlarge it gradually, since the base flange covers minor over-cuts.
- 💡 The finished install matches the factory look and typically takes anywhere from about 20 minutes to a couple of hours depending on how cautiously you cut.
Was this guide helpful?

