Front Bumper Cover Removal: 1st-Gen Acura CL (1997)
Introduction
This guide covers taking the front bumper cover off a first-generation Acura CL (1997 2.3CL and 3.0CL). Pulling the cover is the gateway to a long list of front-end work: swapping to blacked-out or HID headlights, refitting or replacing the corner turn signals, relocating fog lights, and reaching the headlamp assemblies or radiator support. The cover is retained by a pair of Phillips screws in each fender liner, two 12mm bolts hidden behind each turn signal, and two push clips along the lower lip. Once those are freed, the cover and the foam impact absorber mounted behind it lift away as a unit. Expect the refit to take longer than the removal, and line up a second person to help with it. Adapted from a community writeup by Orlando3.0 on AcuraZine (https://acurazine.com/forums/1g-cl-diy-faq-74/diy-bumper-removal-finally-pictures-479502/), including corrections from the follow-up discussion.
Reference
Tools Required
- Ratchet
- 12mm socket
- Short socket extension
- Long socket extension
- Short Phillips screwdriver
- Long Phillips screwdriver
- Flathead screwdriver
- Flashlight
Parts Required
-
None required for removal (inspection/access job)
-
Optional: spare push-type retainer clips in case the lower fasteners break during removal
Safety Warnings
- ⚠ Make sure the vehicle is stable before reaching underneath to release the lower fasteners.
- ⚠ If you are unsure of any step, work with a helper or have a professional handle it.
Step-by-Step Instructions
1 Remove the lower fender-liner screw (driver side)
Steer the front wheels toward full lock to open up working room. Look into the inner fender liner on the driver side at the point where the liner meets the lower edge of the bumper cover. A single Phillips screw sits there; back it out with the short Phillips driver. Turning the wheel toward the opposite side usually gives enough clearance to get the driver onto the head.
2 Remove the upper fender-liner screw
Directly above the first fastener is a second Phillips screw. It is frequently tucked behind the edge of the wheel-well liner, so peel the liner back if needed to reach and back it out.
3 Free and remove the corner turn signal
Move to the corner turn signal. Just inboard of the lens is a small access hole, roughly the diameter of a pen. Shine a flashlight in to find the retaining screw, then loosen it while pressing the signal housing inward. The screw is captive in a retainer and will not drop out, so stop once it spins freely. Press the lens in and slide it outboard; the inner edge releases first, then shift it back the other way to free it fully. Twist the bulb holders out of the housing and set the assembly aside.
4 Remove the two 12mm mounting bolts behind the signal
With the signal out of the way, look into the exposed cavity: one 12mm bolt is visible inside it, and a second sits toward the inboard side within the lower grille opening. On this car the outer bolt had a copper finish and the inner one was black. Drive both out with the 12mm socket on the ratchet, fitting the short or long extension as clearance dictates.
5 Repeat on the passenger side
Carry out the same four operations on the passenger side: the two fender-liner Phillips screws, the corner turn signal, and the two 12mm bolts in the cavity behind it.
6 Release the two lower push fasteners
Go under the front of the car to where the lower lip of the bumper cover meets the undercarriage. Two push-type fasteners hold the cover down here; pry them free with the flathead screwdriver. Keep spares handy in case one breaks.
7 Lift the cover off the car
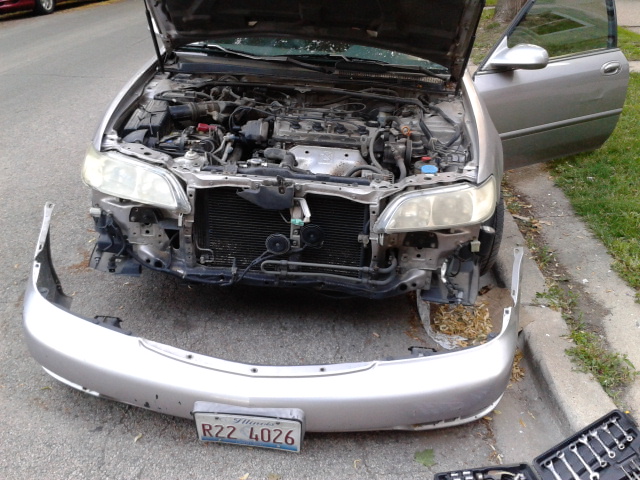
Free the cover by pushing it down to release it, then lifting it off the radiator-support tabs. Draw it rearward slowly and watch for any remaining clip or wiring lead. The foam impact absorber behind the cover comes away together with it, so support the whole assembly as it separates.
Pro Tips
- 💡 On reassembly, each side of the cover locates on a slotted bracket held by a large screw. Confirm both slots are engaged before pushing the cover home.
- 💡 Two people make removal and especially refitting far easier; the refit is the harder half of the job.
- 💡 The fasteners inside the turn signal openings secure the cover to the foam absorber. Because the absorber lifts out with the cover, some people leave those fasteners in place rather than removing them first.
- 💡 Reaching the mounting bolts through the turn signal holes without pulling the whole cover has been tried, but refitting the signals afterward is troublesome; taking the cover fully off is the more reliable route.
Was this guide helpful?


