Acura RSX Rear Hatch Lock Actuator Replacement
Introduction
This guide covers replacing the rear hatch lock actuator on the Acura RSX (DC5, 2002-2006, including Type-S). The actuator is the small electric motor that latches and releases the tailgate on command from the key fob. When it wears out the hatch stops responding to the remote, and you may notice the exterior lights no longer flash and the horn stays silent when you press lock, because the car still reads the hatch as open. The repair requires removing a few interior trim panels at the rear of the hatch to reach the unit, then swapping it for a new one. It is an inexpensive, low-risk job that most owners complete in well under an hour with basic hand tools. Adapted from a community writeup by dstanced on Club RSX (https://www.clubrsx.com/threads/diy-rsx-trunk-hatch-actuator-replacement.926809/), including corrections from the follow-up discussion.
Reference
Tools Required
- Phillips screwdriver
- Flathead screwdriver
- Optional: stubby Phillips, right-angle screwdriver, or vice-grips for the lower actuator screw
Parts Required
-
Replacement rear hatch lock actuator (eBay ref DLA142 / DLA-142, 1A Auto part 1ADLA00130, or OEM)
-
Optional: strong adhesive if attempting to reseal and reuse the original actuator
Safety Warnings
- ⚠ The electrical connectors are fragile; even careful removal can snap a plug tab, so buy the new actuator before disturbing the old wiring.
Step-by-Step Instructions
1 Confirm the actuator is at fault
The hatch lock actuator drives the latch that secures the tailgate. As it fails, the hatch stops responding to the fob and you may hear only a faint mechanical effort instead of a firm click when locking or unlocking. A common early clue is that the exterior lights stop flashing and the horn no longer chirps on lock; this simply indicates the system still sees the hatch as open because it never latched. Verify the doors still lock normally so you know the fault is isolated to the rear hatch before ordering parts.
2 Source the correct replacement actuator

Have the new part in hand before you start, since the job cannot be finished without it. Aftermarket listings commonly carry the reference DLA142 (also written DLA-142), and 1A Auto sells an equivalent under part number 1ADLA00130. Budget units run roughly $20 to over $100 and often last about a year; several owners reported early failures and eventually fitted an OEM unit (around $130 shipped from a dealer such as Bernardi) to avoid repeating the work. Note that the door lock actuators are a separate, cheaper part (about $40 for the pair) and are not interchangeable with the hatch unit.
3 Remove the hatch lid liner
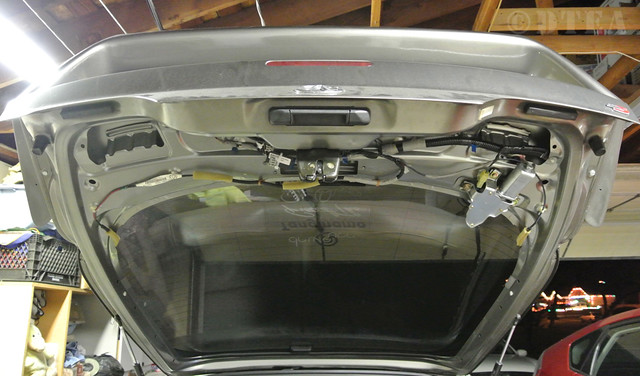
Open the tailgate and take out the padded privacy liner on the underside of the lid if one is fitted. Find the two retaining hooks, one on each side, each concealed behind a small cover that exposes a single screw. Back out both screws with a Phillips driver to release the liner. Expect the surrounding panels to rattle a little once loosened.
4 Release the side trim strips

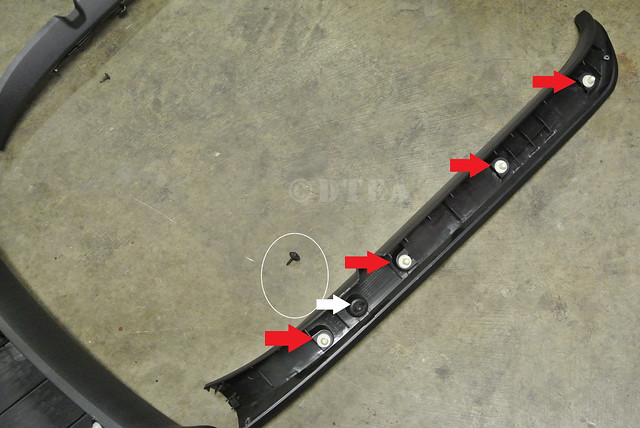
Working along each side of the hatch opening, ease the flathead behind the narrow side trims and pop the retaining clips. Each side is held by four clips plus a single screw. Begin prying at the corner nearest the top of the hatch; once that end lets go, the rest of the strip follows away with it.
5 Remove the lower rear trim panel
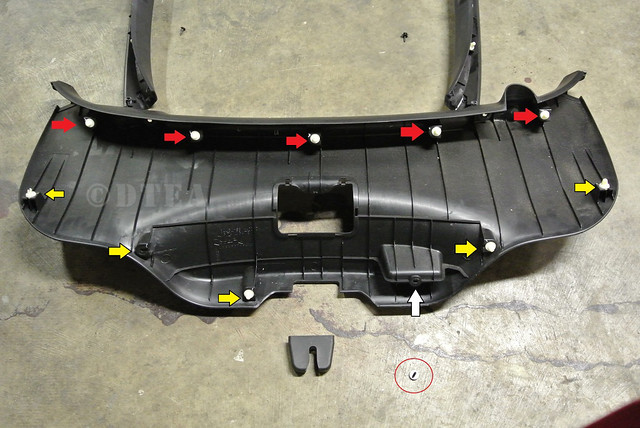
The wide plastic panel across the bottom of the hatch opening comes off next. Pry the upper row of tabs loose with the flathead (these appear marked in yellow in the original photos), then remove the single screw recessed inside the hatch pull handle. The remaining lower tabs (marked in red) release by pushing the panel firmly toward the front of the car rather than by prying.
6 Unbolt and remove the actuator
With the trim out of the way the actuator is exposed. Undo its two gold-colored mounting screws and unplug the two electrical connectors. Work the plugs off slowly because they are brittle and crack easily. The manual lock lever sits alongside the actuator; even with the unit removed you can still lock and unlock the hatch by hand using that lever, which is enough to keep the car secure until the new part is installed.
7 Fit the new actuator and test
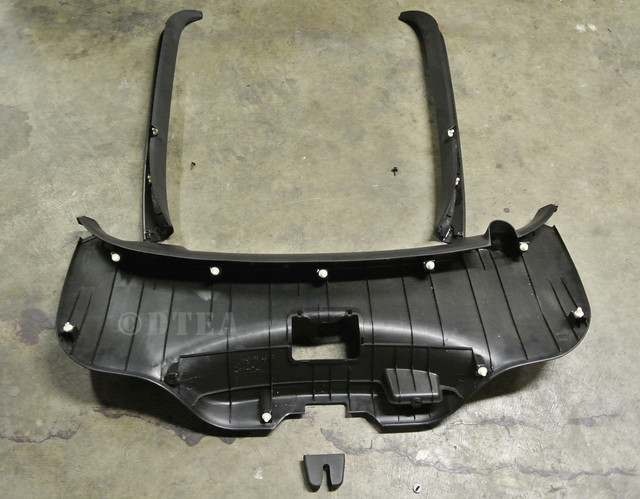
Mount the replacement in reverse order, reconnecting both plugs and driving in the two screws. Cycle the lock several times with the fob before reassembling any trim. If the hatch still fails to respond, the actuator's contact pins may not be seating against the connector; gently bend them so they make solid contact, a fix that resolved an early failure on a brand-new unit in the original thread. Once the lock works reliably, reinstall the trim panels and the lid liner.
Pro Tips
- 💡 Faster access: you can often skip pulling the full rear trim. Pop the four rear fasteners loose, reach the upper gold screw through the hatch inspection cover, and back out the lower screw using vice-grips, a stubby Phillips, or a right-angle driver.
- 💡 Manual override when locked out: open the small access window to the third brake light, reach in, flip the actuator lever by hand to the locked position, then press lock on the fob.
- 💡 Since the trim is already off, consider replacing tired hatch lift-support struts at the same time.
- 💡 The actuator housing is glued shut. You can pry it open at the connector end to inspect the motor and spring-loaded return gear, but resealing needs a strong adhesive and the motor is usually just worn out rather than repairable.
Was this guide helpful?
