Acura 3.0/3.2 V6 Idle Air Control Valve: Throttle Body Removal, Cleaning, and Replacement
Introduction
The idle air control valve (also called the ICV or IACV) meters the small amount of air the engine draws at idle. When it clogs with carbon or its electric actuator fails, the first-generation Acura 3.0CL, the TL 3.2, and the related 1998-2001 Honda Accord V6 will hunt, surge, or stall at idle — a common pattern is the tachometer wandering on its own between roughly 1000 and 2500 rpm, or the idle dropping and shuddering when the air conditioning loads the engine. It frequently sets a P0505 (idle control system) or P1676 code. This guide walks through removing the throttle body to reach the valve on the underside, then either cleaning the valve or fitting a new one. Budget about an hour or two the first time; a straight swap once you know the layout takes well under an hour. Adapted from a community writeup by joeshmoe on AcuraZine (https://acurazine.com/forums/1g-cl-diy-faq-74/install-thottle-body-idle-control-valve-3-0-motor-458330/), including corrections from the follow-up discussion.
Reference
Tools Required
- 3/8" drive ratchet
- 8mm, 10mm, and 12mm sockets
- Phillips and flat-blade screwdrivers
- Small, strong pliers (for spring-type hose clamps)
- Penetrating lubricant (PB Blaster or equivalent)
- Carburetor/throttle cleaner
- Razor blade or gasket scraper
- Rags and a drain tray for coolant
- Work light and a small inspection mirror
- Optional: dremel, hacksaw, or chisel for a stripped-screw last resort
Parts Required
-
Idle air control valve (IACV/ICV) for the 3.0L/3.2L V6 (approx. $70 aftermarket to $100 at the dealer; the 1998-2001 Accord V6 valve is the same unit)
-
Throttle body gasket (approx. $1.50)
-
Engine coolant to top off after opening the two coolant lines
Safety Warnings
- ⚠ Coolant will spill when the two hoses at the valve are opened — catch it with rags and a tray, and top up and bleed the cooling system afterward.
- ⚠ Install the valve the correct way around. Reversed, it siphons coolant into the engine and blows a heavy plume of white smoke.
- ⚠ Spray the valve retaining screws with penetrant before removal; they strip readily, and a stripped screw is the hardest part of the whole job to recover from.
- ⚠ Disconnect the battery before starting, both for safety and to reset the idle control system.
Step-by-Step Instructions
1 Disconnect the battery and clear the workspace
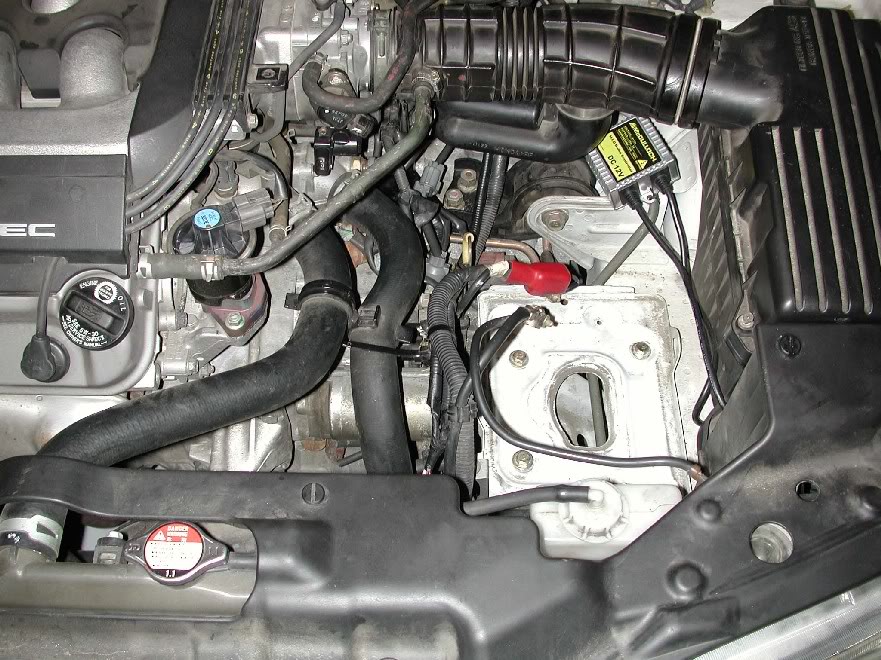
Pull the plastic engine cover off the top of the throttle body. Disconnect the battery, then lift out the battery and its black plastic hold-down tray. This opens up room around the intake and, because power is now off, it also clears the ECU's learned idle values so the engine can relearn after the repair.
2 Remove the intake ductwork
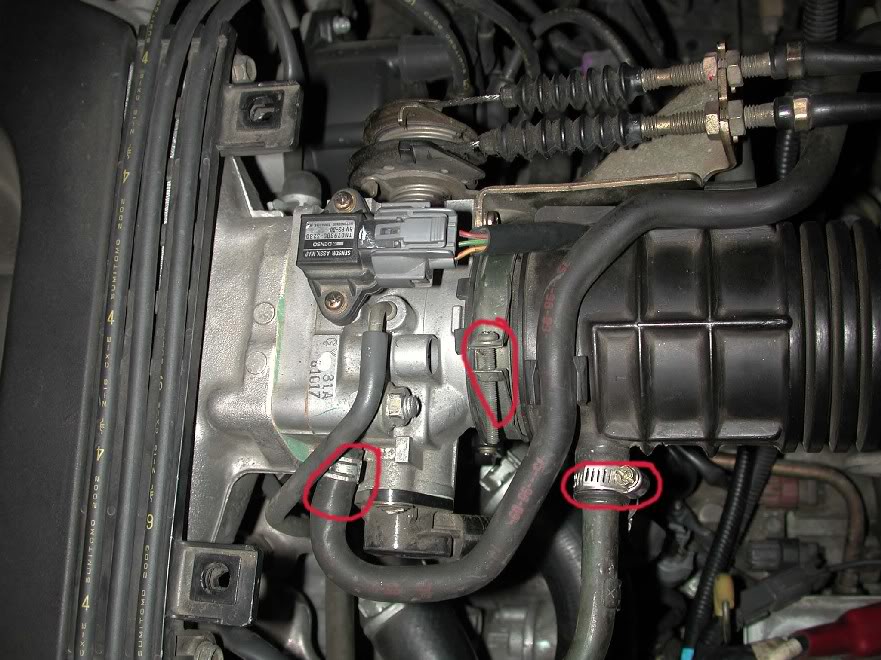
Loosen the clamps on the intake hose that feeds the throttle body. Screw-type clamps back off with a screwdriver; spring clamps release by squeezing the tabs with pliers — slide them back rather than removing them fully. A secondary air hose ties into the far side of the intake hose and is awkward to detach; leave it attached and simply prop the assembly toward the rear of the bay so it stays clear of your work.
3 Disconnect the electrical connectors and vacuum lines
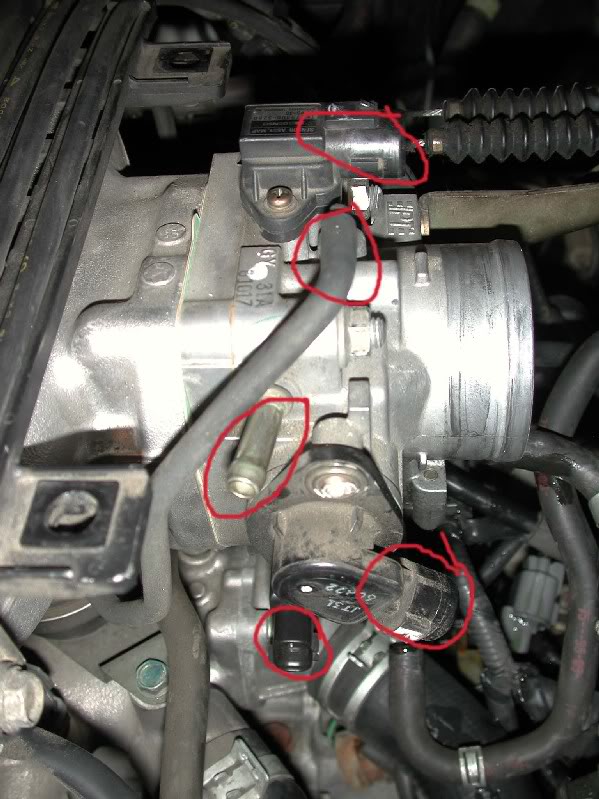
Unplug the electrical connectors and detach the vacuum/breather hoses that tie into the throttle body so it can be freed from the engine. Note the routing of each line before you pull it — photographing the area first makes reassembly straightforward.
4 Free the throttle cable bracket
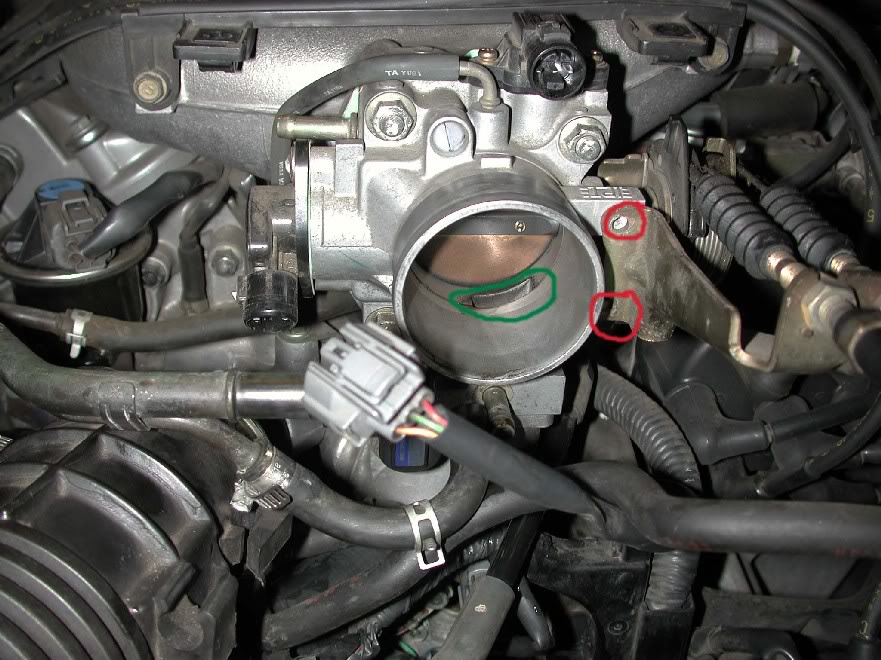
Remove the two screws that hold the throttle cable bracket to the throttle body. With the bracket loose you can set the cable assembly aside. The circular opening you will see on the throttle body is where the idle valve draws its air.
5 Release the throttle cables from the quadrant
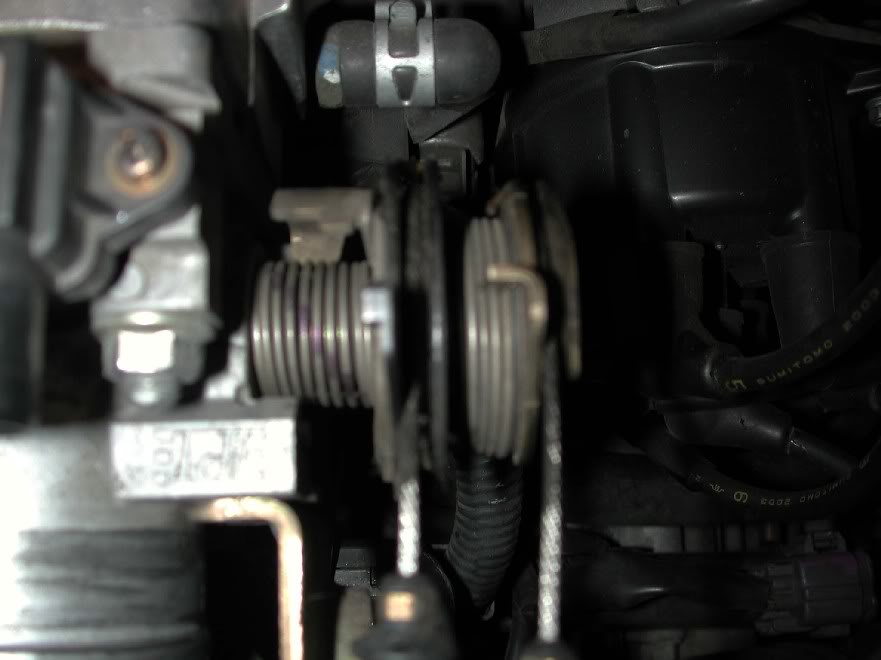
Two cables anchor into the spring-loaded throttle quadrant at the rear. Rotate the quadrant by hand to compress the spring and create slack, then slip each cable end out of its slot; if it resists, you have not opened the spring far enough. Note that this step is not always necessary — some owners reached the valve with the cables left attached — so only detach them if they are in your way.
6 Disconnect the two coolant lines
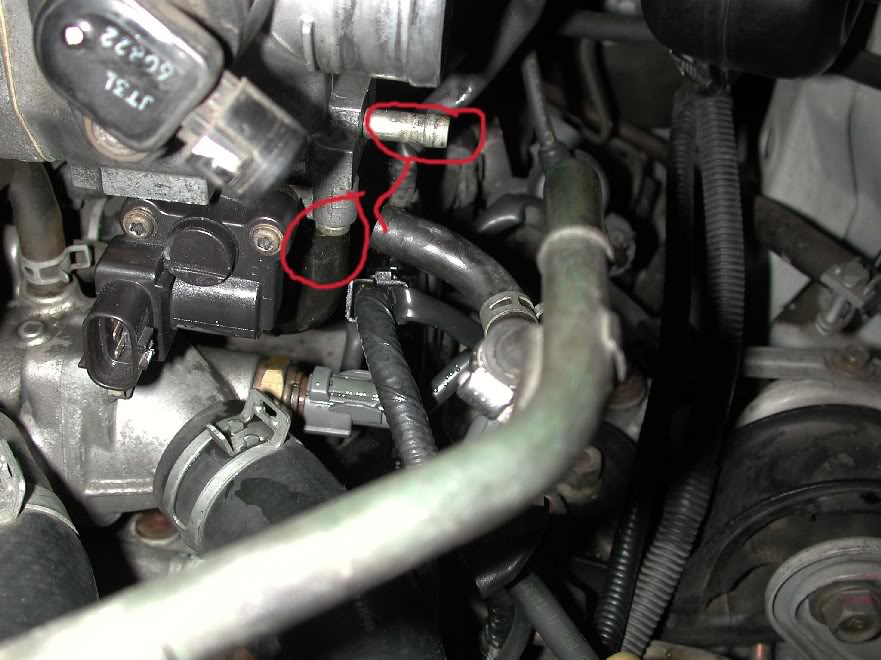
Two coolant hoses feed the base of the valve: the upper one is the supply and the lower one is the return. Set a rag and a tray underneath first, because both lines will dribble coolant as they come off. Ease the clamps back and work the hoses free.
7 Unbolt and lift off the throttle body
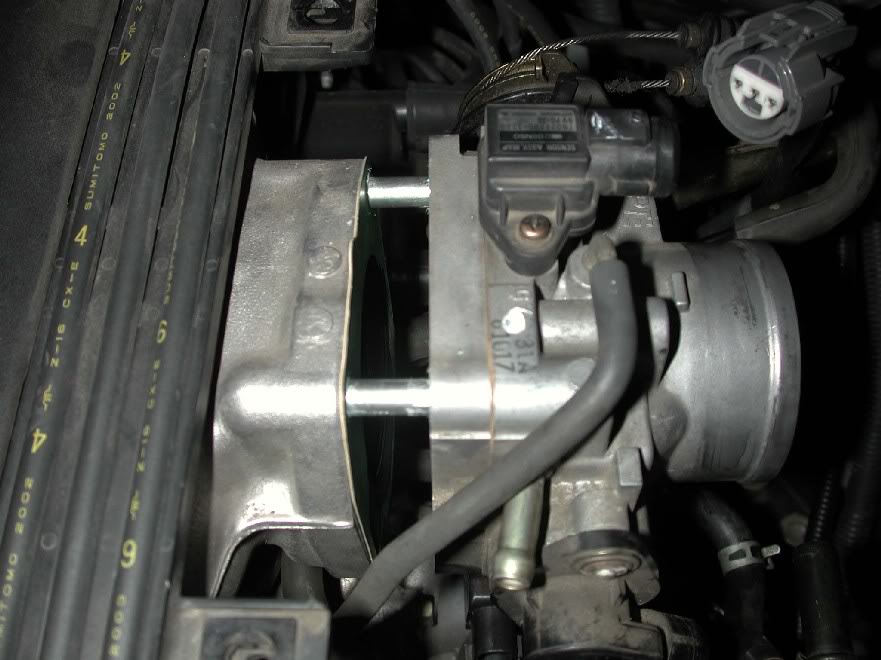
Four fasteners hold the throttle body to the intake manifold. The upper two are studs — spin off their 12mm nuts. The lower two are full bolts that back all the way out. With all four removed, draw the throttle body off the manifold. If it feels stuck to the manifold, work penetrant into the seam and rock it gently rather than prying hard.
8 Clean up the old gasket
Peel off the throttle body gasket. If it tears or leaves residue on the mating faces, shave the remnants away with a razor blade until both surfaces are clean and flat. Plan to fit a fresh gasket on reassembly.
9 Remove the idle valve screws
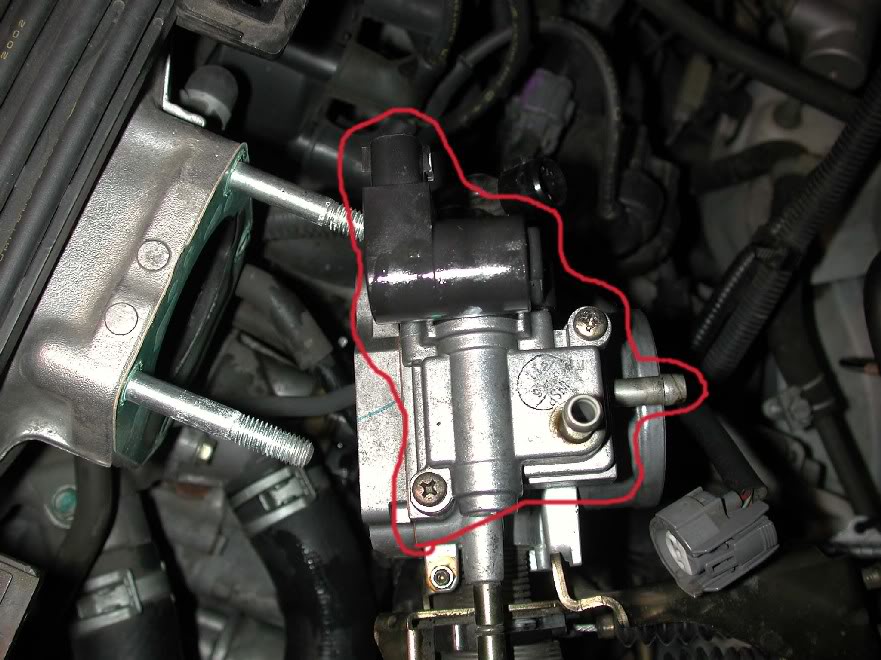
Turn the throttle body over to expose the idle valve on the underside, held by two screws that face downward. Douse the screws with penetrating lubricant before touching them — they seize easily and a stripped head turns a simple job into a real problem. Back them out carefully; an impact driver or a Phillips socket on a ratchet gives the cleanest grip.
10 Decide: clean the valve or replace it
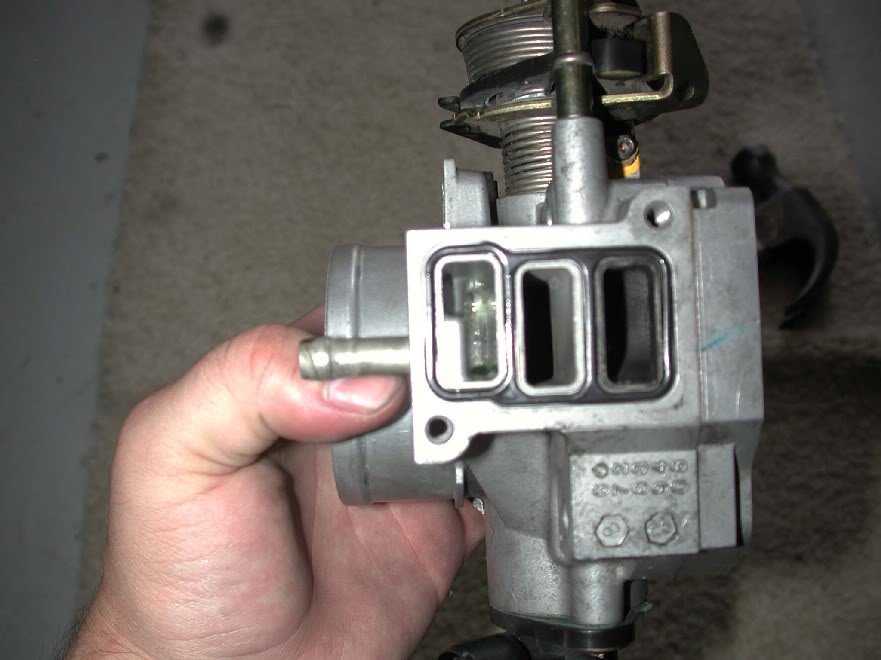
Inspect the two air passages the valve controls. If they are simply fouled with carbon, flush them with carburetor cleaner and refit the valve. Cleaning only helps when the problem is deposits; the valve pairs a mechanical rotor with a magnetically driven electric actuator, and if that actuator has failed no amount of cleaning will restore idle control. In that case install a complete new valve. Do not attempt to split the valve's own two halves — they are held by special five-point Honda screws, are not sold separately, and opening them serves no repair purpose.
11 Reinstall the valve and reassemble
Bolt the valve back to the throttle body in its correct orientation — fitting it reversed lets coolant be pulled into the intake, which produces a large cloud of white exhaust smoke on startup. Fit a new throttle body gasket, then reverse the removal sequence: mount the throttle body, torque the nuts and bolts, reconnect the coolant lines, cables, vacuum hoses, and connectors, and refit the intake ductwork. Top up and bleed the coolant, reinstall the battery, and reconnect it. Start the engine, let it idle to relearn, and confirm the idle has settled.
Pro Tips
- 💡 You can sometimes skip pulling the throttle body entirely: the two Phillips screws face straight down, so a Phillips socket on a ratchet plus a mirror to sight the heads lets you drop the valve out in place. A toothbrush works for a quick clean of the ports at the same time.
- 💡 For screws that are seized solid, a shop impact wrench (some parts-store counters will help) usually breaks them free where hand tools slip.
- 💡 If a screw head strips despite everything, cutting a fresh slot with a dremel so a flat-blade screwdriver can bite is a workable last resort.
- 💡 Cleaning the valve does not always fix it — several owners cleaned theirs, still had a rough idle or a returning P0505 code, and ultimately needed the complete valve, so budget for the possibility of a replacement.
- 💡 While the throttle body is off, the thermostat is easy to reach, making this a convenient time to replace it too.
Was this guide helpful?
