Honda CR-Z Inflatable Lumbar Support Bladder Installation
Introduction
The factory CR-Z seats are widely criticised for offering almost no lower-back support, leaving the seatback flat and unsupportive on longer drives. This guide shows how to add an inexpensive, manually inflated lumbar air bladder to the driver's (or passenger's) seat by tucking it between the seat foam and the upholstery, with no seat disassembly, no hog rings, and no upholstery-shop labour charge. The bladder is squeezed up with a small hand pump so you can dial in exactly how much lower-back bulge you want, and it can be deflated again at any time. The same method works on cloth, leather, heated, and seat-cover-equipped seats, and applies to any CR-Z (ZF1/ZF2) generation. Expect a noticeable improvement in seating comfort and something firm to brace against when working the clutch. Adapted from a community writeup by SS2CRZ on CRZ Forum (https://www.crzforum.com/threads/diy-drivers-seat-lumbar-support-bladder-installation.10550/), including corrections from the follow-up discussion.
Reference
Tools Required
- Your hands (no tools strictly required)
- One or two small cable ties (optional, for securing the hose)
Parts Required
-
Manually inflated in-seat lumbar air bladder with hand pump bulb (universal type, roughly $15-30 each)
Safety Warnings
- ⚠ The bladder sits near the seat's side-airbag (SRS) area; work gently, avoid disturbing airbag wiring or the fabric seams held by hog rings, and disconnect the negative battery cable first if you want extra caution around the SRS system.
- ⚠ The rubber bladder can fatigue over time; owners have reported one splitting after about a year, so treat it as a wear item and inspect or replace as needed.
Step-by-Step Instructions
1 Release the lower seatback tension strip

Reach behind the seat and run your fingers along the very bottom edge of the seatback upholstery. You will feel a rigid plastic strip sewn into the lower hem of the black fabric; it snaps into a matching plastic J-channel sewn to the rear edge of the lower cushion. Those two strips clip together to keep the seat fabric under tension. Unclip them to free the bottom edge of the seatback cover so you can work your hand up inside.
2 Open the side zippers

There is a hidden zipper on each side of the seatback, tucked out of sight behind the seat's plastic hinge covers. Undo both. This releases a flap of upholstery along the bottom of the seatback. Fold that flap up and tuck it under the headrest so it stays out of the way while you work.
3 Find the access cavity behind the cushion

With the hem and zippers open, slide a hand up inside the seatback. Your whole hand should pass easily into the void between the seatback foam and the outer upholstery fabric. This pocket, in the lower-back region of the seat, is where the bladder will sit. No cutting, de-upholstering, or hog-ring removal is needed to reach it.
4 Insert and position the bladder

Feed the deflated bladder up into the cavity between the foam and the cover. Orient it so the inflation hose exits pointing downward and toward the inside of the cabin. Centre the bladder side to side within the seat. Because this is lumbar support, set it as low as it will go while keeping it clear of the seat's lower hinge area, where it could get pinched. Note that the pocket is a tight fit, so take a moment to work it fully into place; once seated it will not shift around.
5 Connect the pump and route the hose

Push the inflation hose fully onto the nipple of the hand pump bulb. A machined groove on the nipple invites a cable tie, but note the follow-up discussion: at least one installer found the tie distorted the rubber hose and appeared to cause a slow leak, while an uncable-tied install held air for over a year. If you tie it, keep it light. For the cleanest result, route the hose out through the inside corner of the seat and rest the pump bulb in the gap in front of the seatbelt buckle, where it is nearly invisible and easy to reach for adjustment; alternatively let it hang beside the seat near the door.
6 Test-fit before closing up
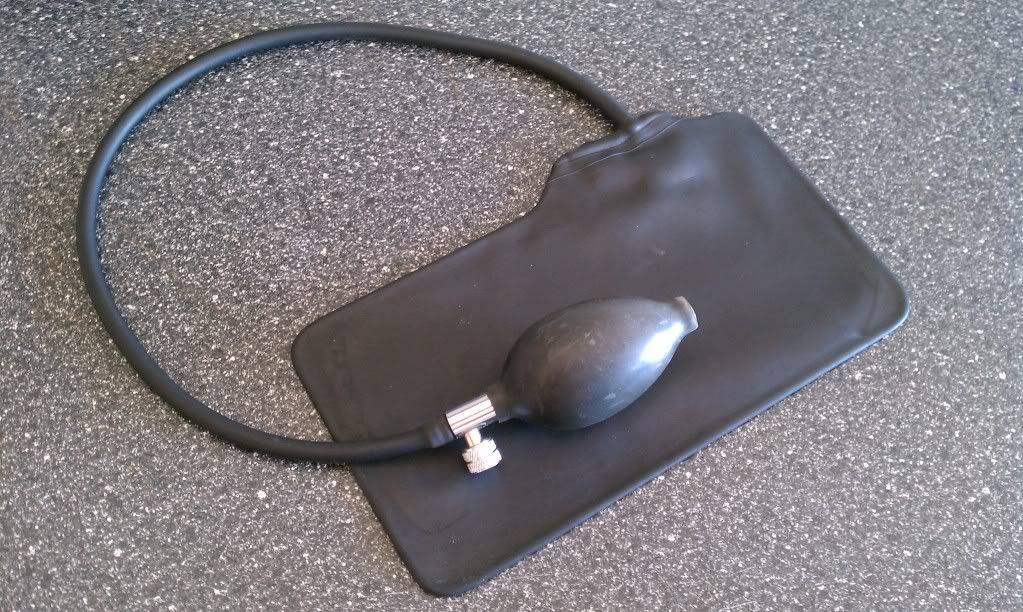
Before re-zipping and re-clipping anything, return the seat to its normal driving position and sit in it. Confirm the bladder sits where your lower back wants it and that the hose routing does not interfere with getting in or out. Adjust the bladder height or hose path now, while access is still open.
7 Close the seat and inflate to taste

Fold the upholstery flap back down, re-zip both side zippers behind the hinge covers, and re-snap the lower plastic strip into its J-channel to restore fabric tension. Then squeeze the pump bulb to inflate the bladder to the amount of lower-back bulge you prefer. Deflate slightly if it feels too aggressive. You can re-adjust the pressure at any time from the pump bulb.
Pro Tips
- 💡 The manufacturer rates the bladder to hold air for roughly 24 hours, but many owners report theirs held pressure for weeks and thousands of highway miles without re-pumping; if yours deflates quickly, suspect a leak and dunk the inflated bladder underwater to find bubbles.
- 💡 Skipping the cable tie on the pump nipple may reduce the chance of a slow leak, since the tie can distort the rubber hose.
- 💡 Routing the hose through the inside corner and parking the pump bulb near the seatbelt receptacle keeps it hidden and out of the door opening.
- 💡 The same pocket can accommodate a shaped piece of upholstery foam or a padded strap-style lumbar cushion instead of an air bladder, though foam is not adjustable.
- 💡 Order two if a passenger will also want lumbar support; the passenger seat installs the same way.
Was this guide helpful?