Acura RDX (2G) Front Door Panel Removal
Introduction
This guide covers taking the front door panel off a second-generation Acura RDX (2013-2018) to reach the hardware behind it. Removing the panel is the starting point for replacing a side mirror, upgrading or servicing the door speakers, adding sound deadening, or working on the window and lock mechanisms. The door cavity is backed by a thin fiber mat, which is easy to peel back once the trim is off. The job relies mostly on releasing hidden screws and push clips, so the main risk is cracking a clip or snapping one of the small locating tabs; proper plastic trim tools and unhurried prying prevent that. Adapted from a community writeup by Dimcorner on AcuraZine (https://acurazine.com/forums/2g-rdx-diy-faq-406/diy-taking-door-panel-off-948968/), including corrections from the follow-up discussion.
Reference
Tools Required
- Plastic trim removal tools
- Phillips #2 screwdriver
- Small flat-blade screwdriver
- 10mm socket with extension (only for side mirror removal)
Parts Required
-
Replacement plastic retaining clips (in case any break during removal)
-
Replacement side mirror (only when performing a mirror replacement)
Safety Warnings
- ⚠ The tweeter and the door-pull cover each rely on fragile locating tabs; prying from the wrong edge will break them.
- ⚠ Reconnect and fully seat every wiring plug before reinstalling the panel.
Step-by-Step Instructions
1 Lower the glass and remove the handle-recess trim
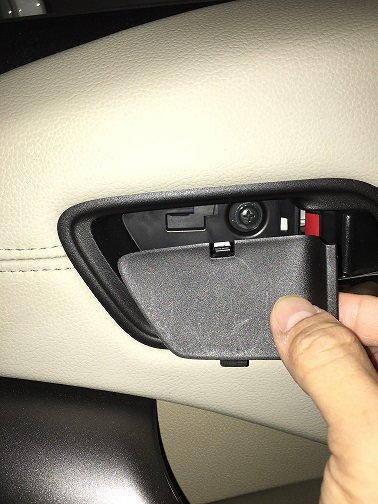
Roll the window all the way down first so the glass sits clear of the door frame. Behind the interior door handle is a small trim insert. Press its upper retaining clip downward using a slim flat-blade screwdriver, then draw the insert toward you to release it. Two Phillips screws are concealed behind this piece; back them both out.
2 Release the door-pull cover
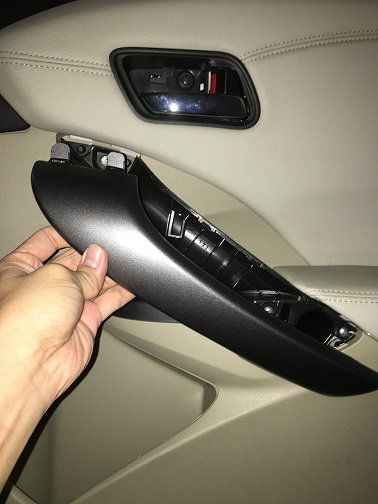
Work on the cover over the door pull next. Slip a plastic trim tool into the gap along its lower edge and gently lever it outward; two clips secure the bottom. Ease the cover down and away, being careful with the pair of locating tabs along its top so they do not snap. Two more Phillips screws sit underneath, one at the top and one recessed inside a hole near the bottom. Remove both.
3 Detach the tweeter
A tweeter is set into the upper front corner of the panel. Lift it out by prying from its top edge with a trim tool, then unplug the speaker connector. A tab holds the lower edge in place, so avoid levering from the bottom or the tab will break.
4 Pop the perimeter clips
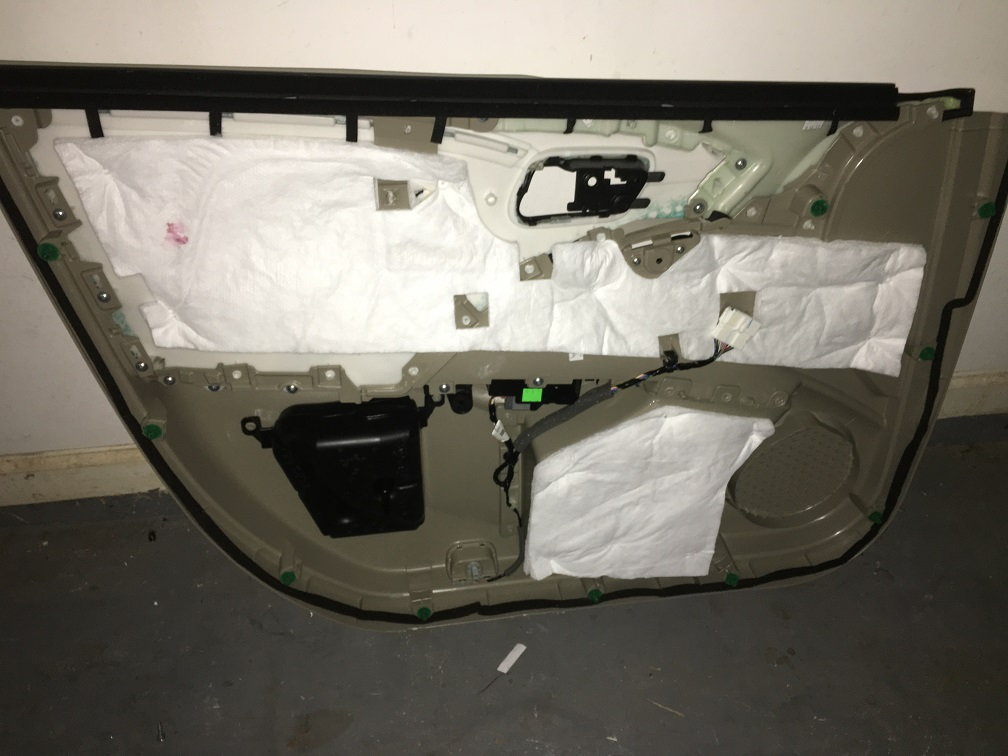
The panel is now held only by push clips around its edge: nine spaced around the perimeter plus one located closer to the center. Begin at the lower outboard corner and walk a trim tool along, freeing each clip in turn. Once every outer clip is free, slip a hand around to the hinge-side rear of the trim panel and release that last central clip.
5 Lift the panel free and unplug the wiring
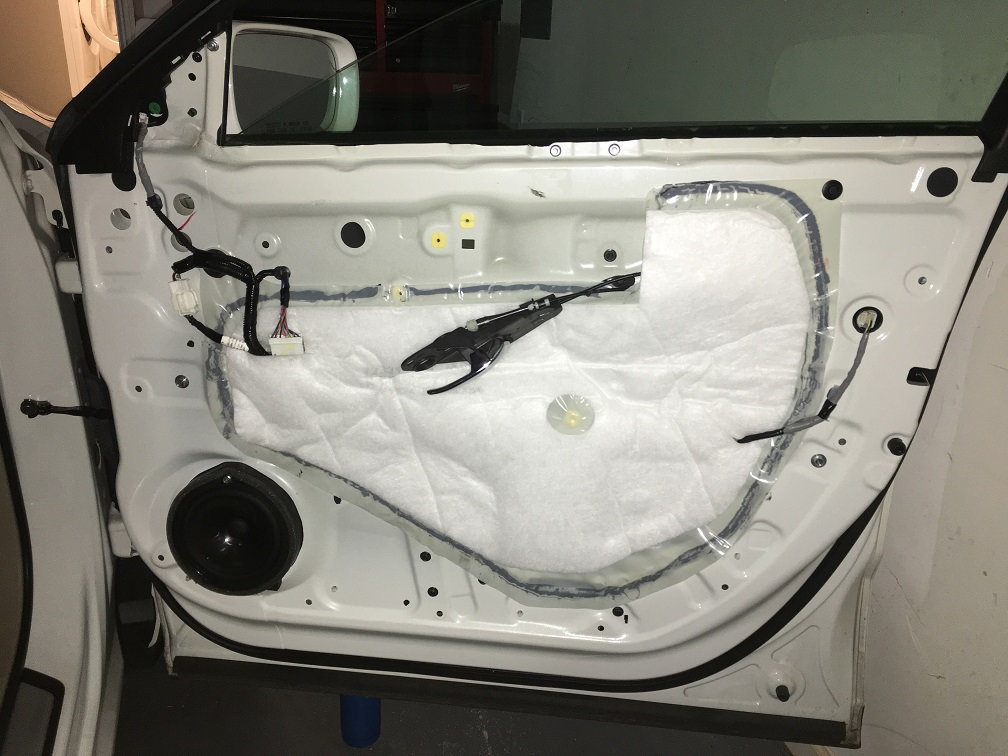
With every clip released, the panel simply hangs on the lip of the window opening. Grasp the handle and raise the panel straight up and off that top lip. Before setting it aside, disconnect the wiring plug that still tethers it to the door.
6 Expose the mirror fasteners (mirror replacement only)
If the goal is to swap the side mirror, locate the three rubber plugs in the upper front corner of the door, just below where the tweeter was mounted. Pull the plugs out to reach the three 10mm hex nuts that hold the mirror to the door.
7 Remove the side mirror (mirror replacement only)
Undo the three 10mm nuts with the socket and extension, then unclip the mirror's electrical connector inside the door and release the retainer that pins its cable to the door shell (the black clip directly below that connector). Support the mirror as the final nut comes off so it cannot fall. Should a nut drop into the door cavity, remove the single Phillips screw holding the speaker and fish the nut out; temporarily reconnecting the panel to raise the glass opens up more room to see and reach inside.
Pro Tips
- 💡 Use dedicated plastic trim tools rather than metal screwdrivers against the clips to avoid gouging or marking the panel.
- 💡 Watch for the two hidden screws (behind the handle insert and inside the door-pull cover); they are easy to miss.
- 💡 With the panel off, it is a convenient moment to add sound deadening to the exposed door skin.
- 💡 In the reference photos the perimeter clips are green, which makes them easy to spot.
Was this guide helpful?