Honda Fit (GE8) Custom Dash-Mounted Phone Cradle
Introduction
This guide converts a throwaway windshield suction mount into a permanent, factory-clean phone cradle on the center dash of a second-generation Honda Fit (GE8, roughly 2009-2013). Instead of leaving a suction cup on the glass, you fasten just the cradle arm through the radio/HVAC trim panel at a point below the windshield line and in line with the climate controls, so the phone sits in your sightline, stays within easy reach, and blocks none of the vents. The whole job costs under two dollars in hardware, leaves only two small holes in the trim, and can be finished in about half an hour; hardwiring a charger outlet behind the radio is an optional add-on. Adapted from a community writeup by WhiskeySix on FitFreak (https://www.fitfreak.net/forums/2nd-gen-ge8-specific-fit-interior-modifications-sub-forum/63838-diy-custom-phone-mount-honda-fit.html), including corrections from the follow-up discussion.
Reference
Tools Required
- Phillips screwdriver
- Trim removal / pry tool
- Power drill
- 3/16" drill bit
- Pencil
Parts Required
-
Cradle arm salvaged from a suction-cup phone mount
-
1" machine screw (8x32)
-
Wing-nut (8x32)
-
2 internal-tooth lock washers
-
Optional: 12V accessory socket for hardwiring the charger (about $7)
Safety Warnings
- ⚠ Removing the center stack requires unplugging the airbag-warning light connector; keep clear of SRS wiring and do not disturb any airbag components.
- ⚠ Confirm there is open space behind the trim before drilling, or the screw and wing-nut can foul a clip and stop the panel from seating fully.
Step-by-Step Instructions
1 Source the cradle arm and matching fastener
Take your existing suction mount apart so the cradle arm separates from its suction base; the arm is the only piece you reuse. Carry the arm to a hardware store and size a machine screw to its mounting hole. An 8x32 screw is the correct diameter, and a 1" length reaches through both the arm and the dash trim while leaving enough thread exposed for the wing-nut. Pick up two internal-tooth lock washers as well to stop the joint from working loose. Total hardware cost stays under two dollars.
2 Dry-fit the cradle to choose a position
Before any trim comes off, hold the cradle with your phone loaded in it against the center dash and try several positions. Target a spot just below the base of the windshield and roughly level with the HVAC controls, where the screen stays in your field of view while driving, sits close enough to reach without leaning forward, and covers no vents. Once a spot works, mark it lightly with a pencil dot so you can find it again after the trim is out.
3 Remove the center trim and head unit
Follow kman's stickied center-stack removal guide for the GE8. Pop the lower trim loose, back out the single Phillips screw hidden behind it, and draw the radio forward. Unplug the four connectors behind it (radio, antenna, hazard switch, and airbag-warning light); the radio, its surround, and the center vents then lift away together as one assembly. Move that assembly to a bench so you can work on its back side.
4 Find clear space behind the trim
With the panel in hand, study its back side around the pencil mark. Pick a drilling point where the plastic has open room behind it, so the screw head and wing-nut will not run into a clip, rib, or support once the assembly is pushed back into the dash. If the exact marked spot is blocked, shift the drilling point a short distance to the nearest clear area.
5 Drill the mount hole and charger-cable notch
Drill from the rear of the panel toward the face using the 3/16" bit. Working from the inside out keeps the bit from tearing through a hidden clip or support and keeps the visible face clean. Make the single mounting hole at your chosen point. For the charger cable, drill a through-hole right at the panel edge, then tilt the spinning bit sideways to open that hole into an edge notch; the micro-USB plug slips straight into the notch, whereas a hole placed in the middle of the panel would need roughly a 1/2" opening to pass the connector.
6 Power the charger and reassemble
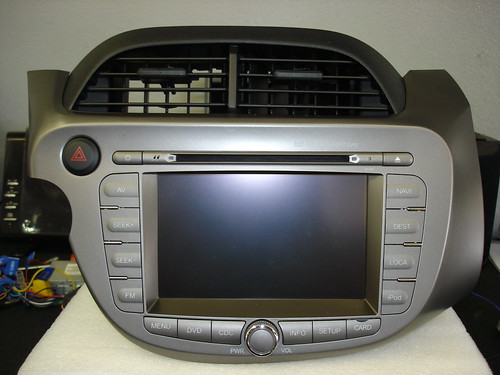
Decide how the phone will be charged. With the wiring already exposed you can fit a 12V accessory socket behind the radio (about $7) so the charger plugs in out of sight. If you would rather leave the harness alone, feed the cable up behind the dash from the existing accessory outlet near the shifter. Refit the trim and radio assembly, reconnect the four connectors, seat it back into the dash, then bolt the cradle arm through the new hole with a lock washer under the screw head and against the wing-nut, tightening the wing-nut from behind the panel.
Pro Tips
- 💡 Drill from the back of the panel outward: it protects the visible face from cracking and stops the bit from punching into a clip you cannot see.
- 💡 Putting the charger notch at the panel edge lets you drop the micro-USB cable in from the side instead of cutting a large through-hole for the plug.
- 💡 If you skip the hardwired socket, the factory accessory outlet behind the shifter can run the charger with the cable routed up behind the dash.
Was this guide helpful?