
JDM B18C (Integra Type R) Engine Swap into an EG Civic
- Never vent R12 refrigerant to the atmosphere - have the A/C system professionally evacuated before starting the job.
- Before lifting the engine out, verify nothing is still connected to it; a snagged hose or loom can cause damage or injury.
- Never cross-drill your brake rotors or improvise brake hardware; braking upgrades must use properly matched components.
- Check your local registration authority's requirements - depending on the state, an engine swap may need an engineer's certificate or at minimum an inspection (blue slip) to record the new engine number.
Introduction
This guide covers transplanting a JDM B18C engine from an Integra Type R (DC2) into a 1992-1995 EG Civic. The B18C is a 1.8 L DOHC VTEC engine, and with the complete set of Integra Type R ancillaries (mounts, power steering hose, shift linkage and driveshafts) it installs into the EG engine bay with essentially no fabrication: every mechanical connection lines up with the factory Civic hardware. The work that requires real care is the engine management wiring, since the OBD2-era Type R ECU must be joined to the Civic's loom wire by wire, with five additional circuits run to the engine bay. Buying a front cut (the complete front half of a donor car) is strongly recommended because it supplies the engine, gearbox, ECU, loom, mounts, accelerator cable, power steering hose and driveshafts in one purchase. The conversion described here was completed in two days of work. Note that the JDM Type R and the JDM SiR/VTi-R engines are both stamped "B18C" with no suffix; the Type R unit is identified by its S80 LSD gearbox, its intake manifold and its rocker cover color (the B18C5 is the US Type R engine and the B18C7 the Australian one). Adapted from a community writeup by ECU-MAN on OzHonda (https://ozhonda.com/forum/showthread.php?30312-DIY-JDM-B18C-ITR-Engine-Install-in-EG-Civic), including corrections from the follow-up discussion.
Procedure
12 steps-
Step 1: Prepare the donor engine and have the A/C degassed
Before any work on the car, take it to an air-conditioning specialist and have the refrigerant evacuated from the A/C system - never vent R12 refrigerant to the atmosphere. If you are buying a front cut, transport it on a car trailer, not a cage trailer; a front cut will not fit out of a caged trailer without a lot of wasted effort. Remove the B18C from the front cut carefully so you do not damage parts you will need for the install (or want to sell afterwards), then pressure-clean the engine to remove accumulated grime.
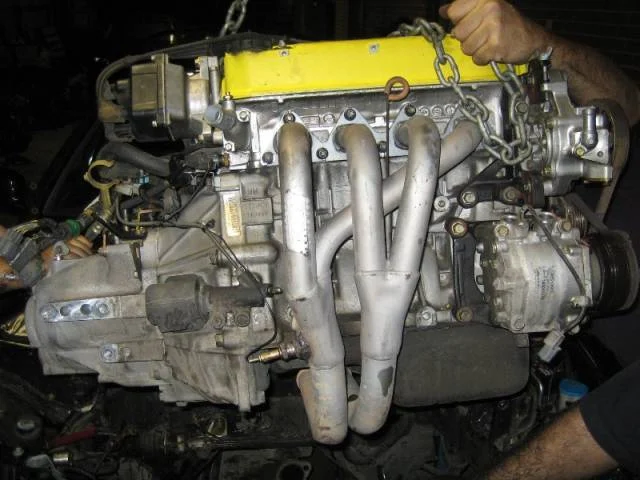
FIG. 2.1 -
Step 2: Drain the Civic's fluids
Take the bonnet off. Drain out the gearbox oil, the engine oil, the coolant, the power steering fluid and the clutch hydraulic fluid. Confirm the A/C gas has already been professionally removed before disturbing any refrigerant lines.
-
Step 3: Strip the ancillaries from the engine bay
Remove the battery, radiator, A/C condenser, power steering pump and reservoir, the intake system and the splash guard under the engine.
-
Step 4: Disconnect the engine from the chassis
Undo the brake booster vacuum line, fuel lines, heater hoses and accelerator cable. Disconnect the wiring looms at both the left and right shock towers (PGM-FI and accessory connectors), the A/C lines at the compressor, the clutch slave cylinder hose, the shift linkage and the exhaust. Remove the earth straps at the rocker cover and the gearbox, and disconnect the battery positive lead at the fuse box. Finally, remove both driveshafts.
-
Step 5: Lift out the D-series engine
Support the engine with the hoist and undo the engine mounts. Before lifting, double-check that nothing is still attached to the engine, then lift the engine and gearbox out of the bay.
-
Step 6: Swap the chassis-side Type R parts
With the bay empty, remove the rear center engine mount for the D-series along with the original high-pressure power steering line. Install the Integra Type R high-pressure power steering hose - it lines up perfectly with the B18C and carries a power steering pressure switch that the ECU uses. Fit the Type R rear center engine mount to the crossmember. This is also the ideal time to pressure-clean the engine bay.
-
Step 7: Install the B18C
Lower the engine and gearbox into the bay with the hoist. Bolt up the two center mounts first to hold the engine, then the two lower mounts, and finally the center rear mount (the awkward one). Use the complete set of Integra Type R mounts throughout - with all ITR mounts fitted, the engine sits correctly with no clearance problems.
-
Step 8: Reconnect the mechanical systems
Connect the power steering lines, vacuum lines, the driver-side engine-to-shock-tower loom, fuel lines, heater hoses, the earth strap at the gearbox and the clutch slave cylinder hose, and fit an air intake of your choice - all of these line up with the B18C without modification. Refit the radiator and A/C condenser. The A/C compressor hoses will need modification later, but they bolt in well enough to keep the system sealed until it is professionally modified and regassed. Connect the earth strap to the rocker cover.
-
Step 9: Fit the Type R shift linkage and driveshafts
Take the D-series shift linkage out and fit the Integra Type R linkage in its place. Install both Type R driveshafts - they fit the EG perfectly, and any 1996-on Integra Type R shafts are suitable.
-
Step 10: Fill all fluids
Fit a new oil filter, then fill the engine oil, gearbox oil, clutch hydraulic fluid, coolant and power steering fluid. Do not skip any of these before first start.
-
Step 11: Wire the Type R ECU into the Civic loom
Cut the OBD2 ECU connectors off the Type R loom roughly 30 cm from the connectors and remove the D-series ECU. Join the Type R ECU connectors to the Civic's ECU wiring one wire at a time, running a continuity test after each joint before moving to the next wire - this discipline is what makes the engine start on the first attempt. Five additional circuits must be run from the ECU to the engine bay: power steering pressure switch signal, power steering pressure switch ground, knock sensor, O2 sensor heater and VTEC solenoid. Tap these in at the shock tower's loom connector, then plug in the three engine-bay connectors there.
-
Step 12: First start and final checks
Start the engine and let it run. If it runs and then refuses to restart, check the spark plugs - the plugs in this install were worn out and needed replacement. Have the exhaust professionally welded to the Type R manifold rather than relying on a temporary connection, then road test and confirm VTEC engagement and normal operation.
- Buy a front cut rather than a bare engine: it includes the ECU, loom, mounts, accelerator cable, power steering hose and driveshafts, all of which you will otherwise have to source separately.
- If you cannot get factory ITR mounts, aftermarket B-series conversion mounts work: Hasport mounts are the long-standing favorite for fit and build quality, while AVID mounts give a slightly smoother ride. Different brands position the engine differently, which affects bonnet, chassis rail and driveshaft clearances.
- Converting an automatic EG adds work: the driver-side chassis mount must be replaced with a manual one (welded on, or use a bolt-in aftermarket mount such as Innovative's) and two holes drilled for the shift linkage.
- Upgrade the brakes to suit the extra power - the ITR front brake setup is a direct improvement, and the standard VTi/GLi brakes overheat and fade quickly. Pre-1998 JDM ITR brakes are 4-stud, matching the EG hubs. Never redrill rotor stud patterns as a shortcut.
- A carbureted EG (GL twin-carb) needs EFI fuel lines, an EFI fuel tank and other EFI hardware before this swap is possible - starting with an EFI model is much easier.
- For an EK Civic the same process applies but more parts are needed: a rear T-bracket mount from an EK4, an EK4 dual-post engine bracket, a lower transmission mount from an EK4 or DC2, the B-series A/C front engine bracket, an EK4 loom, and an OBD2A engine with matching OBD2A P72 ECU; the mount bracket at the engine's front, behind the timing covers, must also be changed.
Related procedures
All guides →
Tap right for next · left for back · Keys: ← → step · Space / PgUp / PgDn scroll · Esc exit