
Honda Integra Ignition Control Module (ICM) Replacement
- Disconnect the battery negative terminal before opening the distributor — it carries ignition voltage.
- Use thread locker on the ICM screws and especially the rotor screw. A loose rotor or module at 8200 RPM will cause serious damage.
- Never run the ICM without thermal grease between the module and heat sink — it will overheat and fail.
- If you remove the distributor without marking its position, the ignition timing will need to be reset with a timing light before the car is driven hard.
Introduction
The ignition control module (ICM) lives inside the distributor and is a classic age-related failure point on 1990s Hondas. A failing ICM typically acts up when the engine is hot: the engine cuts out while driving (the car keeps rolling with little or no power), refuses to restart until it has cooled, and the tachometer becomes erratic, jumpy, or unresponsive. Before condemning the ICM, test the ignition coil and ICM per the Honda service manual (sections 23-95 and 23-96 of the 1994 Integra manual) — a failed coil never lets the car start at all, whereas an ICM fails intermittently — and rule out the main relay and fuel pump, which cause similar engine cuts. This guide is written for the DC2/DC4 Honda Integra with a B-series engine but broadly applies to other distributor-equipped Hondas, and replacing the module yourself avoids buying a complete distributor from Honda (about $700). Adapted from a community writeup by specialst on OzHonda (https://ozhonda.com/forum/showthread.php?127058-DIY-Ignition-Control-Module-(ICM)-Replacement-Lots-of-Pics!), including corrections from the follow-up discussion.
Procedure
10 steps-
Step 1: Disconnect the battery
Disconnect the battery at the negative terminal before doing anything else.
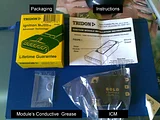
FIG. 2.1 -
Step 2: Remove the distributor cap
Undo the three 8mm hex bolts holding the distributor cap and remove the cap. Despite their appearance, do not attack these with a screwdriver — you will round them off. Use an 8mm spanner or socket.
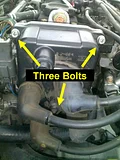
FIG. 2.2 -
Step 3: Remove the rotor
Remove the screw holding the rotor using an impact screwdriver — it is fitted extremely tight and a normal screwdriver will strip it. If the rotor screw is hidden behind the distributor body, the engine has stopped in the wrong position: refit and screw on the rotor, briefly crank the engine with the ignition key to rotate it, and repeat until the screw is accessible. Ensure the impact driver bit is long enough to fit between the rotor and the dust cover.
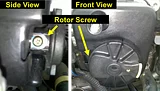
FIG. 2.3 -
Step 4: Remove the dust cover
Squeeze the dust cover off by its sides to expose the ICM inside the distributor housing.
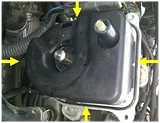
FIG. 2.4 -
Step 5: Photograph and disconnect the ICM wiring
It is imperative to record the position of every wire and terminal connection before touching them — take multiple photos. Then pull the wires off the ICM terminals.
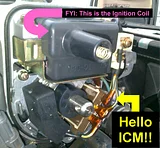
FIG. 2.5 -
Step 6: Remove the ICM
Undo the two ICM retaining screws, then slide the module out of the distributor housing. On some engines the heat sink screws face the bottom of the distributor and cannot be reached in the car; in that case mark the distributor's position relative to the head with a permanent marker at all three mounting points (its rotation sets ignition timing), remove the distributor, and do the swap on the bench.
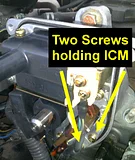
FIG. 2.6 -
Step 7: Clean the heat sink for reuse
Remove the screws attaching the heat sink to the old ICM and set the old module aside. Give the heat sink a thorough clean using a rag and an appropriate solvent (methylated spirits works well) until the mating surface is free of all old paste and contaminants.
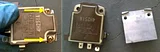
FIG. 2.7 -
Step 8: Grease and fit the new ICM to the heat sink
Clean the new ICM's mating surface with solvent as well. Spread a liberal, full-coverage layer of conductive (thermal) grease onto the heat sink, then reattach the heat sink to the new ICM with the same screws and wipe away any excess. The grease is mandatory — it transfers heat from the ICM to the heat sink exactly like the paste between a computer CPU and its heat sink, and running without it will overheat and kill the module.
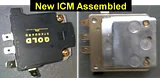
FIG. 2.8 -
Step 9: Install the new ICM and reconnect the wires
Slide the ICM/heat sink assembly back into the distributor housing the same way it came out and screw it down tight, using medium (blue) thread locker on the screws so they cannot vibrate loose at high RPM. Reattach each wire to its correct terminal, checking against the photos taken earlier.
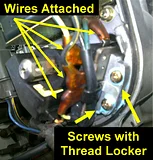
FIG. 2.9 -
Step 10: Refit the dust cover, rotor, and cap
Press the dust cover firmly back into place. Refit the rotor in the same position it came off and secure its screw tightly with thread locker — a rotor coming loose at 8200 RPM will destroy the distributor. Bolt the distributor cap back on with normal tightness only; do not overtighten the three 8mm bolts. Reconnect the battery and test-start the engine.
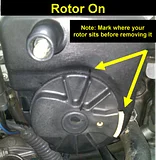
FIG. 2.10
- Random stalling with an easy immediate restart can also be an early ICM symptom; test the module per the service manual before buying parts.
- A common ICM failure mode is simply dried-out thermal paste causing the module to overheat — if the old module still tests good, cleaning and re-pasting can revive it, but a new module with fresh automotive paste is the reliable fix.
- Use proper automotive thermal paste (usually supplied with a new ICM) rather than computer thermal grease; the PC product is not equivalent in the long run, especially in summer heat.
- If the distributor must be removed for access, mark its housing position relative to the head first and refit it on those marks — the distributor's rotation sets ignition timing, and refitting on the marks preserves it.
- ICM part numbers differ between engines even when the distributors look the same (e.g. the B18C module is listed differently from the B18B/D-series unit) — confirm the application for your exact engine before purchase.
Related procedures
All guides →
Tap right for next · left for back · Keys: ← → step · Space / PgUp / PgDn scroll · Esc exit